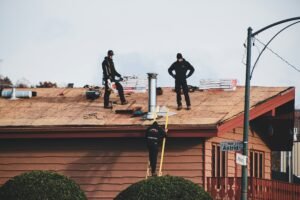

Metal roofing DIY is an achievable project for experienced homeowners with proper planning, tools, and safety measures. While metal roofing DIY projects can save thousands in labor costs, they require careful consideration of roof complexity, local building codes, and weather conditions.
DIY metal roofing typically involves selecting the right materials (standing seam, corrugated, or metal shingles), preparing the roof deck, installing underlayment, and securing panels with appropriate fasteners. Most homeowners can complete a simple gabled roof in 2-3 days, though complex rooflines may require professional assistance. Success depends on accurate measurements, proper tool selection, and understanding manufacturer installation guidelines.
This comprehensive guide covers everything from material selection to final installation, helping you determine if metal roofing DIY is right for your project while ensuring professional-quality results. The metal roofing DIY installation process requires patience, attention to detail, and commitment to safety protocols throughout every phase of the project.
Benefits of DIY Metal Roofing vs. Professional Installation
The financial advantages of metal roofing DIY projects are substantial, with homeowners typically saving between $7,000 to $17,000 on a standard residential roof. Labor costs represent 50-70% of professional installation expenses, making DIY approaches highly attractive for budget-conscious property owners.
Beyond immediate cost savings, DIY installations provide complete timeline control, allowing homeowners to work around weather conditions and personal schedules without contractor dependencies.
Cost Savings Analysis
Labor cost elimination represents the most significant financial benefit of DIY approaches. Professional roofers charge $5-12 per square foot for installation services, while material costs remain consistent regardless of installation method. Material purchase flexibility allows DIY installers to shop for deals, buy in bulk, or choose premium options within their specific budgets.
Timeline control offers another advantage, as homeowners can extend projects across multiple weekends or complete installations during optimal weather windows. This flexibility prevents weather delays from escalating costs and allows for careful, methodical work without rushing to meet contractor schedules.
Table 1: Cost Comparison – DIY vs. Professional Metal Roofing
| Project Aspect | DIY Cost Range | Professional Cost Range | Potential Savings |
| Materials | $3-8 per sq ft | $3-8 per sq ft | $0 |
| Labor | $0 | $5-12 per sq ft | $5-12 per sq ft |
| Tools/Equipment | $200-800 | Included | Variable |
| Total (1,500 sq ft) | $4,700-$12,800 | $12,000-$30,000 | $7,300-$17,200 |
Skill Development and Satisfaction
Hands-on roofing experience provides valuable knowledge for future maintenance and repairs. Understanding your roof’s construction, material properties, and installation methods enables confident troubleshooting and minor repair work throughout the roof’s lifespan. This knowledge proves particularly valuable during warranty claims or insurance inspections.
Personal accomplishment from completing major home improvements creates lasting satisfaction and increased property value understanding. Successfully completing a metal roofing DIY project builds confidence for future construction projects and develops practical skills applicable to various home improvement tasks.
Essential Tools and Materials for Metal Roofing DIY
Proper tool selection determines project success and installation quality. Professional-grade tools ensure clean cuts, accurate measurements, and secure fastening throughout the installation process. Investing in quality tools pays dividends through improved results and reduced installation time.
Required Tools Checklist
Cutting tools form the foundation of any metal roofing installation. Metal snips handle trim work and small adjustments, while circular saws with metal-cutting blades manage large panel cuts. Angle grinders provide precision cutting for complex shapes and penetration modifications.
Measuring tools ensure accurate panel placement and proper alignment:
- Tape measure (minimum 25-foot length)
- Chalk line for establishing reference lines
- Framing square for checking right angles
- 4-foot level for panel alignment verification
Installation tools facilitate efficient panel securing and trim attachment:
- Drill/driver with multiple battery packs
- Socket wrench set for bolt-type fasteners
- Rivet gun for specific connection requirements
- Caulk gun for sealant application
Safety equipment protects against falls and injury:
- Full-body harness with shock-absorbing lanyard
- Non-slip roofing boots with proper traction
- Hard hat for head protection
- Safety glasses and work gloves
Table 2: Metal Roofing Material Options Comparison
| Material Type | Cost per Sq Ft | Lifespan | DIY Difficulty | Best For |
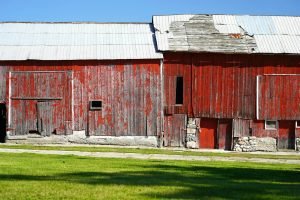
| Corrugated Steel | $1.50-3.50 | 20-30 years | Beginner | Simple roofs, barns |
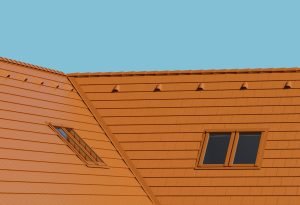
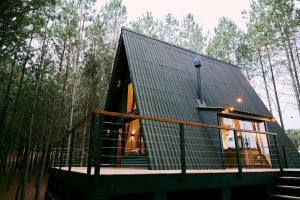
| Standing Seam | $4.00-8.00 | 30-50 years | Intermediate | Residential, modern |
| Metal Shingles | $3.00-7.00 | 40-70 years | Advanced | Traditional appearance |
| Aluminum Panels | $2.50-5.50 | 25-40 years | Beginner | Coastal areas |
Fasteners and Accessories
Self-drilling screws with EPDM washers provide weather-tight connections for most metal roofing applications. These specialized fasteners eliminate pre-drilling requirements and create reliable seals that accommodate thermal movement. Stainless steel fasteners offer superior corrosion resistance in coastal environments.
Ridge caps and trim pieces complete the professional appearance while providing weather protection at roof transitions. Factory-formed accessories ensure proper fit and finish, though custom fabrication may be necessary for unique roof configurations.
Underlayment selection impacts long-term performance and warranty compliance. Synthetic underlayment offers superior tear resistance and UV protection compared to traditional felt products. High-temperature synthetic materials accommodate metal roofing’s thermal expansion characteristics.
Material Quantity Calculations
Accurate roof area measurements prevent material shortages and excessive waste. Complex rooflines require careful calculation of each section, including dormers, hips, and valleys. Professional measuring techniques include accounting for roof pitch, which affects actual surface area compared to ground-level measurements.
Waste factor considerations typically add 10-15% extra material for cuts, mistakes, and future repairs. Complex rooflines with multiple penetrations may require 20% waste factors to ensure adequate material availability.
Step-by-Step DIY Metal Roofing Installation Process
The metal roofing DIY installation process demands systematic approach and attention to detail throughout every phase. Proper sequencing prevents rework and ensures weather-tight results that match professional installation quality.
Phase 1: Preparation and Planning
Roof inspection and structural assessment form the critical foundation for successful metal roofing DIY installation. Check existing decking for damage, soft spots, or structural deficiencies that require repair before metal installation. Metal roofing’s longevity makes addressing underlying issues essential for long-term performance.
Structural load verification ensures the existing roof frame can support metal roofing weight, snow loads, and wind uplift forces. While metal roofing is typically lighter than asphalt shingles, some systems may require structural reinforcement for code compliance.
Weather consideration and timing directly impact installation success and safety. Optimal conditions include dry weather, moderate temperatures, and wind speeds below 15 mph. Seasonal planning should account for local weather patterns, with spring and fall typically offering the most favorable conditions.
Emergency protection planning prepares for unexpected weather during installation. Temporary tarps, quick-sealing materials, and weather monitoring equipment help protect partially completed installations from damage.
Phase 2: Underlayment Installation
Synthetic underlayment application creates the essential weather barrier beneath metal roofing. Roll orientation should run horizontally across the roof, with each course overlapping the previous by 6 inches minimum. This orientation sheds water effectively and prevents wind-driven moisture infiltration.
Fastening patterns require careful attention to manufacturer specifications, typically involving plastic cap nails spaced 12 inches on center along edges and 24 inches in the field. Proper fastening prevents underlayment tearing during metal panel installation while maintaining weather barrier integrity.
Ice and water shield placement provides additional protection in vulnerable areas. Eaves, valleys, and penetration areas require this self-adhering membrane to prevent ice dam damage and wind-driven rain infiltration. Local building codes specify minimum coverage requirements for different climate zones.
Phase 3: Panel Installation Sequence
Starting point determination affects the entire installation’s success and appearance. Square measurement from multiple reference points ensures proper panel alignment and prevents cumulative errors across the roof surface. Establishing chalk lines provides visual references throughout the installation process.
Panel orientation and overhang calculations must account for thermal expansion, wind uplift resistance, and water shedding requirements. Proper overhangs protect fascia boards while preventing water infiltration at roof edges.
Panel securing and fastening techniques vary by material type and manufacturer specifications. Self-drilling screws typically penetrate metal panels into structural decking at predetermined spacing patterns. Proper screw placement avoids panel buckling while ensuring adequate holding power.
Thermal expansion accommodation prevents panel buckling and fastener failure during temperature changes. Slotted fastener holes, expansion joints, and proper fastening torque allow natural movement without compromising weather sealing.
Phase 4: Trim and Flashing Installation
Ridge cap and hip installation completes the roof’s weather protection while maintaining proper ventilation. Ridge caps must allow adequate ventilation airflow while preventing weather infiltration. Proper fastening schedules ensure wind resistance without over-constraining thermal movement.
Valley and penetration flashing represent the most critical aspects of metal roofing DIY installation. These areas experience the highest water flow volumes and require precise installation to prevent leaks. Custom fabrication may be necessary for unique configurations not covered by standard flashing components.
Table 3: Installation Timeline for Different Roof Sizes
| Roof Size (sq ft) | DIY Timeline | Crew Size | Weather Delays |
| 1,000-1,500 | 2-3 days | 2 people | +1 day |
| 1,500-2,500 | 3-5 days | 2-3 people | +1-2 days |
| 2,500+ | 5-7 days | 3-4 people | +2-3 days |
Safety Considerations and Best Practices
Personal safety equipment and proper usage protocols prevent accidents and injuries during metal roofing DIY projects. Fall protection systems require careful selection, regular inspection, and proper anchoring to structural components capable of supporting fall arrest loads.
Personal Safety Equipment
Harness selection should prioritize comfort, adjustability, and certification compliance with ANSI safety standards. Full-body harnesses distribute fall arrest forces across the torso, reducing injury potential compared to waist-only designs. Regular inspection checks for wear, damage, or deterioration that could compromise safety performance.
Anchor point identification and installation require structural engineering knowledge or professional consultation. Proper anchor points must withstand 5,000-pound loads in any direction, necessitating connection to structural framing rather than roof decking or sheathing materials.
Ladder safety and positioning techniques prevent falls during roof access and material handling. Three-point contact, proper extension ratios, and secure footing reduce accident potential. Ladder standoff brackets protect gutters while providing stable roof access points.
Structural Safety Measures
Roof loading and weight distribution affect worker safety and structural integrity throughout the installation process. Material staging should distribute weight evenly across multiple roof framing members rather than concentrating loads in single areas.
Traffic pattern establishment on roof surfaces minimizes damage to installed materials while maintaining worker safety. Designated walkways, material placement zones, and waste removal paths organize work flow and reduce accident potential.
Common DIY Metal Roofing Mistakes to Avoid
Installation errors account for most metal roofing DIY project failures and warranty voids. Understanding common mistakes helps DIY installers avoid costly repairs and performance issues.
Installation Errors
Improper fastener selection and placement represents the most frequent DIY mistake. Using incorrect fastener types, inadequate penetration depth, or improper spacing patterns compromises weather sealing and wind resistance. Fastener over-tightening distorts metal panels and damages weather sealing washers.
Inadequate thermal expansion accommodation causes panel buckling, fastener failure, and noise issues during temperature changes. Metal roofing expands and contracts significantly more than other roofing materials, requiring proper installation techniques that allow natural movement.
Poor flashing installation and sealing creates leak points that may not become apparent until severe weather testing. Flashing must be properly lapped, sealed, and secured to provide long-term weather protection. Inadequate sealant application or improper sealant selection leads to premature failure.
Planning and Preparation Mistakes
Insufficient material ordering and waste calculation results in project delays and increased costs. Rush ordering during project completion often involves premium pricing and limited material selection. Accurate quantity calculations and appropriate waste factors prevent these issues.
Weather timing and seasonal considerations significantly impact installation success and worker safety. Installing metal roofing during inappropriate weather conditions increases accident risk and may void material warranties. Proper planning accommodates seasonal weather patterns and local climate conditions.
Frequently Asked Questions
Q1: Can a beginner tackle metal roofing DIY installation?
Metal roofing DIY is possible for beginners with simple gabled roofs, but requires careful planning, proper safety equipment, and realistic timeline expectations. Start with smaller structures like sheds or garages to build experience before attempting your main residence. Complex rooflines, steep pitches, or multiple penetrations may require professional assistance. Success depends on thorough preparation, quality tools, and strict adherence to safety protocols throughout the installation process.
Q2: How long does DIY metal roofing last compared to professional installation?
When properly installed, metal roofing DIY can last just as long as professional installations (20-50+ years depending on material). The key factors are following manufacturer guidelines, using quality materials, proper fastening techniques, and adequate flashing installation. Poor DIY installation can significantly reduce lifespan through leaks and premature failure. Warranty coverage may differ between DIY and professional installations, so review manufacturer terms carefully.
Q3: What’s the most challenging aspect of metal roofing DIY projects?
Flashing installation around penetrations, valleys, and transitions presents the greatest challenge for DIY installers. These areas require precise cutting, fitting, and sealing to prevent water infiltration. Proper flashing accounts for most roofing failures, making this the most critical skill to master or consider professional help for complex situations. Custom fabrication skills and specialized tools may be necessary for unique roof configurations.
Q4: Do I need permits for DIY metal roofing installation?
Most jurisdictions require building permits for complete roof replacements, including metal roofing DIY projects. Contact your local building department to understand permit requirements, inspection schedules, and code compliance standards. Permits protect you legally and ensure proper installation standards, even for DIY work. Permit fees are minimal compared to potential issues from unpermitted work, including insurance claims and resale complications.