
Let me tell you why roof drip edge flashing is probably the most overlooked piece of your roofing system And why skipping it will cost you thousands in repairs down the road. I’ve watched homeowners cut corners on this $500 component only to spend $5,000 fixing fascia rot two years later. It’s brutal.
So let’s talk about what drip edge actually does and why you need it.
What Is Roof Drip Edge Flashing?
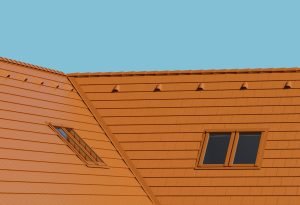
Drip edge flashing is basically an L-shaped or T-shaped metal strip installed at your roof’s edges.
It directs water away from your fascia board and into your gutters. Simple concept. Massive impact.
Without it, water clings to your shingles and runs behind your fascia. That’s how wood rot starts.
The Three Names Everyone Uses
Drip edge: The common term everyone knows.
D-metal: What old-school roofers call it. Same thing.
Roof edge flashing: The technical term. Also the same product.
Don’t let different names confuse you. It’s all the same protective metal flashing.
Why Drip Edge Flashing Is Non-Negotiable
Here’s what most contractors won’t tell you straight.
Drip edge isn’t just recommended. It’s required by the International Building Code since 2006.
But enforcement varies wildly by location. So sketchy contractors skip it to save money.
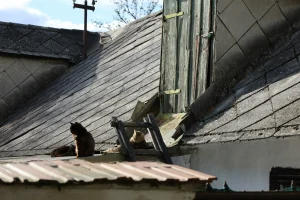
What Happens Without Drip Edge
Water runs directly onto your fascia. The wood stays wet. Rot develops within 2-3 years.
Wind-driven rain gets pushed under your shingles. Your roof deck deteriorates from moisture exposure.
Pests find gaps at the roof edge. You now have uninvited critters in your attic.
Ice dams form easier in winter. Snow melt backs up under shingles. Interior ceiling damage follows.
All because you saved $400-600 on roof drip edge flashing installation.
Drip Edge for Metal Roof vs Shingle Roofs
Let me clarify something that confuses people constantly.
The drip edge for metal roof installations works differently than for asphalt shingles.
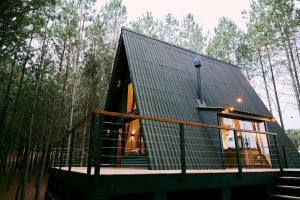
Metal Roof Drip Edge Requirements
Metal roofing already has built-in water management in many systems. Especially standing seam metal roof installations.
But you still need edge protection at the fascia. Just different profiles.
For metal roofs: Use Type F extended drip edge or custom metal trim pieces that match your panel system.
The drip edge must accommodate metal’s expansion and contraction. Standard profiles sometimes don’t work.
Shingle Roof Drip Edge Needs
Asphalt shingles need roof drip edge on both eaves and rakes. No exceptions.
Installation order matters here. Eaves get a drip edge before underlayment. Rakes get it after.
This layering prevents water from working backward under materials.
Drip Edge Types That Actually Matter
There are three main drip edge types you’ll encounter.
Type C (L-style): Classic 90-degree bend. Budget option. Works but not ideal.
Type D (T-style): Has an extra kickout. Keeps water further from fascia. ARMA recommends this profile.
Type F (gutter apron): Extended leading edge. Perfect for retrofit jobs over existing shingles.
I always spec Type D for new construction. Better water management. Worth the small upcharge.
Roof Drip Edge Flashing Sizes and Specifications
Roof drip edge flashing sizes vary but here are standard dimensions.
Length: 10-foot sections most common. Sometimes 8-foot.
Vertical leg: Minimum 1.5 inches required by code. I prefer 2 inches.
Horizontal leg: Typically 2-3 inches onto roof deck.
Overhang: Quarter inch below sheathing minimum. Up to half an inch is better.
Don’t cheap out with undersized drip edge. Proper dimensions matter for performance.
Drip Edge Flashing Install Process
Let me walk you through proper drip edge flashing install technique.
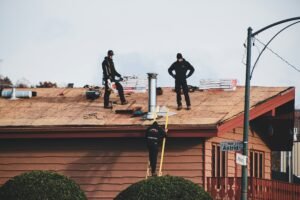
Step 1: Tear Off to Clean Deck
Remove all old roofing down to bare wood. Inspect every board for damage.
Replace any rotted or compromised decking before touching the drip edge.
Step 2: Eaves First, Before Underlayment
Install drip edge along bottom edges (eaves) first. This is crucial.
Align so the flange points down and away from the house. Nail every 12 inches maximum.
Overlap sections by one inch. No gaps allowed.
Step 3: Underlayment Over Eave Drip Edge
Ice and water shields go over the drip edge at eaves. This creates proper water flow.
If you reverse this order, water gets trapped. Fascia rots anyway.
Step 4: Rake Drip Edge Over Underlayment
Side edges (rakes) get roof edge flashing installed after underlayment is down.
This prevents wind-driven rain from working under the drip edge.
Step 5: Corner Cuts and Ridge Work
Cutting corners properly takes skill. Mark one inch past the overhang point.
Make perpendicular cuts to create a square removal. Bend the remaining flap to form the corner.
At the ridge, fold the drip edge over and cut along the centerline for a clean finish.
Mess this up and your roof looks amateur.
Materials: What Your Drip Edge Should Be Made Of
Metal drip edge comes in three main materials.
Aluminum: Lightweight. Won’t rust. Easy to paint match. Most popular residential choice.
Galvanized steel: Stronger than aluminum. Minimum 24-gauge for wind resistance. Needs maintenance to prevent rust.
Copper: Premium option. Develops patina. Lasts forever. Costs 3-4x more than aluminum.
I spec aluminum for 90% of residential jobs. Best balance of cost and performance.
Avoid vinyl or plastic drip edge types. They’re marketed for roofs but belong on windows instead.
What Does Drip Edge Do During Storms?
During heavy rain, what does drip edge do becomes obvious.
Water sheets down your roof slope. Hits the drip edge. Gets directed into gutters.
The lower flange hangs far enough that gravity pulls water away from fascia.
Without it, surface tension makes water cling to the roof edge and run backward.
Wind-driven rain during storms gets pushed around. The drip edge’s extended overhang fights this upward water movement.
Two to four inches of lower flange combat wind effects effectively.
Roofing Drip Edge Detail: The Installation Order That Matters
Roofing drip edge detail installations fail when contractors ignore the proper sequence.
At eaves: Drip edge goes on first, then ice and water shield over it, then shingles.
At rakes: Underlayment first, then drip edge over it, then shingles.
This creates a shingled effect where water flows over seams, not under them.
Reverse this order anywhere and you’ve created a leak pathway.
What Is Drip Edge Flashing Cost Realistically?
Most homeowners ask how much does drip edge cost for a roof installation.
Material costs $1.50-3.00 per linear foot depending on material choice.
Labor adds another $2-4 per linear foot for proper installation.
The average home needs 150-200 linear feet of roof drip edge. Total cost $500-1,000 installed.
That’s nothing compared to fascia replacement at $15-25 per linear foot after rot damage.
Can You Install Drip Edge Without Removing Gutters?
Yes, you can install drip edge without removing gutters if you’re careful.
One person lifts existing shingles. Another slides old drip edge out and new drip edge in.
Use a flat pry bar to remove old nails. Install new drip edge with fresh fasteners.
It’s possible but awkward. Removing gutters makes the job cleaner and faster.
Alternative to Drip Edge: Do They Actually Work?
People always ask what is the alternative to drip edge on a roof.
Some older homes have a 1×2 wood strip called shingle molding. That’s technically the original “drip edge.”
But wood alone without metal flashing still allows water problems. It’s not a real alternative.
Can you do a roof without a drip edge? Technically yes in areas without enforcement.
Should you? Absolutely not. The $500 savings costs you thousands later.
Should Drip Edge Be Replaced When Replacing Roof?
Should the drip edge be replaced when replacing the roof?
Every single time.
The old drip edge has 15-20 years of wear. It’s bent, rusty, or corroded.
Nails are rusted. Seams are separated. Performance is compromised.
The new roof with the old drip edge is like new tires on rusty wheels. Defeats the purpose.
Always replace roof edge components with full roof replacements.
Can Roof Flashing Cause Leaks?
Can roof flashing cause leaks?
Only when installed incorrectly.
Improperly overlapped sections create gaps. Water finds those gaps every time.
Wrong installation order (underlayment before eave drip edge) creates reverse water flow.
Missing fasteners let wind get under the flashing. Panels lift and water intrudes.
But proper installation prevents leaks for the entire roof lifespan.
What Is Another Name for Drip Edge?
What is another name for a drip edge on a roof?
You’ll hear several terms.
D-metal, drip cap, edge flashing, eave drip, gutter apron (Type F specifically).
All describe the same basic product with slight profile variations.
Don’t get confused by terminology. Just verify the contractor is installing proper code-compliant drip edge flashing.
The Proper Order of Roof Installation
What is the proper order of roof installation including drip edge?
- Tear off old materials to clean deck
- Replace damaged decking
- Install drip edge at eaves
- Install ice and water shield over eave drip edge
- Install underlayment over rest of deck
- Install drip edge at rakes over underlayment
- Install shingles over everything
Mess up this sequence and you’re building in future leak pathways.
What Happens If You Don’t Have Roof Flashing?
What happens if you don’t have roof flashing?
Specifically the drip edge?
Water runs behind your fascia board. Wood stays continuously wet.
Rot develops within 2-3 years in most climates. Faster in humid or coastal areas.
Eventually the fascia fails structurally. Gutter supports weaken and pull away.
Interior water damage follows once fascia rot reaches the soffit and roof deck.
You’re looking at $3,000-8,000 in repairs for skipping a $500 component.
Most Expensive Part of Roof Replacement
People always ask what is the most expensive part of replacing a roof.
Labor is 60% of total cost. Material is 40%. Within materials, shingles dominate.
Drip edge represents maybe 2-3% of total material cost. Minimal in the big picture.
But its absence causes disproportionate damage. High ROI on a small investment.
My Take on Roof Drip Edge Flashing
Look, roof drip edge flashing isn’t exciting. It’s not the pretty part of roofing.
But it’s the difference between a 20-year roof and a 10-year roof with thousands in repair bills.
I’ve seen too many homeowners get burned by contractors who skip this to save $400.
Make the drip edge non-negotiable in your roofing contract. Verify the installation order.
Check that both eaves and rakes get proper coverage. Confirm material gauge and profile type.
It’s a small detail that prevents massive problems.
FAQs About Roof Drip Edge Flashing
Is drip edge flashing necessary?
Yes, drip edge has been required by International Building Code since 2006. It prevents water damage to fascia, soffit, and roof deck. Even in areas without strict enforcement, it’s necessary to protect your investment and prevent costly rot damage.
How should drip edge flashing be installed?
nstall eaves before underlayment, then install rakes after underlayment. Nail every 12 inches maximum with one-inch overlaps between sections. The flange should point down and away from the house with proper overhang below sheathing.
What is drip flashing used for?
Drip flashing directs water away from the fascia board and into gutters using gravity and the extended lower flange. It prevents water from clinging to the roof edge and running backward under shingles or behind fascia.
Should the drip edge be replaced when replacing roof?
Always replace the drip edge during roof replacement. The old drip edge has years of wear, rust, and compromised fasteners. New roofing over old drip edge defeats the purpose of getting a new roof.
What is the alternative to drip edge on a roof?
Some older homes have wood shingle molding, but this isn’t a true alternative. No adequate substitute exists for metal drip edge flashing. Wood alone doesn’t provide sufficient water protection or durability.
Can you do a roof without a drip edge?
While possible in areas without strict code enforcement, it’s never advisable. Skipping the drip edge saves $400-600 initially but causes thousands in fascia rot and water damage within 2-3 years.
Can roof flashing cause leaks?
Improperly installed flashing causes leaks through gaps, wrong layering order, or missing fasteners. But correctly installed drip edges prevents leaks for the entire roof lifespan.
What is the proper way to install flashing?
Follow correct sequencing: eave drip edge before underlayment, rake drip edge after underlayment. Overlap sections one inch, nail every 12 inches, and ensure proper overhang and orientation with flange pointing down.
Should the drip edge have a gap?
No gaps should exist between drip edge sections. Overlap adjacent pieces by one inch minimum. Any gaps create water intrusion points that defeat the entire purpose.
What is the proper order of roof installation?
Tear off to clean the deck, replace damaged boards, install eave drip edge, apply ice and water shield over eave drip edge, install underlayment, add rake drip edge over underlayment, then install shingles.
What happens if you don’t have roof flashing?
Water runs behind fascia causing rot within 2-3 years. This leads to structural fascia failure, gutter problems, soffit damage, and eventually interior water damage requiring $3,000-8,000 in repairs.
What is another name for a drip edge on a roof?
Other names include D-metal, drip cap, edge flashing, eave drip, and gutter apron (for Type F specifically). These terms describe the same basic product with minor profile variations.
What is the most expensive part of replacing a roof?
Labor represents 60% of total cost, with shingles being the largest material expense. Drip edge is only 2-3% of material costs but prevents disproportionate damage when omitted.
Can you install a drip edge without removing gutters?
Yes, though it’s awkward. One person lifts shingles while another removes old drip edge and installs new sections. Removing gutters makes installation cleaner and faster.
How much does a drip edge cost for a roof?
Material costs $1.50-3.00 per linear foot plus $2-4 per linear foot for labor. Average homes need 150-200 linear feet, totaling $500-1,000 installed—minimal compared to repair costs without it.
Roof drip edge flashing protects your investment for pennies on the dollar compared to fascia replacement and prevents the cascade of water damage that destroys roofing systems prematurely.
Read more blogs at Rainy Roofers.