
I’m not going to lie to you. When I first looked at how to replace camper roof damage on my old rig, I thought I’d made the biggest mistake of my life. Water was dripping through the ceiling. My wife looked at me like I’d lost my mind buying this thing. And the camper roof replacement cost quotes? They ranged from $3,000 to $12,000.
Here’s what I learned after doing it myself and talking to dozens of RV owners who’ve been through this nightmare.
What You Need to Know Before Starting
Replacing rv roof plywood isn’t like replacing shingles on your house. It’s a completely different beast.
Most people think they can slap some sealant on it and call it done. Wrong. That’s how you end up with a moldy mess six months later.
The truth? You’ve got three real options when learning how to replace camper roof damage:
- Do it completely yourself (save money, lose weekends)
- Hire a pro (expensive but done right)
- Hybrid approach (pro does structure, you do finishing)
I went with option three. Best decision I made.
The Cheapest Way to Replace RV Roof (Without Cutting Corners)
Look, the cheapest way to replace rv roof isn’t always the smartest. But I get it. Money matters.
Here’s what actually works:
Buy your own materials. Shops mark up materials 40-60%. I saved $1,800 just by sourcing my own rv roof replacement kit from online suppliers.
Do the teardown yourself. Removing old roofing is grunt work. Any competent DIYer can handle it. You’re looking at 8-12 hours of scraping and pulling.
Hire pros for installation only. Let them handle the new membrane and sealing. This is where amateurs mess up and create bigger problems.
I spent $4,200 total doing it this way. Full professional camper roof replacement cost was quoted at $8,500.
Understanding Camper Roof Replacement Cost Reality
The average camper roof replacement cost runs $300-350 per linear foot. That’s the industry standard.
But here’s what nobody tells you:
Hidden damage adds 20-40% to final costs. When they peel back your roof, they’ll find rotted wood. Guaranteed.
I budgeted $5,000. Ended up spending $6,100 after finding water damage in three sections.
Your rv roof replacement kit alone runs $800-1,500 depending on size. That’s just materials. No labor.
My Step-by-Step Process for How to Replace Camper Roof
Step 1: Set Up Proper Shelter
Don’t be that guy working without cover. I built a temporary carport using a $340 canopy from Northern Tool.
Rain will destroy your progress faster than you can say “insurance claim.”
Step 2: Remove Everything on Top
This took me an entire Saturday:
- AC unit (disconnected power first)
- Vent fans and covers
- Antenna base
- All sealant and caulk
Pro tip: Take photos of everything before removal. You’ll thank me during reassembly.
Step 3: Strip the Old Membrane
EPDM rubber roofing peels up easier than you think. Use a utility knife to cut sections.
The adhesive underneath? That’s the annoying part. Still sticky after 20 years.
Wear knee pads. Seriously. I didn’t and regretted it by hour two.
Step 4: Inspect and Replace Damaged Decking
This is where replacing rv roof plywood becomes critical. Don’t skip this.
I found soft spots in four areas. Cut out rotted sections with a reciprocating saw. Replaced with new 3/8″ plywood.
Used construction adhesive and screws every 6 inches. Made it bomber-proof.
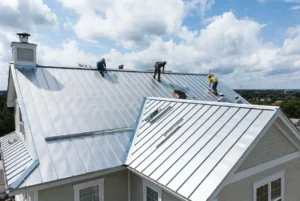
Step 5: Install New Roofing Membrane
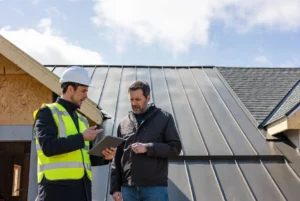
I hired Rainy Roofers for this part. Best $2,100 I spent on the entire project.
They laid the membrane in 90-degree weather without wrinkles. Applied adhesive perfectly. Sealed every seam like their reputation depended on it.
Because it did.
Step 6: Reinstall Fixtures and Seal
I handled reinstallation myself. Saved another $600 in labor.
Used Dicor lap sealant on everything. Every screw hole. Every seam. Every fixture base.
People ask about the cheapest way to replace rv roof materials. Don’t cheap out on sealant. Ever.
The RV Roof Replacement Kit You Actually Need
A proper rv roof replacement kit includes:
- EPDM or TPO membrane (sized to your roof)
- Bonding adhesive (one gallon per 60 square feet)
- Lap sealant (three tubes minimum)
- Primer (if required by membrane manufacturer)
- Butyl tape (for fixture reinstallation)
I bought mine from an online RV supply house. Saved 35% compared to local pricing.
The kit came with instructions. I read them twice. Then I watched YouTube videos. Then read the instructions again.
Common Mistakes That Cost You Thousands
Mistake 1: Skipping the inspection phase.
Remove that old roof and inspect every inch of decking. Don’t assume it’s fine.
Mistake 2: Working in wrong weather.
Install membrane between 60-85 degrees. Too hot? Adhesive sets before positioning. Too cold? Won’t bond properly.
Mistake 3: Reusing old sealant.
I see people trying to save $40 on sealant. Then spending $3,000 fixing leaks six months later.
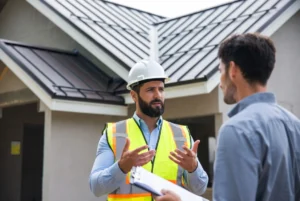
Rainy Roofers told me: “New roof, new sealant. No exceptions.”
When to Just Hire Professionals
Look, I’m all for DIY. But some situations require pros.
Call professionals if:
- Your RV is under warranty (DIY voids it)
- Structural damage is extensive
- You’ve never worked on roofs before
- Time matters more than money
- Insurance is covering it anyway
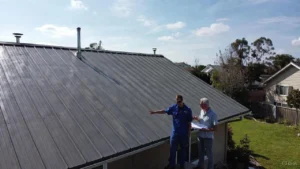
Rainy Roofers offers free inspections. They’ll tell you honestly if DIY makes sense for your situation.
I’ve seen guys try to save $4,000 and create $8,000 worth of problems.
Timeline: How Long Does This Actually Take?
DIY full replacement: 3-5 weekends minimum
Professional job: 1-3 weeks (including scheduling)
Hybrid approach: 2-3 weeks
I spread mine over four weekends. I could’ve done it in three but rain delayed me.
Waiting for materials? That’s what kills your timeline. Order your rv roof replacement kit before you start teardown.
Insurance and Warranty Considerations
My insurance covered storm damage minus $1,000 deductible. Worth filing the claim.
Manufacturer warranty? Only covers defects, not maintenance neglect.
Document everything with photos. Insurance adjusters want proof.
Keep all receipts. Even if you’re doing DIY work, material costs might be reimbursable.
Real Talk on Replacing RV Roof Plywood
Replacing rv roof plywood scared me most. I’m not a carpenter.
But it’s honestly straightforward:
- Cut out damaged sections square
- Match plywood thickness exactly (usually 3/8″)
- Use exterior-grade plywood only
- Seal cut edges with primer
- Secure with adhesive and screws
Cost me $180 in materials to replace four sections totaling 12 square feet.
A pro quoted $850 for the same work.
FAQs
How much does it cost to replace a camper roof?
Expect $3,000-12,000 depending on size and damage. Average runs $6,000-8,000 for professional work.
Can I replace my RV roof myself?
Yes, but understand it’s a major project requiring 20-40 hours of work. Mistakes create expensive water damage.
How long does an RV roof last?
Quality installations last 10-20 years with proper maintenance. Cheap work fails in 5-7 years.
What’s included in an RV roof replacement kit?
Membrane, adhesive, primer, lap sealant, and installation instructions. Some include butyl tape and cleaning supplies.
Should I repair or replace my RV roof?
Replace if damage covers more than 30% of surface or if structural damage exists. Otherwise repair.
Bottom Line
Learning how to replace camper roof damage saved me thousands. But it wasn’t easy. The camper roof replacement cost through pros ranges $6,000-10,000 for most travel trailers. DIY with a quality rv roof replacement kit runs $1,500-3,000 in materials.
My hybrid approach? $4,200 total. I handled demolition and prep. Rainy Roofers handled the critical installation work. Perfect middle ground. Replacing rv roof plywood added $600 to my project. Worth every penny for peace of mind.
The cheapest way to replace rv roof isn’t always cutting corners. It’s being smart about what you DIY and what you outsource.Three years later? Bone dry. No leaks. No regrets. Would I do it again? Absolutely. But I’d buy better knee pads.