

To apply EPDM (Ethylene Propylene Diene Monomer) roofing, clean the roof deck, unroll and relax the membrane, fold it back halfway, apply water-based adhesive, roll the membrane into place, seal all seams with splice primer and 3-inch seam tape, and secure the perimeter with termination bars. The full process takes 1–2 days for a standard residential flat roof up to 1,500 sq ft (139 m²).
EPDM is the most widely used flat roofing membrane in North America. Properly installed, an EPDM roof lasts 20–50 years and costs $4–$9 per sq ft ($43–$97 per m²) installed less than TPO or modified bitumen alternatives for comparable performance.
This guide covers every installation step, the tools and materials you need, the 3 installation methods, critical mistakes that cause premature failure, and when professional installation makes more sense than DIY.
What Is EPDM Roofing?
EPDM is a single-ply synthetic rubber membrane made from ethylene, propylene, and diene monomer. It comes in large rolls or sheets in 3 thicknesses: 45 mil (1.14 mm), 60 mil (1.52 mm), and 90 mil (2.29 mm). The 60 mil thickness suits most residential flat roofs; 90 mil works for commercial applications or climates with heavy foot traffic.
EPDM works on roofs with slopes of 0:12 to 3:12. It performs best on flat or near-flat surfaces the membrane’s rubber composition handles thermal expansion, UV exposure, and ponding water better than most competing materials.
EPDM vs TPO vs Modified Bitumen: Quick Comparison
| Feature | EPDM | TPO | Modified Bitumen |
| Material | Synthetic rubber | Thermoplastic | Asphalt + polyester |
| Cost (per sq ft) | $4–$9 installed | $5–$10 installed | $4–$8 installed |
| Lifespan | 20–50 years | 15–30 years | 15–20 years |
| Seam method | Adhesive/tape | Heat-welded | Torch/cold-applied |
| Flexibility | Excellent | Good | Moderate |
| UV resistance | Good (white: high) | Excellent | Moderate |
| Ponding water | Good tolerance | Good tolerance | Poor tolerance |
| Best slope | 0:12 – 3:12 | 0:12 – 3:12 | 0:12 – 2:12 |
| Eco-friendly | Recyclable | Recyclable | Limited |
| Maintenance | Low | Low | Moderate |
3 EPDM Installation Methods
Choose the right method before buying materials — each requires different adhesives and prep work.
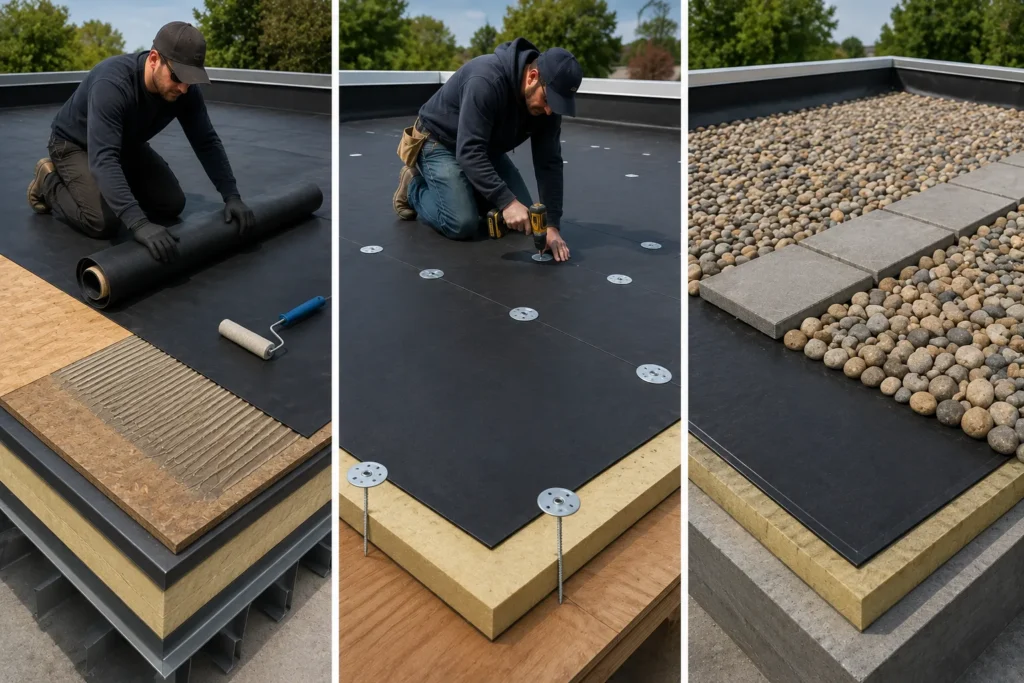
1. Fully Adhered
Glued directly to the roof deck using water-based or solvent-based adhesive across the full membrane surface. This is the most secure method and the one most roofers recommend for residential flat roofs. Installation cost runs $2.75–$3.50 per sq ft for materials alone. Fully adhered systems resist wind uplift better than ballasted systems and perform well in areas with high wind speeds.
2. Mechanically Fastened
Screwed through the membrane and insulation into the roof deck at set intervals using metal plates and fasteners. Faster to install than fully adhered, but seams carry more stress over time. Best for re-roofing over existing insulation that cannot be glued.
3. Ballasted
The membrane lays loose across the roof and is held down by 10–12 lbs per sq ft (48–58 kg per m²) of smooth round stone or concrete pavers. Lowest labor cost and easiest to remove, but adds significant dead load to the structure. Requires a structural assessment before use. Not suitable for sloped roofs above 1:12.
Tools and Materials Needed
| Tools | Materials | Safety Gear |
| Utility knife | EPDM membrane (45–90 mil) | Safety gloves |
| 9-inch paint roller | EPDM primer | Non-slip footwear |
| Seam roller | Water-based deck adhesive | Eye protection |
| Measuring tape | Contact adhesive | Knee pads |
| Chalk line | Seam tape (3-inch) | Hard hat (if height) |
| Stiff push broom | Termination bars | Safety harness |
| Caulking gun | EPDM-compatible sealant | High-vis vest |
| Straight edge / square | Flashing strips |
Budget $300–$500 for tools and supplies on a DIY install. EPDM membrane costs $1.50–$5 per sq ft ($16–$54 per m²) depending on thickness. A full EPDM rubber roof kit bundles membrane, adhesive, seam tape, and primer buy a kit if this is a first install.
How to Apply EPDM Roofing: 9 Steps
Step 1: Inspect and Prepare the Roof Deck
Remove all old roofing material, debris, screws, and nails. The deck must be dry, flat, and structurally sound. Fill gaps larger than ¼ inch (6 mm) with wood strips, EPDM membrane will not bridge large gaps without creating weak points. Repair any rot, soft spots, or damaged decking boards before proceeding.
If installing over existing insulation, verify the insulation is dry and firmly attached. Wet insulation under an EPDM membrane traps moisture, leading to membrane blistering and deck rot within 2–5 years.
Step 2: Install Insulation Board (If Required)
Flat roofs typically use rigid polyisocyanurate (polyiso) or extruded polystyrene (XPS) insulation boards before the membrane layer. Mechanical-fasten or adhesive-bond insulation boards with joints staggered to avoid straight-line gaps. Butt all seams tightly gaps in insulation allow the membrane to flex and eventually fatigue at that point.
Step 3: Unroll and Relax the Membrane
Unroll the EPDM membrane across the entire roof surface and let it relax for 30–60 minutes before cutting or adhering. In temperatures above 70°F (21°C), 30 minutes is sufficient. In cold weather below 50°F (10°C), allow up to 60 minutes. Skipping this step creates wrinkles after adhesion wrinkles trap water and cause early failure.
Leave 6 inches (150 mm) of overhang on all edges and walls. This overhang folds down the edge and up vertical surfaces during the finishing steps.
Step 4: Cut the Membrane to Size
Use a straight edge and utility knife to cut the membrane. Make clean, straight cuts jagged edges create gaps at seams. Cut around penetrations such as pipes, vents, and drains with 6-inch (150 mm) clearance you will seal these separately with flashing and sealant in Step 8.
Step 5: Apply Primer
Apply EPDM primer to the roof deck using a 9-inch (230 mm) roller. Cover the entire surface evenly. Primer is non-negotiable for fully adhered systems skipping it causes the adhesive to bond weakly and peel within 3–7 years. Allow the primer to dry completely before applying adhesive, typically 15–30 minutes depending on temperature and humidity.
Step 6: Apply Adhesive and Bond the Membrane
Fold back half the membrane to expose the primed deck. Apply water-based adhesive to both the deck and the underside of the membrane using the 9-inch roller in 2-meter (6.5 ft) sections. Leave a 6-inch (150 mm) unglued perimeter this area gets contact adhesive in the next step.
Wait for the adhesive to become tacky (milky-white turns translucent) before rolling the membrane back into place. In hot weather, work faster adhesive dries quickly above 85°F (29°C). Roll the membrane from the fold point outward, pressing firmly as you go.
Use a stiff push broom or weighted roller to press the membrane flat, working from the center outward to push out air bubbles. Repeat for the second half of the membrane.
Step 7: Seal All Seams with Splice Primer and Seam Tape
Seams are the single most common failure point on any EPDM roof. Improper sealing causes 70–80% of all EPDM leaks. Overlap seams by a minimum of 3 inches (75 mm).
Clean both seam surfaces with an approved EPDM cleaner. Apply splice primer to both surfaces and allow it to flash off completely primer that is still wet when taped creates weak adhesion. Lay 3-inch (75 mm) seam tape over the overlap and press firmly with a hand roller. Roll from the center of the seam outward to avoid trapping air under the tape.
Apply seam edge caulk along the exposed edge of the tape to prevent water from working under the seam from the side.
Step 8: Flash All Penetrations and Edges
Every penetration pipe, vent, drain, skylight, HVAC curb requires individual flashing. Cut the EPDM membrane flush around each penetration. Apply EPDM-compatible flashing strips using contact adhesive, extending the flashing at least 6 inches (150 mm) onto the field membrane and wrapping tightly around the penetration.
Seal the top edge of all vertical flashing with EPDM-compatible caulk or water cut-off mastic. At parapet walls, extend the membrane 6 inches (150 mm) up the vertical face and secure with termination bars. Seal above the termination bar with caulk.
At roof edges, fold the membrane over and secure with aluminum termination bars fastened every 6 inches (150 mm) with appropriate screws. The termination bar compresses the membrane against the drip edge consistent spacing creates even compression across the entire edge.
Step 9: Final Inspection
Walk the entire roof surface and check for 5 failure points: unsealed seam edges, bubbles or unbonded areas under the membrane, gaps around penetrations, termination bars with inconsistent compression, and any cuts or punctures made during installation.
Press firmly on all seam areas a properly bonded seam feels solid with no movement. Any area that flexes or lifts needs re-priming and re-taping before the project is complete.
EPDM Roofing Cost in 2026
- Materials only: $1.50–$5 per sq ft ($16–$54 per m²) depending on membrane thickness
- Professional installation labor: $3–$7 per sq ft ($32–$75 per m²)
- Total installed cost: $4–$9 per sq ft ($43–$97 per m²) for standard residential projects
- 1,500 sq ft (139 m²) roof: $6,000–$15,000 fully installed
- 2,500 sq ft (232 m²) commercial roof: $10,000–$22,500 fully installed
- Tools and supplies (DIY): $300–$500 additional
Labor accounts for up to 60% of total project cost. The size of the roof reduces cost per sq ft at scale — a 5,000 sq ft commercial roof typically costs 15–20% less per sq ft than a 1,000 sq ft residential job.
Need a detailed quote for your project? Our commercial roofing specialists and residential installation team provide free estimates.
6 Common EPDM Installation Mistakes That Cause Early Failure
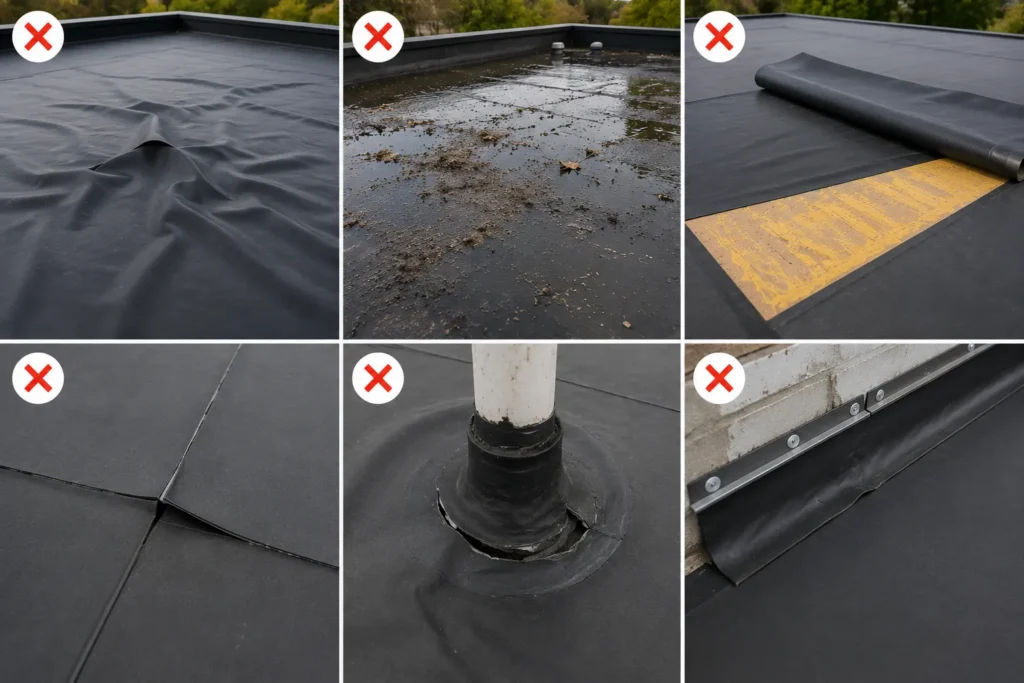
- Skipping membrane relaxation. Installing before the membrane relaxes creates wrinkles that trap water and cause adhesion failure within 2–3 years.
- Wet or dirty deck surface. Any moisture or debris under the membrane prevents proper adhesion. One week of rain through a poorly adhered bubble can cause $3,000–$8,000 in deck rot repairs.
- Using wrong adhesive for the substrate. Water-based adhesive works on most decks; use solvent-based only where specified by the membrane manufacturer. Wrong adhesive chemistry causes delamination.
- Insufficient seam overlap. Less than 3 inches (75 mm) of seam overlap creates a bond that fails under thermal movement. Seam failures reduce roof lifespan by 10–15 years according to industry field data.
- Improper flashing at penetrations. Pipes, drains, and vents require dedicated flashing — wrapping the field membrane around them without flashing creates gaps at the point of highest movement stress.
- Poor termination bar spacing. Bars fastened more than 12 inches (305 mm) apart allow the edge to lift under wind uplift, especially at corners where wind loads are highest.
How to Maintain an EPDM Roof After Installation
A properly installed EPDM roof needs minimal maintenance, but 4 tasks extend its lifespan significantly:
- Inspect seams and flashings twice per year — spring and fall — for signs of separation or caulk deterioration
- Clear drains and scuppers of debris after every storm to prevent ponding water lasting more than 48 hours
- Check for membrane shrinkage at edges annually — EPDM contracts slightly over time and can pull termination bars loose
- Patch small punctures immediately using 60 mil cured EPDM patch material, splice primer, and splice adhesive — do not allow punctures to sit through a rain season
Schedule professional commercial roof maintenance or residential roof maintenance annually to catch seam separation, flashing failures, and ponding issues before they cause interior damage.
DIY vs Professional EPDM Installation: When to Call a Roofer
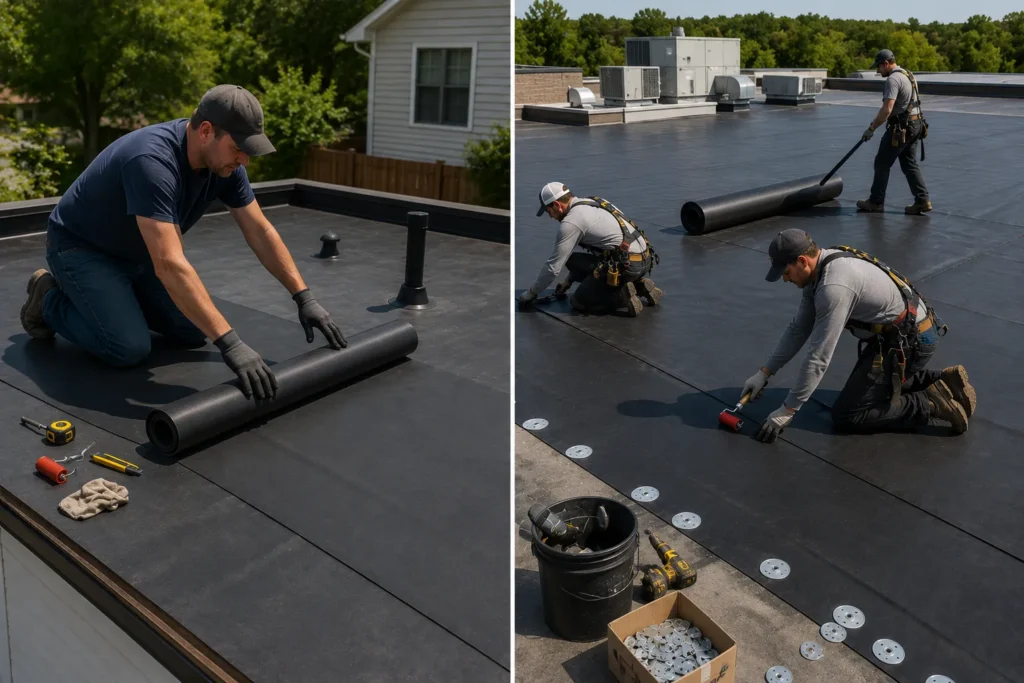
DIY EPDM installation is realistic for experienced DIYers on simple flat roofs up to 500 sq ft (46 m²) with no penetrations or parapet walls. The process is forgiving on large flat sections — mistakes on the field area are easier to spot and fix than mistakes at seams or flashings.
Call a professional for any of these 5 conditions:
- The roof has more than 3 penetrations — each one requires precise flashing that is difficult to get right without experience
- The roof is above a finished living space — a failed DIY seal on a bedroom ceiling costs far more to remediate than professional installation
- The existing deck shows soft spots or rot — structural repairs must precede membrane installation
- The roof area exceeds 1,000 sq ft (93 m²) — handling a full-size commercial membrane sheet alone is not practical
- The project needs to meet a manufacturer warranty — most lifetime warranties require certified installer programs
If your existing flat roof has already failed and needs replacement, our commercial roof replacement and residential roof replacement teams handle the full scope — removal, deck inspection, insulation, and EPDM installation.
Signs Your EPDM Roof Needs Inspection or Repair
- Water stains on interior ceilings — inspect seams and flashings at the affected area first
- Visible bubbles or ridges in the membrane — indicates trapped moisture or adhesion failure
- Cracks or crazing on the membrane surface — UV degradation requiring coating or patch
- Pulling or tearing at roof edges — membrane shrinkage pulling termination bars loose
- Ponding water remaining more than 48 hours after rain — drainage blockage or insulation failure
- Separated seams with visible gaps — immediate repair required before the next rain event
Conclusion
Applying EPDM roofing correctly comes down to 3 non-negotiable steps: thorough surface preparation, proper adhesive application with full membrane coverage, and watertight seam sealing with splice primer and 3-inch seam tape. Every other step either supports or follows from those 3.
A DIY install is realistic for small, simple flat roofs. For commercial buildings, roofs with multiple penetrations, or any project where a manufacturer warranty matters, professional installation protects the investment from the start.
EPDM’s 20–50 year lifespan and low maintenance cost make it the most cost-effective flat roofing material available. The difference between a 20-year roof and a 50-year roof is almost entirely installation quality.




