
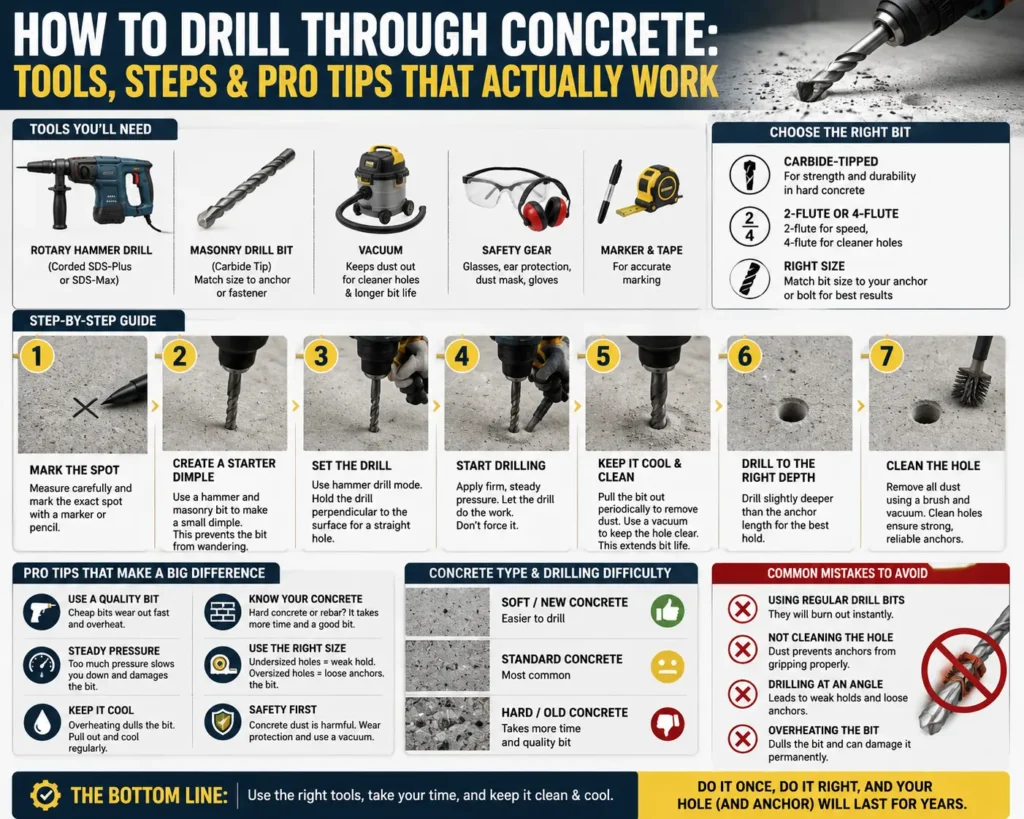
Most people grab the wrong drill, burn through 3 bits, and crack the concrete before they get halfway through. Drilling concrete is not difficult but it punishes wrong tool choices fast. Use a hammer drill (HD) or rotary hammer with a carbide-tipped masonry bit, and the job takes under 10 minutes. Use a regular drill, and it will not work.
This guide covers every decision you face: which drill, which bit, which size, how deep, and how to handle rebar. It applies to concrete walls, floors, and foundations whether you are mounting a roof bracket, anchoring a post, or running a conduit through a slab.
Hammer Drill vs Rotary Hammer: Which One Do You Need?
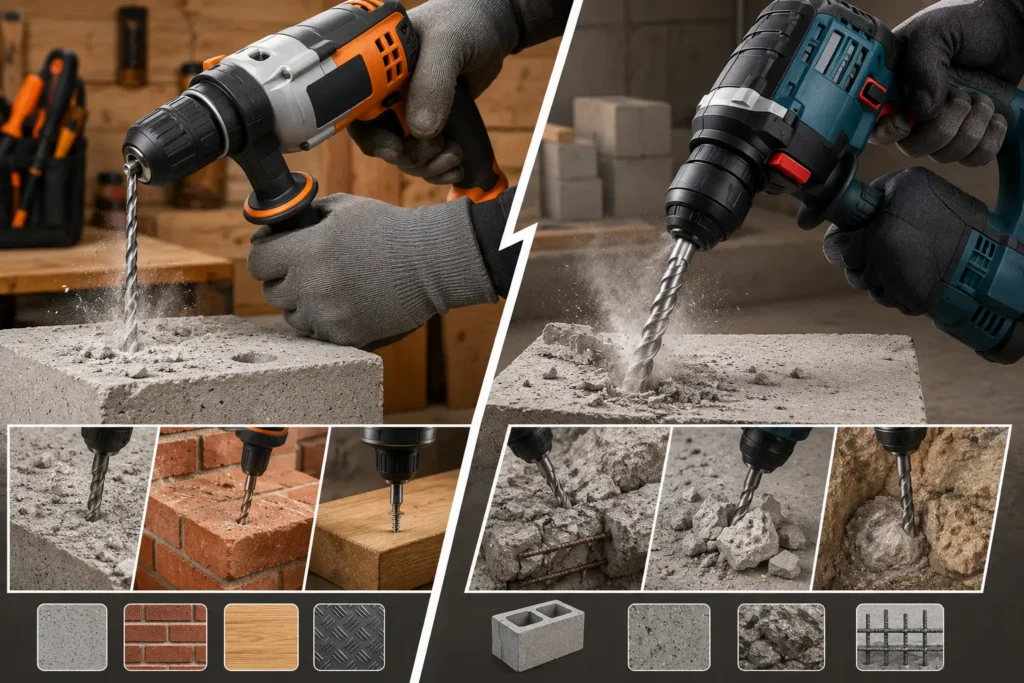
A hammer drill suits holes up to 1/2 inch (12.7 mm) in diameter wall anchors, screws, and light brackets. A rotary hammer suits holes above 1/2 inch and dense or reinforced concrete. These 2 tools handle 95% of all concrete drilling jobs.
| Drill Type | Hole Size | Best For | Cost Range | Bit System |
| Hammer Drill | Up to 1/2 in (12.7 mm) | Light — anchors, screws, hangers | $80–$200 | Standard chuck |
| Rotary Hammer (SDS) | 1/2 in – 4 in (12.7–100 mm) | Heavy — posts, conduit, rebar concrete | $150–$600 | SDS-plus / SDS-max |
| Core Drill | 2 in – 12 in (50–300 mm) | Large openings — pipes, HVAC sleeves | $400+ | Diamond core bit |
| Regular Drill | Not suitable | Will not penetrate hardened concrete | — | — |
A regular drill does not generate the hammering action concrete requires. Concrete hardness ranges from 3,000 to 8,000 PSI a rotary drill only spins; it does not break the aggregate. Do not attempt concrete with a standard drill.
What Is an SDS Bit System?
SDS (Slotted Drive System) bits lock into a rotary hammer without a key chuck. The bit slides freely in the chuck — this lets the hammering mechanism move the bit forward and back while the chuck drives rotation. SDS-plus bits fit most residential rotary hammers. SDS-max bits fit heavy commercial-grade hammers. Never use SDS bits in a regular drill.
Choosing the Right Masonry Drill Bit
The correct bit for concrete is a carbide-tipped masonry bit — not wood, not metal, not multi-purpose. Carbide withstands concrete’s abrasive aggregate. Tungsten carbide tips stay sharp 10x longer than standard steel on concrete.
| Bit Type | Drill Required | Best Application | Price Range |
| Standard Carbide Masonry Bit | Hammer drill | Holes up to 1/2 in (12.7 mm) — anchors, screws | $5–$20 |
| SDS-Plus Carbide Bit | Rotary hammer | Holes 1/4 in – 1 in (6–25 mm) — brackets, posts | $10–$40 |
| SDS-Max Carbide Bit | Heavy rotary hammer | Holes 1 in – 2 in (25–50 mm) — structural anchors | $30–$80 |
| Diamond Core Bit | Core drill | Large clean holes 2 in – 12 in — pipes, HVAC | $50–$300 |
| Multi-cutter Bit | SDS rotary hammer | Breaking out old anchors, chiseling | $15–$50 |
How to Match Bit Size to Anchor Size
The bit diameter must match the anchor diameter not the hole diameter. Most masonry anchors specify the exact bit size on the package. For a 3/8-inch (9.5 mm) sleeve anchor, drill a 3/8-inch hole. For a 1/2-inch (12.7 mm) wedge anchor, drill a 1/2-inch hole. Drilling oversized leaves gaps that reduce holding strength by up to 40%.
Safety Equipment: 4 Items You Cannot Skip
Concrete drilling produces 2 hazards: silica dust and concrete fragments. Inhaled silica dust causes silicosis — a permanent lung condition. Flying concrete chips reach speeds above 50 mph (80 km/h).
- Safety glasses or goggles — rated ANSI Z87.1 or EN166. Concrete chips travel at high velocity and cause permanent eye damage.
- N95 respirator or P100 mask — not a cloth mask. Silica particles measure 0.5–10 microns. Only N95 or better filters silica dust effectively.
- Hearing protection — rotary hammers operate at 95–110 dB. Exposure above 85 dB for 2+ hours causes hearing loss.
- Work gloves — vibration from rotary hammers reaches 8–15 m/s². Gloves reduce vibration transfer and protect against sharp concrete edges.
Drill indoors? Use a vacuum dust extractor attached to the drill port. Wet drilling with a slow water drip at the hole reduces silica dust by 85% — standard practice for professional concrete crews.
Drilling into concrete is common during roof installation anchoring brackets, mounting supports, and securing fascia boards to concrete or masonry substrates all require proper hole placement and the right bit size.
How to Drill Through Concrete: 8 Steps
Step 1 — Check for Rebar and Utilities
Before drilling any hole deeper than 1 inch (25 mm), scan the surface with a rebar detector or combination scanner. Rebar is typically spaced 12 inches (300 mm) apart in residential slabs and 6 inches (150 mm) in commercial concrete. Hitting rebar with a carbide bit destroys the bit. Hitting an electrical conduit is a life safety issue.
Scan vertically and horizontally across the drill location. Mark the clear zone before setting up.
Step 2 — Mark the Drill Point
Use a pencil or chalk marker — not a pen. Mark the exact center of the hole. For multiple holes in a row, use a chalk line and measure twice. Inaccurate placement on anchor holes means the fixture will not align.
Step 3 — Set the Depth Stop
The depth stop is a collar or rod on the drill that limits how deep the bit travels. Set the depth stop to anchor length plus 1/2 inch (12 mm) extra — this clears debris from the bottom of the hole. Most anchors require the hole 1/4 inch (6 mm) deeper than the anchor length. Check the anchor specification sheet for exact depth.
Step 4 — Start with a Pilot Hole (for holes above 1/2 inch)
Drill a 1/4-inch (6 mm) pilot hole first at the marked center point. The pilot hole guides the larger bit and prevents the tip from walking across the surface. On smooth concrete, bit walking causes holes that are off-center by up to 1/2 inch (12 mm). Skip the pilot hole only for holes 3/8 inch (9.5 mm) and smaller.
Step 5 — Position the Drill Perpendicular to the Surface
Hold the drill body level and square to the surface. Use a small torpedo level attached to the drill body if drilling a horizontal hole in a wall. A drill guide jig helps maintain angle on through-holes in thick walls — concrete walls in residential construction are typically 8 inches (200 mm) thick; a 3-inch (75 mm) angle error at entry becomes a 2-inch (50 mm) offset at exit.
Step 6 — Apply Steady, Moderate Pressure
Press the drill forward with consistent, moderate force — roughly 10–20 lbs (4.5–9 kg) of pressure. Do not force the drill by leaning your full body weight into it. Excess pressure overheats the bit and stresses the drill motor. The hammer action does the breaking work; your job is to guide the drill, not to push through the concrete.
Slow the drill speed when entering or exiting the hole. High RPM at entry causes bit walking. High RPM at exit causes blowout — a chunk of concrete breaks away at the back face of the wall.
When concrete anchor bolts corrode or pull loose on a commercial roof, the fix often requires redrilling and resetting anchors. Commercial roof repair on concrete substrates follows the same drilling principles — correct bit selection and perpendicular entry prevent anchor failure.
Step 7 — Clear the Hole
Drill in 30-second intervals. Every 30 seconds, pull the bit fully out of the hole while it is still spinning — this clears concrete dust from the flutes. Dust buildup inside the hole acts as a heat insulator and increases bit temperature by up to 200°F (93°C). Overheated bits lose hardness and dull 3x faster.
After drilling to full depth, blow out the hole with compressed air. Then vacuum the surrounding surface. The hole must be clean and dry before inserting any anchor — dust reduces anchor holding strength by 30–50%.
Step 8 — Insert the Anchor and Test
Tap the anchor into the hole with a rubber mallet not a steel hammer. Steel-to-anchor impacts can deform the anchor head or crack the concrete immediately around the hole. Torque the anchor bolt to the manufacturer specification using a torque wrench. Under-torqued anchors back out under load; over-torqued anchors crack the surrounding concrete.
Test the anchor by applying lateral force before hanging any fixture. A correctly set anchor in 3,000 PSI concrete holds 1,500–2,500 lbs (680–1,130 kg) in shear depending on anchor diameter and embedment depth.
5 Common Concrete Drilling Mistakes
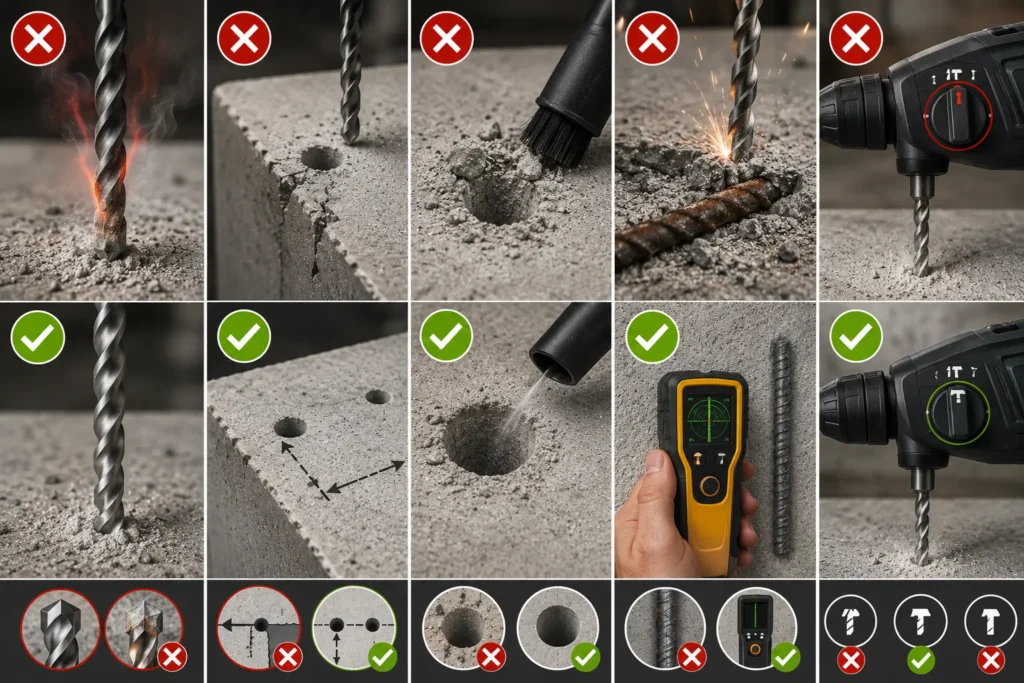
- Using a dull bit — a dull carbide bit generates heat instead of cutting. Replace masonry bits after 20–30 holes or when drilling progress slows noticeably. Dull bits crack concrete edges and wander off-center.
- Drilling too close to the edge — keep holes at least 4 times the anchor diameter from any concrete edge. A 1/2-inch (12 mm) anchor needs 2 inches (50 mm) of edge clearance minimum. Edge blowout is irreversible.
- Skipping the hole cleaning step — concrete dust in an anchor hole reduces holding strength by up to 50%. Always blow and vacuum the hole before inserting anchors.
- Drilling through rebar without knowing — an undiscovered rebar hit destroys a $30 SDS bit instantly. A rebar detector costs $30–$80 and pays for itself on the first job.
- Using the wrong drill mode — most hammer drills have 3 modes: drill only, hammer drill, and hammer only. Concrete requires hammer drill mode. Drill-only mode on concrete wears the bit and does not penetrate.
Drilling Concrete in 4 Specific Situations
Drilling a Concrete Wall
Concrete walls in residential construction are 6–8 inches (150–200 mm) thick. Use an SDS-plus bit at least 2 inches (50 mm) longer than wall thickness for through-holes. Secure a backer board on the exit face to prevent blowout if a clean exit hole is required.
Drilling a Concrete Floor or Slab
Slabs are typically 4–6 inches (100–150 mm) thick. Rebar density is highest in slabs — scan the entire drilling grid before starting. Drill at low speed with firm pressure. Water cooling extends bit life on horizontal slab drilling.
Drilling Old or Hardened Concrete
Concrete hardens with age 50-year-old concrete reaches 6,000–8,000 PSI versus 3,000 PSI for fresh pours. Old concrete requires an SDS rotary hammer regardless of hole size. Increase impact energy setting and reduce forward pressure let the hammer mechanism work harder instead of pushing.
Drilling Near a Roofline or Parapet Wall
Concrete parapets and roof edge curbs require waterproof anchor sealing after drilling. Water penetration through unsealed anchor holes is one of the 4 leading causes of commercial roof leaks. Use a waterproof anchor sealant rated for masonry and apply it around the anchor head before final torque.
Unsealed anchor holes in concrete parapets and roof decks allow water infiltration over time. Routine roof maintenance includes checking all penetrations and anchor points for failed sealant catching these early prevents costly structural repair.
Concrete Drilling Quick Reference
| Hole Diameter | Recommended Drill | Bit Type | Drill Speed |
| Up to 1/4 in (6 mm) | Hammer drill | Standard carbide masonry bit | 3,000–5,000 RPM |
| 1/4 – 1/2 in (6–12 mm) | Hammer drill or SDS rotary | SDS-plus carbide bit | 2,000–3,500 RPM |
| 1/2 – 1 in (12–25 mm) | SDS rotary hammer | SDS-plus carbide bit | 1,200–2,000 RPM |
| 1 – 2 in (25–50 mm) | Heavy SDS rotary hammer | SDS-max carbide bit | 600–1,200 RPM |
| 2 in+ (50 mm+) | Core drill | Diamond core bit (wet) | 300–600 RPM |
Conclusion
Drill selection determines whether you finish in 2 minutes or strip 3 bits. Use a hammer drill for light anchor work under 1/2 inch (12 mm). Use a rotary hammer for everything else.
Bit quality determines hole quality. A fresh carbide-tipped SDS bit cuts clean and stays cool. A dull bit generates heat, wanders, and cracks the surface. Replace bits at the first sign of slow progress.
Hole cleaning determines anchor performance. A clean, dry hole with no concrete dust holds anchors at full rated load. A dusty hole reduces holding strength by up to 50% the anchor will pass torque but fail under dynamic load.




