

Look, I’ve watched too many people waste money on the wrong metal panels. And honestly? It’s not their fault. The difference between r panel vs pbr panel comes down to one thing: a small leg that changes everything. That leg is called a purlin bearing rib, and it makes PBR panels stronger and more weather-tight than standard R panels.
Here’s what matters: PBR panel dimensions are 36″ wide with a 1.25″ rib height, and they can handle both roofing and siding jobs. R panels? Same dimensions, but they’re really only meant for walls.
I’m going to walk you through exactly what makes these panels different so you don’t end up ripping off a leaking roof two years from now.
The One Difference That Actually Matters
Most contractors won’t tell you this straight.
PBR vs R panel isn’t about looks. They look nearly identical. It’s about that overlapping leg.
PBR panels have an extra overlap section. This creates metal-to-metal contact between panels. More contact means:
- Stronger connections
- Better water resistance
- Wind can’t get underneath as easily
R panels? They connect, but without that extra leg, they’re weaker.
I saw a guy use an R panel on his barn roof last year. Six months later, wind-driven rain was coming through the seams. He had to redo the whole thing with PBR. Don’t be that guy.
Where Each Panel Actually Works
Here’s where people mess up the most.
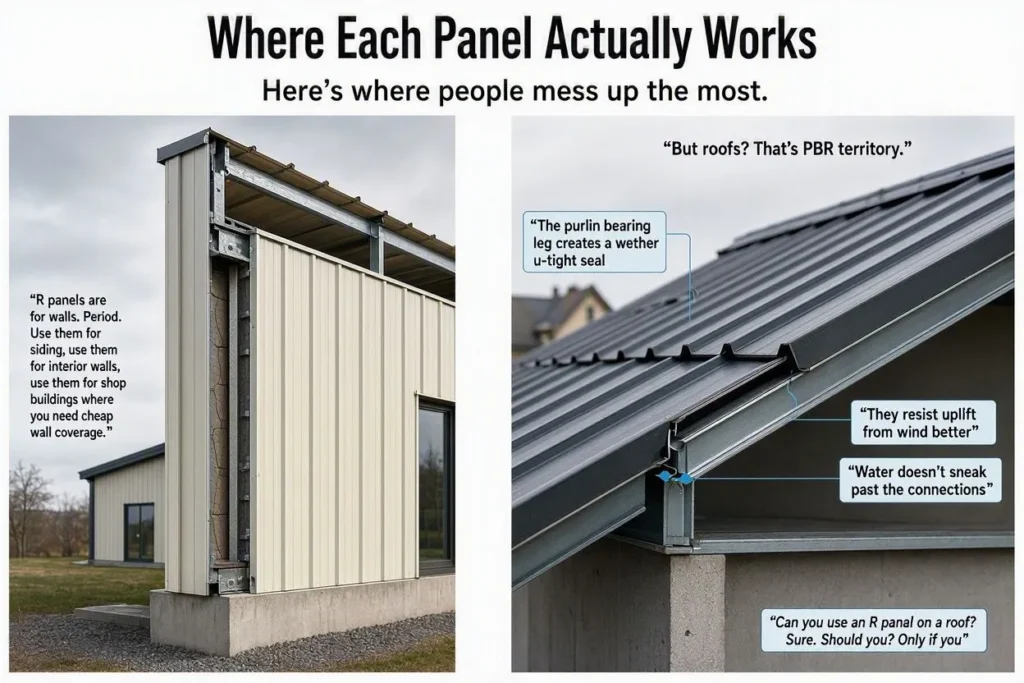
R panels are for walls. Period. Use them for siding, use them for interior walls, use them for shop buildings where you need cheap wall coverage.
But roofs? That’s PBR territory.
PBR panels handle roofing because:
- The purlin bearing leg creates a weather-tight seal
- They resist uplift from wind better
- Water doesn’t sneak past the connections
Can you use an R panel on a roof? Sure. Should you? Only if you like fixing leaks. I’ve installed both. Trust me on this.
Breaking Down PBR Panel Dimensions
Let me make this simple.
PBR panel dimensions are designed for efficiency:
- 36″ coverage width (you get what you pay for, no waste)
- 1.25″ rib height (provides strength and water channeling)
- 12″ rib spacing (regular intervals for consistent strength)
- Lengths from 1′ to 52′ (custom cut to your needs)
R panel dimensions? Exactly the same. The dimensions aren’t the difference. It’s that bearing leg.
R Panel Price Per Linear Foot — And Why PBR Costs Almost the Same
R panel price runs $2.00–$3.50 per linear foot depending on gauge, length, and supplier. On a 2,000 sq ft roof, that is roughly $4,000–$7,000 in materials alone.
Now here is the number most buyers miss: how much is r panel per foot for PBR? Almost identical — typically $0.05–$0.15 more per linear foot. On a full roof, that gap closes to $30–$60 total.
So when people ask PBR panel vs R panel on price, the honest answer is: there is no real price difference. The cost comes from gauge selection, not panel type.
| Panel | Price Per Linear Foot | Best Use |
|---|---|---|
| R Panel | $2.00–$3.50 | Walls & siding only |
| PBR Panel | $2.05–$3.65 | Roofing + walls |
The reason PBR dominates the market is simple — most suppliers stock purlin bearing R panel (PBR) exclusively now because it handles both roofing and siding jobs. Pure R panel is harder to find because contractors stopped ordering it.
The purlin bearing leg panel design adds a structural overlap that standard R panel lacks. That leg locks panels together metal-to-metal, blocks wind-driven rain, and adds uplift resistance under high wind loads. Without it, exposed seams on a roof become leak points within 1–3 years.
The Real Cost Difference
This surprised me when I first learned it. The cost difference between r panel vs pbr panel is less than 2%. Sometimes they’re the same price. Most manufacturers only stock PBR now because why wouldn’t you?
Here’s the actual math:
- PBR panel: Let’s say $2.50 per linear foot
- R panel: Maybe $2.45 per linear foot
- Difference: 5 cents per foot
On a 2,000 square foot roof, you’re talking about maybe $30 difference. Would you risk a leaking roof to save $30? I wouldn’t.
Installation: What Nobody Tells You
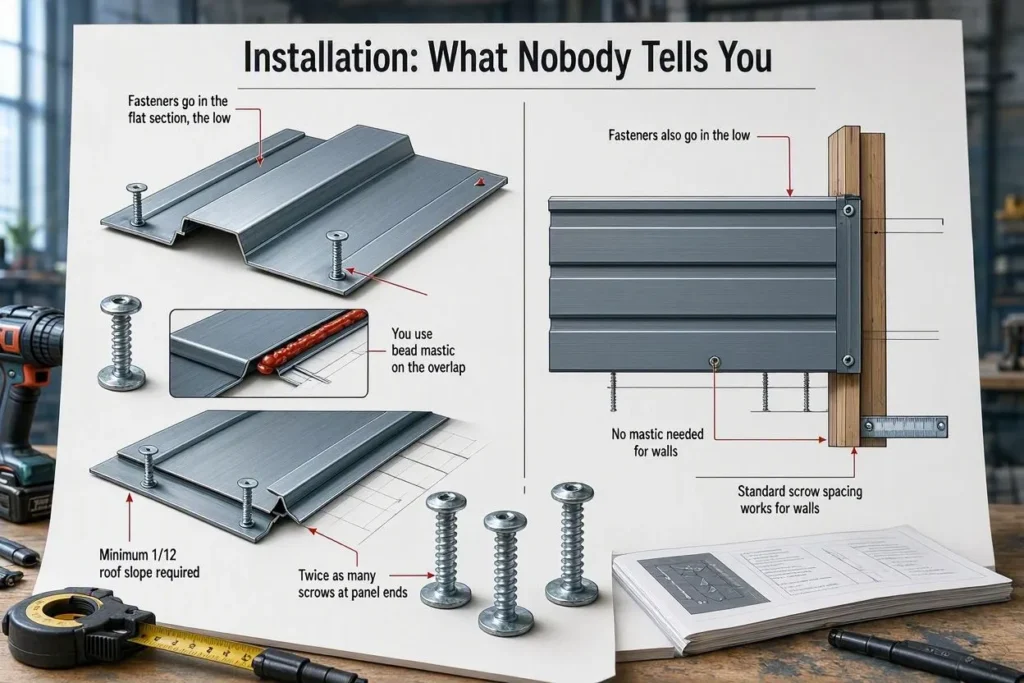
Installation is where things get interesting. Both panels use exposed fasteners. Screws go through the metal into your substrate. Simple. But here’s what changes:
For PBR roofing panels:
- Fasteners go in the flat section (the low)
- You use bead mastic on the overlap
- Twice as many screws at panel ends
- Minimum 1/12 roof slope required
For R panel siding:
- Fasteners also go in the low
- No mastic needed for walls
- Standard screw spacing works fine
The purlin bearing leg on PBR means your overlap is tighter. Less room for error.
I remember installing my first PBR roof. That overlap leg made alignment easier, not harder. It guides the next panel into place.
Read Related Blog: Steel Roofing Panel Installation Instructions
Strength Comparison Nobody Talks About
Let’s talk about what happens when things get real. Both panels are strong. But PBR wins when:
- You’re installing over open purlins
- Wind loads are high
- You need long spans between supports
- The panel has to carry weight (like snow)
The r panel vs pbr panel strength difference comes from that overlap creating a continuous connection. Think of it like this: R panel is fingers touching. PBR is fingers interlocked. Which holds better in a fight?
Gauge Options and Material Specs
Both panels come in the same gauges:
- 26 gauge (most common for residential)
- 24 gauge (commercial grade)
- 22 gauge (heavy duty applications)
The substrate is Galvalume (AZ50 minimum). Paint systems include SMP and PVDF. Color options? Over 100 choices.
But here’s what matters: gauge selection depends on your application, not whether you choose R or PBR. Go 26 gauge for normal residential. Upgrade to 24 if you’re in high wind zones or need longer spans.
When R Panel Actually Makes Sense
I’m not here to trash the R panel.
It has its place:
- Interior walls where weather doesn’t matter
- Shop buildings where you want cheap coverage
- Agricultural siding on three-sided structures
- Accent walls in modern designs
For these uses, the R panel saves you money without compromising anything. The problem is when people use it wrong.
Weather Resistance: The Truth
Let me be straight with you. Water is your enemy. Always has been, always will be.
PBR panels handle weather better because:
- The overlap leg creates a dam against water
- Wind can’t drive rain through the seams as easily
- The metal-to-metal contact stops moisture
R panels on a roof? Water finds a way. Especially in wind-driven rain. I’ve seen it happen in Texas, where sideways rain is normal. PBR holds. R panel doesn’t.
Making Your Decision
Here’s how I’d choose:
Pick PBR panel if:
- You’re roofing anything
- Weather exposure is high
- You need maximum strength
- The 2% cost difference doesn’t matter
Pick R panel if:
- You’re doing walls only
- Budget is extremely tight
- Weather protection isn’t critical
- Interior applications
Most of the time? Just buy PBR. The versatility alone makes it worth the tiny extra cost.
Common Mistakes I See

People mess this up constantly:
- Mistake 1: Buying R panel “to save money” on a roof. Then spending 3x more fixing leaks.
- Mistake 2: Over-thinking the dimensions. They’re the same, folks.
- Mistake 3: Skipping the bead mastic on PBR overlaps. That sealant matters.
- Mistake 4: Not using enough fasteners at panel ends. Wind will find those weak spots.
Learn from other people’s mistakes, not your own.
Wrapping This Up
The r panel vs pbr panel debate isn’t really a debate. If you’re roofing, use PBR. The purlin bearing leg gives you weather protection and strength that R panel simply can’t match. The cost difference is minimal, usually under 2%.For walls and siding where weather isn’t penetrating your structure, R panel works fine and saves a few bucks.
Most manufacturers only stock PBR now because it handles both applications. That’s your sign right there.I’ve installed thousands of square feet of both. The peace of mind from knowing your roof won’t leak is worth way more than the $30 you might save with an R panel.
Make the smart choice. Your future self will thank you and read more exciting blogs at Rainy Roofers.




