
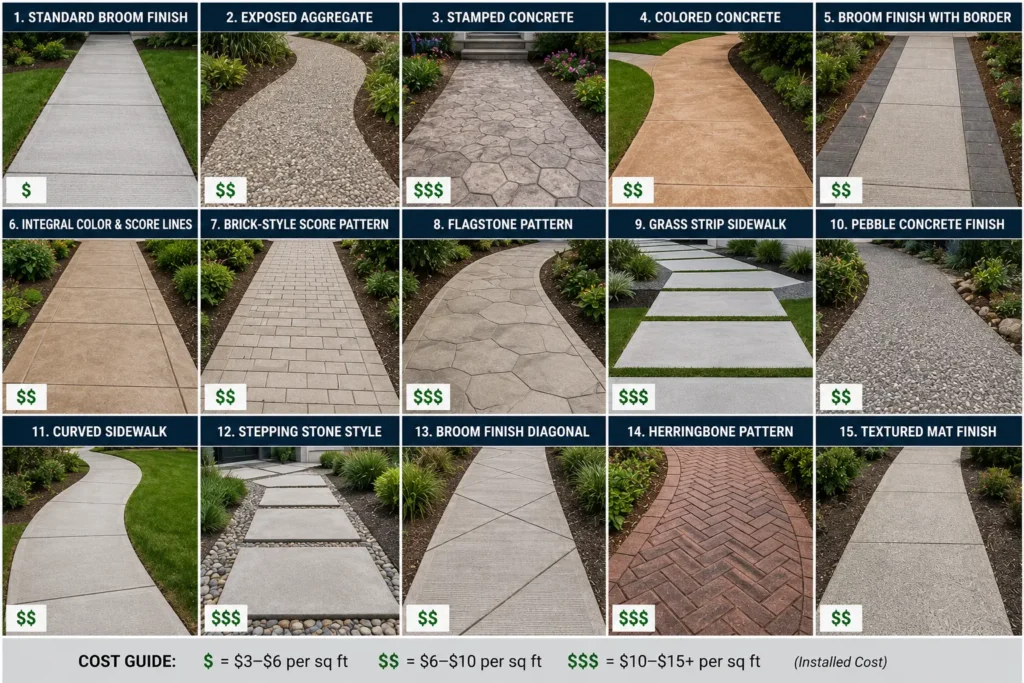
The best concrete sidewalk ideas combine slip-resistant texture, weather durability, and visual appeal that matches the home’s architecture. A plain grey slab costs $7–$12/sq ft ($75–$129/m²). Decorative options — stamped, stained, exposed aggregate — run $10–$22/sq ft ($108–$237/m²) and deliver curb appeal that plain concrete never achieves.
A poorly designed or cracked front walkway cuts perceived home value before a buyer reaches the door. A well-executed concrete sidewalk does the opposite — it signals quality, frames the landscaping, and sets the tone for the property.
This guide covers 15 concrete sidewalk ideas with realistic 2026 costs, best-fit home styles, and the practical details contractors need to deliver each finish. Surface water management from sidewalks also connects directly to foundation and wall health — an issue Rainy Roofers addresses from the roofline down.
Concrete Sidewalk Cost by Finish Type (2026)
Cost per square foot installed, including materials, labor, and basic site prep for a standard 4-inch (100 mm) residential sidewalk:
Plain broom finish: $7–$12/sq ft ($75–$129/m²)
Integral colored concrete: $9–$17/sq ft — adds $2–$5/sq ft over plain
Stamped concrete: $10–$21/sq ft ($108–$226/m²)
Stained concrete (acid or water-based): $12–$25/sq ft ($129–$269/m²)
Exposed aggregate: $14–$22/sq ft ($150–$237/m²)
Engraved / saw-cut patterns: $10–$18/sq ft ($108–$194/m²)
Concrete stenciling: $8–$14/sq ft ($86–$150/m²)
Polished concrete: $8–$12/sq ft ($86–$129/m²) — mostly interior/covered applications
Resurfaced / overlay: $3–$9/sq ft ($32–$97/m²) over existing concrete
A standard residential front walkway runs 3–4 ft (0.9–1.2 m) wide and 20–50 linear ft (6–15 m). Total installed cost: $1,400–$3,400 for a plain finish; $2,500–$7,000 for stamped or stained. ADA-compliant commercial sidewalks at 5 ft (1.5 m) wide and 5-inch (127 mm) thickness cost $40–$70 per linear foot.
15 Concrete Sidewalk Ideas for Every Home Style
1. Broom Finish Concrete Sidewalk
A broom finish is the standard for residential sidewalks — and for good reason. Dragging a stiff broom across freshly poured concrete creates fine parallel ridges that provide slip resistance in wet conditions. It is the most affordable finish, the fastest to install, and the easiest to repair.
Cost: $7–$12/sq ft ($75–$129/m²)
Best for: Any home style. Front walkways, side yard paths, driveway aprons, garage approaches.
Thickness: 4 inches (100 mm) standard residential. 5–6 inches (127–152 mm) for driveways and vehicle crossings.
Broom finish concrete suits all climates. The texture channeling water away from the walking surface reduces slip risk better than trowel-smooth finishes. Seal every 3–5 years with a penetrating silane-siloxane sealer to prevent moisture intrusion and freeze-thaw spalling.
2. Stamped Concrete Sidewalk
Stamped concrete uses textured rubber mats pressed into freshly poured concrete to replicate brick, flagstone, slate, cobblestone, or wood plank patterns. It delivers the look of expensive materials at 30–50% lower cost than natural stone or brick installation.
Cost: $10–$21/sq ft ($108–$226/m²)
Best for: Traditional, colonial, craftsman, and Mediterranean-style homes. Front walkways, courtyard paths, pool surrounds.
Most popular patterns: Ashlar slate, running bond brick, flagstone, cobblestone, herringbone, wood plank, Roman fan
Stamped concrete requires resealing every 2–3 years to maintain color and prevent surface fading. Use a UV-resistant acrylic sealer for exterior stamped surfaces. Without resealing, the integral color fades within 5–7 years in direct sun exposure. Always request a concrete mix with 4,000 psi (27.6 MPa) minimum strength for stamped sidewalks — the additional pressure from stamping requires higher base strength than plain slabs.
Combine stamped concrete with proper roof drainage planning — stamped surfaces near downspout discharge zones need adequate slope (1/8 in per foot / 10 mm per meter minimum) to prevent water pooling against foundation walls.
3. Exposed Aggregate Sidewalk
Exposed aggregate concrete reveals the decorative stones, pebbles, or shells mixed into the concrete by washing away the surface cement paste before it cures fully. The result is a textured, pebble-studded surface with natural color variation and strong slip resistance.
Cost: $14–$22/sq ft ($150–$237/m²) — highest cost of standard finishes
Best for: Craftsman, contemporary, coastal, and natural-landscape homes. Front walkways, garden paths, pool decks.
Aggregate options: River rock, pea gravel, quartz, granite chips, crushed glass, sea shells — each produces a distinct color and texture profile
Exposed aggregate surfaces are naturally slip-resistant without additional texturing — the protruding aggregate provides grip even when wet. The surface requires sealing every 3–5 years to protect aggregate adhesion and prevent individual stones from loosening. A 3/8 in (9.5 mm) to 3/4 in (19 mm) aggregate size works best for pedestrian sidewalks — larger stones create uncomfortable walking surfaces.
4. Stained Concrete Walkway
Concrete staining adds color without altering surface texture. 2 stain types exist: acid stains react chemically with concrete minerals to produce mottled, variegated earth tones; water-based stains deliver consistent, solid color in a wider range including blues, greens, and reds.
Cost: $12–$25/sq ft ($129–$269/m²)
Best for: Modern, contemporary, Spanish colonial, and desert-style homes. Front entries, covered walkways, patio connections.
Acid stain colors: Browns, tans, terracotta, burnt orange, olive green, black — natural and earthy tones only
Water-based stain colors: Full spectrum — greys, blues, greens, reds, whites, custom blends
Acid stains penetrate 1/16 to 1/8 inch (1.6–3.2 mm) into the concrete — the color is permanent and will not peel. Water-based stains are topical and require sealing for durability. Stained concrete is best paired with a broom or light trowel texture to maintain slip resistance. Apply stain after a 28-day concrete cure for best chemical penetration and color development.
5. Integral Colored Concrete Sidewalk
Integral color mixes pigment directly into the concrete before pouring — color runs through the full slab depth, not just the surface. Chips, scratches, and surface wear expose the same color underneath, eliminating visible wear marks over time.
Cost: $9–$17/sq ft ($97–$183/m²) — adds $2–$5/sq ft over plain
Best for: All residential styles. Front walkways matching brick, stone, or stucco home exteriors.
Color options: Buff, tan, brown, charcoal, red, terracotta, grey blends — 30+ standard pigment options available
Integral color fades with UV exposure over 10–15 years. A UV-stabilized sealer applied every 3 years significantly extends color vibrancy. Specify iron oxide pigments (not organic dyes) for outdoor applications — iron oxides are UV-stable and maintain color twice as long. Match the integral color to the home’s masonry or roofing material for a cohesive exterior palette.
6. Engraved / Saw-Cut Pattern Sidewalk
Concrete engraving uses diamond-tipped cutting tools to carve geometric patterns, borders, logos, or custom designs into existing cured concrete. It is one of the few decorative options applicable to already-poured slabs — no replacement required.
Cost: $10–$18/sq ft ($108–$194/m²)
Best for: Renovation projects. Geometric and contemporary-style homes. Adding visual detail to plain existing sidewalks without full replacement.
Design options: Grid patterns, diamond layouts, borders, custom artwork, tile simulations, compass roses, address numbers
Engraving deepens control joints and saw cuts into decorative features rather than functional cracks — a practical renovation approach. Fill engraved lines with color hardener or contrasting stain for high visual contrast. Engraving works on any slab 28 days or older, provided the concrete is structurally sound and not extensively cracked.
7. Stenciled Concrete Sidewalk
Stenciling applies disposable paper or plastic stencils to freshly poured concrete before broadcasting a dry-shake color hardener over the exposed sections. Removing the stencil reveals a pattern in the color hardener surrounded by grey concrete — mimicking mortared stone or brick at significantly lower cost than stamping.
Cost: $8–$14/sq ft ($86–$150/m²)
Best for: Budget-conscious decorative projects. Homes wanting brick or stone appearance without stamped concrete cost.
Available patterns: Running bond brick, ashlar stone, slate, tile, cobblestone — same range as stamped patterns
Stenciling costs 20–30% less than stamped concrete for similar visual effects because disposable stencils cost less than rubber stamp mats. The tradeoff is slightly less three-dimensional texture depth compared to stamping. Stenciled concrete seals and maintains the same way as stamped concrete.
8. Geometric Pattern Concrete Sidewalk
Geometric sidewalks use cast concrete pavers in squares, rectangles, hexagons, or custom polygons set in planned layouts with deliberate joint spacing. Unlike poured slabs, geometric paths use individual precast units that allow pattern variation, color mixing, and modular replacement.
Cost: $12–$22/sq ft ($129–$237/m²) installed
Best for: Modern, contemporary, minimalist, and mid-century homes. Front yards, garden pathways, courtyard entries.
Popular shapes: 12×12 in (305×305 mm) squares, large-format 24×24 in (610×610 mm) slabs, hexagonal stepping stones, mixed rectangular layouts
Large-format concrete slabs (24×24 in / 610×610 mm or larger) set on a compacted gravel base with wide grass or gravel joints create a modern stepping-stone path at lower material cost than full-coverage concrete. This design also allows water infiltration between units — improving drainage near foundations.
9. Cobblestone-Look Concrete Sidewalk
Cobblestone-pattern concrete uses stamped mats cast from real cobblestone molds to produce the irregular rounded shapes and texture of historic European-style paving. The result costs 60–70% less than genuine granite cobblestone installation, which runs $25–$45/sq ft ($269–$484/m²) for materials alone.
Cost: $12–$18/sq ft ($129–$194/m²) for stamped cobblestone
Best for: Tudor, Victorian, colonial revival, and historic-district homes. Front entries, courtyard paths, entrance columns.
Cobblestone stamps produce the highest visual impact of any stamped finish — the irregular pattern and deep relief create a convincingly authentic appearance. Pair cobblestone stamping with charcoal or antiquing release agents applied before stamping to accentuate the relief depth. Avoid cobblestone patterns on steep slopes — the irregular texture creates trip hazards at grade changes above 5% incline.
10. Flagstone-Pattern Concrete Walkway
Flagstone-pattern concrete stamps replicate the irregular, organic shapes of natural flagstone at a fraction of the installed cost. Natural flagstone installs at $15–$30/sq ft ($161–$323/m²). Stamped flagstone concrete runs $10–$18/sq ft ($108–$194/m²) with better structural uniformity and no loose stone edges.
Cost: $10–$18/sq ft ($108–$194/m²)
Best for: Craftsman, cottage, farmhouse, and natural-landscape homes. Front yard paths winding through garden beds.
Color combinations: Sandstone tan with charcoal release, slate grey with brown antiquing, buff with terracotta borders
The flagstone pattern works best on curved or winding walkway layouts — the irregular stone shapes visually reinforce the organic path shape. Straight runs of flagstone pattern look less natural. Add a contrasting border in a complementary color to define the path edge and prevent the pattern from visually merging with surrounding landscape materials.
11. Wood Plank Concrete Sidewalk
Wood plank concrete stamping replicates the look of deck boards or railway sleepers using linear stamp mats that create board width, grain texture, and joint lines. The result delivers wood aesthetics with concrete’s 25–50-year lifespan and zero rot, splinter, or termite risk.
Cost: $12–$20/sq ft ($129–$215/m²)
Best for: Coastal, farmhouse, modern rustic, and tropical-style homes. Front paths, backyard garden walks, pool approaches.
Color options: Cedar brown, weathered grey, redwood, dark walnut — all achievable with integral color plus antiquing release agents
Wood plank stamps run in one direction, so path orientation affects appearance. Boards running perpendicular to travel direction create a deliberate, deck-like crossing effect. Boards running parallel create a linear runway appearance. Both work — the choice depends on path width and direction relative to the home facade.
12. Concrete Sidewalk with Decorative Border
A border accent uses contrasting color, pattern, or texture on the outer 6–12 inches (150–305 mm) of the sidewalk to frame the main walking surface. Borders cost less than full decorative treatment — only the edge sections receive the premium finish while the main field uses plain or broom-finish concrete.
Cost: $9–$15/sq ft ($97–$161/m²) average — higher-cost finish only on border sections
Best for: Any home that wants decorative impact on a moderate budget. Front walkways, patio connections, driveway aprons.
Border combinations: Plain grey field with charcoal stamped brick border; buff integral color field with dark brown engraved border; exposed aggregate field with smooth colored edge
A 2-color border system uses darker color on the outer 8–12 inches and lighter color on the main field. This design defines the walkway’s edges visually — important on wide driveways where the path boundaries otherwise blend into the surrounding concrete. Border accents also serve a practical function: edge sections stay cleaner than field sections because foot traffic concentrates in the center.
13. Curved Concrete Walkway
Curved concrete walkways use flexible form boards to create flowing, non-linear paths that guide foot traffic organically through landscape features. Straight sidewalks are functional. Curved paths create a welcoming, garden-integrated approach that transforms front yard landscaping.
Cost: $10–$18/sq ft ($108–$194/m²) — 15–20% higher than straight runs due to complex forming
Best for: Cottage, craftsman, English garden, and informal landscape styles. Front yards with significant planting beds or mature trees.
Width recommendation: 36–48 inches (915–1220 mm) minimum for curved residential paths to maintain comfortable two-person passage
Curved forms require flexible 1/4-inch (6 mm) bending plywood or fiber form boards rather than standard lumber. Tight curves (radius under 3 ft / 0.9 m) need relief cuts on the form boards every 6 inches (150 mm). Wider curves (5 ft / 1.5 m radius and above) form more easily and produce more elegant, natural-looking paths. Avoid S-curves in short walkway runs — they read as forced rather than organic.
14. Concrete Stepping Stone Path
Concrete stepping stones place individual cast slabs at regular intervals through lawn, gravel, or ground cover plantings — creating a defined path without full-coverage concrete. The open joints between stones allow full water infiltration and lawn growth, preserving drainage around foundations.
Cost: $6–$14/sq ft ($65–$150/m²) of path coverage — lower material volume reduces total cost
Best for: Informal, garden, and landscape-integrated paths. Side yards, garden beds, lawn connections to outbuildings.
Standard stepping stone spacing: 18–24 inches (457–610 mm) on-center, measured from stone center to stone center — matches natural walking stride
Cast-in-place stepping stones pour directly in the ground without forms — excavate 4 inches (100 mm), compact base, pour and finish each stone individually. Precast stepping stones purchase as standard products and set on a 1-inch (25 mm) compacted sand bed. Precast stones run $3–$8 each for basic shapes, $12–$30 for decorative cast options. Cast-in-place options allow custom shapes, sizes, and exposed aggregate finishes.
15. Resurfaced Concrete Overlay Sidewalk
Concrete resurfacing applies a 1/4 to 1/2 inch (6–13 mm) polymer-modified cement overlay over existing structurally sound but cosmetically worn concrete. It restores appearance, improves texture, and extends surface life by 10–15 years at a fraction of replacement cost.
Cost: $3–$9/sq ft ($32–$97/m²) — 50–75% less than full sidewalk replacement
Best for: Existing sidewalks that are structurally intact but have surface scaling, minor cracking, staining, or outdated appearance.
Overlay options: Smooth trowel finish, broom texture, decorative microtopping, stamped overlay, spray texture
Resurfacing is not a structural repair. It conceals cosmetic damage only. Sidewalks with cracked sections deeper than 1/2 inch (13 mm), heaved panels, or base failure need replacement before resurfacing. Test the existing slab with a hammer — hollow sounds indicate delamination that causes overlays to fail within 1–2 years. A properly bonded overlay on a sound slab outperforms many homeowners’ expectations for cost-to-value ratio.
How to Choose the Right Concrete Sidewalk Design
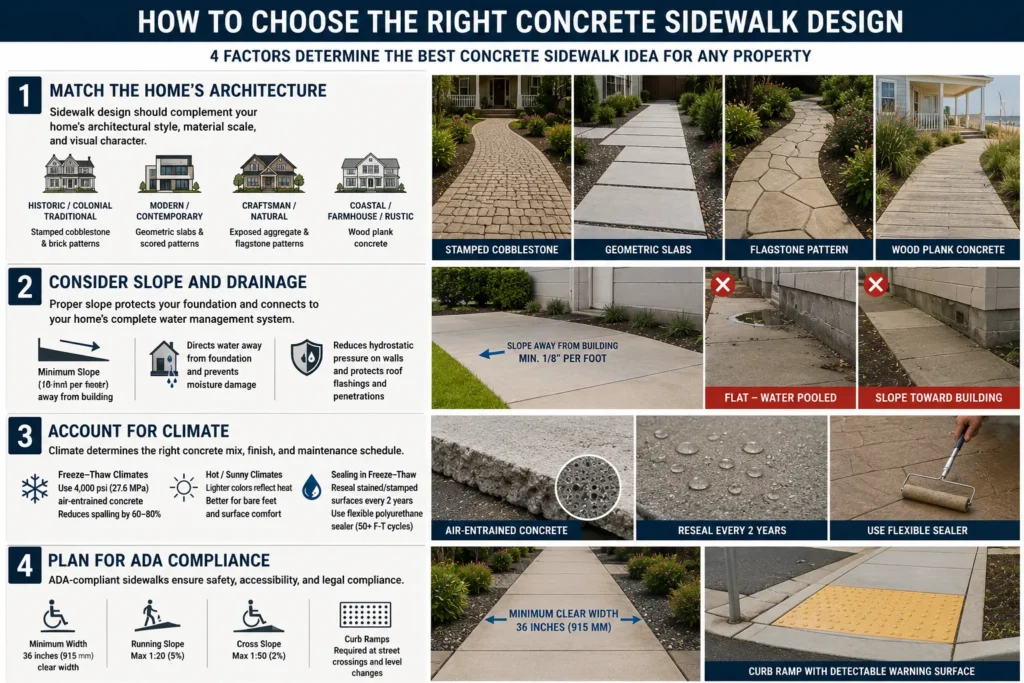
4 factors determine the best concrete sidewalk idea for any property:
1. Match the Home’s Architecture
Stamped cobblestone and brick patterns suit historic, colonial, and traditional homes. Geometric slabs and scored patterns match modern and contemporary architecture. Exposed aggregate and flagstone patterns complement craftsman and natural-landscape styles. Wood plank concrete fits coastal, farmhouse, and rustic homes.
Mismatched sidewalk design undermines curb appeal. A sleek geometric concrete path in front of a Victorian cottage looks jarring. Match the sidewalk material weight and texture to the home’s visual scale — heavy stone patterns for heavy masonry homes, lighter organic patterns for wood-frame and garden-style properties.
2. Consider Slope and Drainage
Every concrete sidewalk requires minimum 1/8-inch per foot (10 mm per meter) slope away from the building foundation. Flat or reverse-sloped sidewalks concentrate water against foundation walls, causing efflorescence, basement moisture, and accelerated wall damage.
Drainage from sidewalks connects directly to the performance of roof drainage systems. Water that cannot move away from the foundation at grade level creates persistent hydrostatic pressure on walls — pressure that eventually reaches roof flashings and wall penetrations. A properly sloped sidewalk is one layer of a complete exterior water management system.
3. Account for Climate
In freeze-thaw climates, specify 4,000 psi (27.6 MPa) air-entrained concrete for all outdoor sidewalks. Air entrainment creates microscopic bubbles that absorb expansion pressure during freezing, reducing surface spalling by 60–80%. Standard 3,500 psi non-air-entrained concrete spalls rapidly through Northern US and Canadian winters.
Stained and stamped surfaces in freeze-thaw climates need resealing every 2 years — not 3–5 years — because freeze-thaw cycling degrades acrylic sealers faster than in mild climates. Use a flexible polyurethane sealer rather than rigid acrylic in climates with 50+ freeze-thaw cycles annually.
4. Plan for ADA Compliance
Public-facing sidewalks must meet ADA (Americans with Disabilities Act) requirements: minimum 36-inch (915 mm) clear width, maximum 2% cross slope, maximum 5% running slope, and detectable warning surfaces at street crossings. Non-compliant sidewalks on commercial properties create liability exposure and require costly retrofitting.
Residential private sidewalks have no federal ADA mandate but local codes may impose accessibility requirements. Check municipal standards before pouring — some cities require permits that enforce ADA dimensions on residential walkways adjacent to public rights-of-way.
Concrete Sidewalk Installation: What to Expect
A standard 4-inch residential concrete sidewalk installs in 5 stages:
- Site preparation — Excavate 6–8 inches (150–200 mm) below finished grade. Remove roots, organic material, and unstable soil. Grade to establish drainage slope.
- Base installation — Compact 4 inches (100 mm) of crushed gravel or compacted subgrade. Use a plate compactor to reach 95% Proctor density before forming.
- Forming — Set 2×4 or 2×6 lumber forms at finished grade elevation. Straight runs use standard lumber. Curves require flexible bending forms or kerfs cut at 6-inch (150 mm) intervals.
- Concrete placement — Pour and screed to form height. Finish surface within the concrete’s working window — typically 2–4 hours depending on temperature and mix design.
- Curing and cutting — Apply curing compound immediately after finishing. Cut control joints every 6–8 ft (1.8–2.4 m) within 24 hours of pour. Do not load the surface for 7 days; full strength develops at 28 days.
Decorative finishes — stamping, stenciling, and aggregate exposure — all occur during the finishing window between pour and initial set. Timing is critical: stamp too early and the pattern blurs; stamp too late and the mat leaves incomplete impressions. Experienced crews work in small sections on hot days to keep the concrete workable.
Concrete Sidewalk Maintenance: 5 Rules
- Seal every 3–5 years — Penetrating silane-siloxane sealers protect plain and broom-finish concrete. Acrylic sealers maintain gloss and color on stamped and stained surfaces. Sealing costs $1–$3/sq ft ($11–$32/m²) applied.
- Fill cracks within the first season — Hairline cracks (under 1/4 inch / 6 mm) fill with polyurethane sealant before water infiltration widens them through freeze-thaw cycling. Early crack repair costs $50–$200. Delayed repair leads to panel replacement at $500–$2,000+.
- Inspect control joints annually — Joint sealant compresses and bonds over time. Re-routing and resealing open joints costs $1–$2 per linear foot — far less than allowing water infiltration to erode the base beneath.
- Avoid de-icing salts — Sodium chloride and calcium chloride accelerate surface scaling on concrete. Use sand for traction in winter. If de-icers are necessary, use potassium acetate or magnesium chloride — both cause less concrete damage than sodium chloride.
- Maintain drainage clearance — Keep landscape plantings back 12 inches (305 mm) from sidewalk edges. Root intrusion lifts and cracks sidewalk panels within 5–10 years of planting. Address standing water near sidewalk sections immediately — pooling indicates drainage failure that accelerates base erosion and slab settlement.
The same maintenance discipline that extends concrete sidewalk life applies to the full exterior building envelope. Roof maintenance inspections cover flashing, drainage, and surface sealing on the same schedule — inspecting sidewalks and roof drainage in the same seasonal pass catches related water management failures efficiently.
6 Concrete Sidewalk Mistakes to Avoid
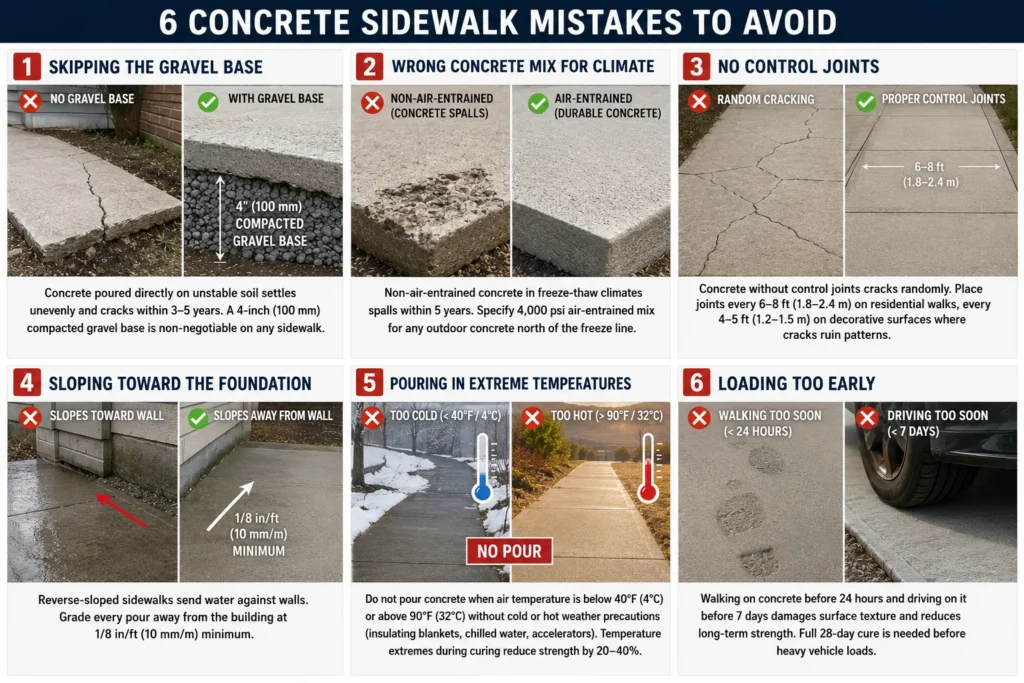
- Skipping the gravel base — Concrete poured directly on unstable soil settles unevenly and cracks within 3–5 years. A 4-inch (100 mm) compacted gravel base is non-negotiable on any sidewalk.
- Wrong concrete mix for climate — Non-air-entrained concrete in freeze-thaw climates spalls within 5 years. Specify 4,000 psi air-entrained mix for any outdoor concrete north of the freeze line.
- No control joints — Concrete without control joints cracks randomly. Place joints every 6–8 ft (1.8–2.4 m) on residential walks, every 4–5 ft (1.2–1.5 m) on decorative surfaces where cracks ruin patterns.
- Sloping toward the foundation — Reverse-sloped sidewalks send water against walls. Grade every pour away from the building at 1/8 in/ft (10 mm/m) minimum.
- Pouring in extreme temperatures — Do not pour concrete when air temperature is below 40°F (4°C) or above 90°F (32°C) without cold or hot weather precautions (insulating blankets, chilled water, accelerators). Temperature extremes during curing reduce strength by 20–40%.
- Loading too early — Walking on concrete before 24 hours and driving on it before 7 days damages surface texture and reduces long-term strength. Full 28-day cure is needed before heavy vehicle loads.
Final Thoughts
15 concrete sidewalk ideas exist — from a $7/sq ft broom finish to a $25/sq ft stained custom path. The right choice depends on budget, home style, climate, and how the path integrates with the rest of the landscape.
Plain broom finish works for every home. Stamped concrete delivers the most visual transformation per dollar. Exposed aggregate lasts the longest with the least maintenance. Resurfacing rehabilitates existing slabs at the lowest cost.
Every concrete sidewalk project should address slope and drainage as a non-negotiable foundation — not an afterthought. A sidewalk that drains away from the building protects the foundation, the walls, and the roof flashing systems above it. Water management starts at grade and runs all the way to the ridge.
Define the budget and architectural style first. Then match the finish. Build it right — proper base, correct mix design, timely sealing — and a concrete sidewalk returns full value for 30+ years.




