

Rebaring in concrete means placing steel reinforcing bars (rebar) inside concrete before or after a pour to resist tensile forces that concrete alone cannot handle. Steel rebar gives concrete structures the combined strength to carry compression, tension, and bending loads without cracking or failing.
Concrete compressive strength reaches 4,000 PSI (27.6 MPa) at 28 days, but tensile strength sits at just 400–600 PSI (2.8–4.1 MPa). Rebar compensates for that 10:1 weakness ratio and keeps slabs, footings, and walls intact under real-world loads.
What Rebaring in Concrete Does to Structural Performance
Rebar transfers tensile and shear forces from the concrete to the steel, preventing brittle fracture. Concrete and steel expand and contract at virtually the same rate — approximately 0.0000065 per degree Fahrenheit (0.0000117 per degree Celsius) — so the two materials work together without separating during temperature changes.
Rebaring in concrete serves 3 structural functions:
- Primary reinforcement — carries the main structural loads: gravity, live loads, and lateral forces from wind or soil pressure.
- Secondary (distribution) reinforcement — limits cracking from shrinkage and temperature change across the full slab surface.
- Confinement reinforcement — surrounds columns and beams to prevent explosive spalling under compression failure.
Without primary reinforcement, a 4-inch (10 cm) concrete driveway slab under a 6,000-pound (2,722 kg) vehicle can crack within months of placement.
6 Types of Rebar Used in Concrete Reinforcement
Selecting the correct rebar type for your project determines long-term durability. The 6 main rebar types differ in material, coating, and corrosion resistance.
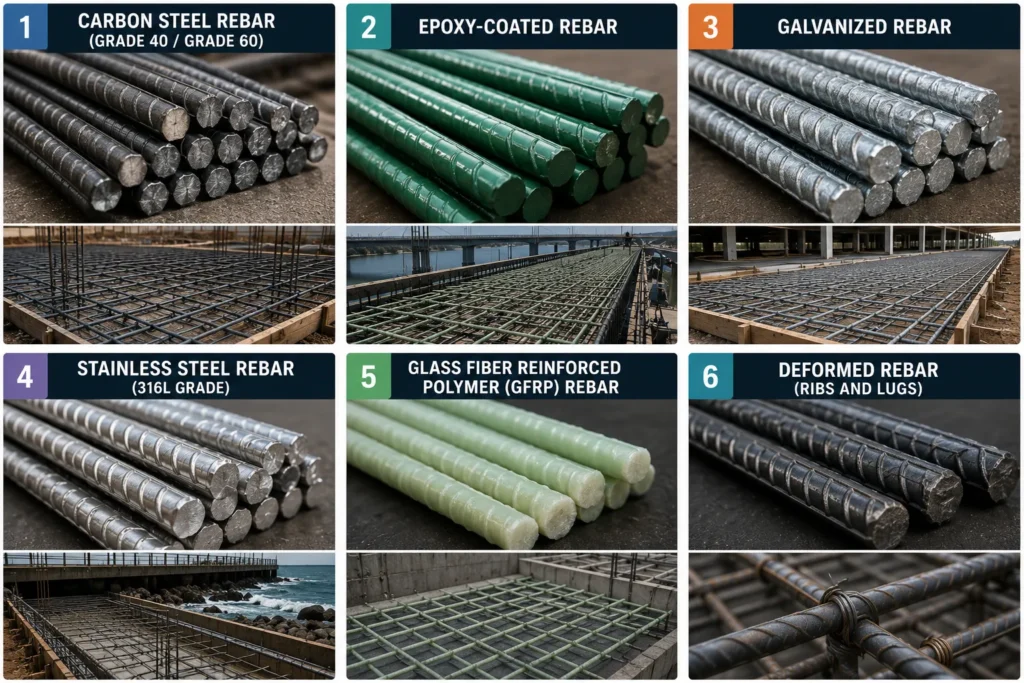
- Carbon steel rebar (Grade 40 / Grade 60) — the standard for most residential and commercial concrete. Grade 60 has a minimum yield strength of 60,000 PSI (414 MPa). Most slabs, footings, and walls use Grade 60 per ACI 318.
- Epoxy-coated rebar — carbon steel with a fusion-bonded epoxy coating. Used in bridge decks, parking structures, and coastal foundations where chloride exposure causes corrosion.
- Galvanized rebar — hot-dip zinc coating provides moderate corrosion resistance at lower cost than epoxy. Used in concrete flatwork exposed to deicing salts.
- Stainless steel rebar (316L grade) — the most corrosion-resistant option. Used in marine structures, seawalls, and chemical plants. Costs 6–8 times more than carbon steel.
- Glass Fiber Reinforced Polymer (GFRP) rebar — non-metallic, fully corrosion-proof. Used in MRI rooms, chemical containment slabs, and marine decking where steel rusting is unacceptable.
- Deformed rebar — the surface deformation type (ribs and lugs) applied to carbon, epoxy, or galvanized bars. Deformations increase mechanical bond with concrete by 30–50% compared to smooth bar.
For residential concrete work driveways, patios, footings Grade 60 deformed carbon steel rebar is the correct choice in most climates. Check with a structural engineer for coastal, freeze-thaw, or chemically aggressive environments.
Rebar Sizes for Rebaring in Concrete: Which Bar Number to Choose
Rebar bar numbers identify diameter in eighths of an inch. A #4 bar measures 4/8 inch = 1/2 inch (13 mm) in diameter. The table below guides bar selection by project type.
Quick Reference: Rebaring in Concrete by Project Type
| Task | Rebar Size | Spacing | Cover Depth | Difficulty |
| 4-in (10 cm) patio/sidewalk slab | #3 (3/8 in / 10 mm) | 12 in (30 cm) OC grid | 1.5 in (38 mm) | Easy |
| Driveway / garage floor | #4 (1/2 in / 13 mm) | 12 in (30 cm) OC grid | 2 in (51 mm) | Moderate |
| Residential footing | #5 (5/8 in / 16 mm) | Linear, 18 in (46 cm) apart | 3 in (76 mm) | Moderate |
| Foundation wall | #5 (5/8 in / 16 mm) | 12 in (30 cm) vertical | 2 in (51 mm) | Hard |
| Retaining wall | #5–#6 (5/8–3/4 in / 16–19 mm) | 12 in (30 cm) OC | 2.5 in (64 mm) | Hard |
| Commercial slab | #6+ (3/4 in+ / 19 mm+) | Engineer-specified | 2 in (51 mm) min | Pro Only |
Bar size directly affects cost. #3 rebar (3/8 in / 10 mm) runs $0.30–$0.45 per linear foot, while #5 rebar (5/8 in / 16 mm) costs $0.55–$0.80 per linear foot. Use the concrete cost calculator to factor rebar reinforcement into your total project budget.
How Rebar Grade Affects Structural Strength
To select the correct rebar grade, match the grade to your design load. Grade 40 yields at 40,000 PSI (276 MPa) and suits light residential work. Grade 60 yields at 60,000 PSI (414 MPa) and is the minimum for structural slabs, footings, and walls per ACI 318 Section 20.2.1.3.
Reducing bar spacing by one step — from 18 inches (46 cm) to 12 inches (30 cm) — increases steel area by 50%, giving significantly more crack resistance without upgrading to a higher grade.
When #3 Rebar Is Sufficient vs. When You Need #5
#3 rebar (3/8 in / 10 mm) is sufficient for 4 project types:
- Sidewalks and garden paths with pedestrian-only traffic
- Patios under 100 sq ft (9.3 m²) on well-compacted gravel sub-base
- Non-structural landscape walls under 24 inches (61 cm) tall
- Pool shells where engineers specify #3 at 12 inches (30 cm) OC
#5 rebar (5/8 in / 16 mm) is required for 3 project types:
- Residential footings supporting load-bearing walls or columns
- Concrete foundation walls over 4 feet (1.2 m) tall
- Retaining walls holding back soil with a surcharge load (parked vehicles, stored materials)
How to Install Rebaring in Concrete: 7 Steps from Layout to Pour
To install rebaring in concrete, follow these 7 steps in sequence. Skipping any step — especially cover depth placement — reduces structural performance and triggers inspection failures.
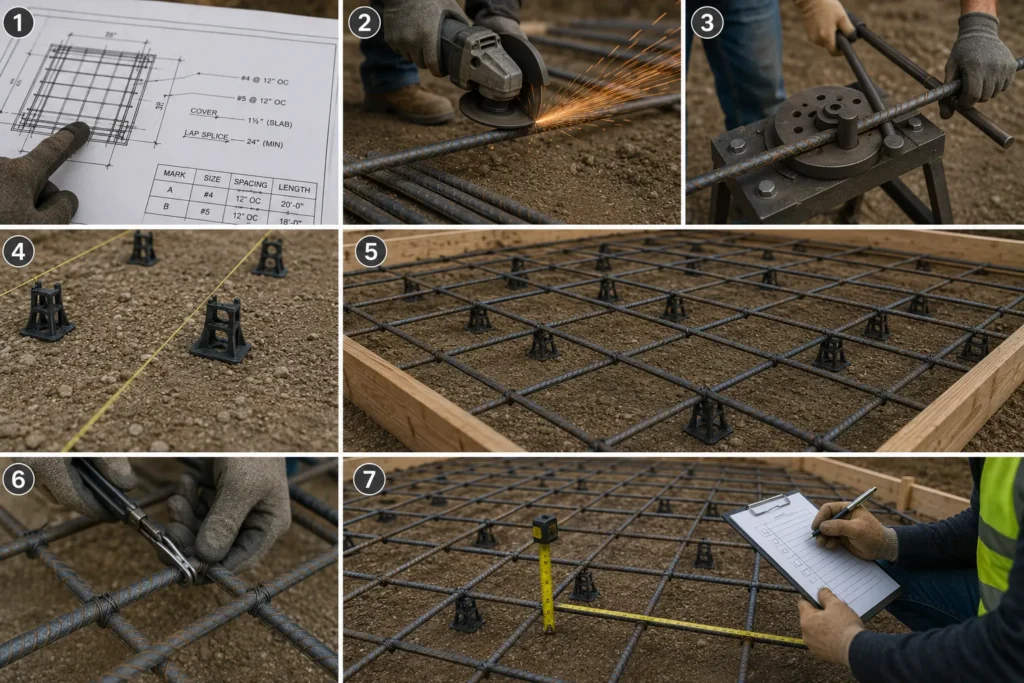
- Read the engineering drawings. Locate bar size (#), spacing (in/cm), cover depth (in/mm), and lap splice lengths before touching any steel.
- Cut rebar to length. Use a rebar cutter or angle grinder for bars up to #5 (16 mm). For bars #6 (19 mm) and larger, use a hydraulic shear. Cut ends flush — no jagged protrusions within 1 inch (25 mm) of formwork edges.
- Bend rebar at corners and hooks. Use a manual or electric bar bending jig. 90-degree hooks require a minimum bend radius of 3 bar diameters per ACI 318 — that is 1.5 inches (38 mm) for #4 bar (13 mm).
- Place rebar chairs (dobies) on the sub-base. Set plastic chairs at 36–48 inches (91–122 cm) on center. Chair height matches required cover depth — 1.5 inches (38 mm) for slabs, 3 inches (76 mm) for footings.
- Lay and position the rebar grid. Start 1 bar-spacing from each formwork edge. Place bars at right angles for grid work. For a 4-inch (10 cm) slab at 12 inches (30 cm) OC, the rebar ends up 2–3 inches (51–76 mm) from each side face.
- Tie all intersections with tie wire. Twist wire snug at every bar crossing using tie pliers or a rebar tying tool (Makita RTF300 or Max RB401). Snug — not bone-tight — prevents bar distortion. Lap splices need 3 ties: at both ends and the middle.
- Inspect before the pour. Walk the grid. Check cover depth, spacing, lap lengths, and chair stability. Correct any loose ties or shifted chairs. Concrete is unforgiving once it flows.
For structural walls with reinforcement on both faces, see the concrete wall calculator to determine exact bar quantities and total concrete volume before placing your order.
How to Achieve Correct Concrete Cover Over Rebar
To achieve correct concrete cover, set rebar chairs at the depth specified in the drawing. Cover is the distance from the outer face of the rebar to the outer surface of the concrete. ACI 318 Table 20.6.1.3.1 sets minimum cover at:
- Slabs and walls not exposed to weather: 3/4 inch (19 mm) minimum
- Slabs exposed to weather, freeze-thaw, or deicers: 1.5 inches (38 mm)
- Footings cast against soil: 3 inches (76 mm)
- Concrete exposed to seawater: 2 inches (51 mm) for #5 and smaller, 2.5 inches (64 mm) for #6 and larger
Rebar that contacts the ground corrodes within 3–10 years. Corrosion products expand to 6 times the volume of the original steel, spalling the concrete from the inside.
How to Tie Rebar Correctly for a Concrete Pour
To tie rebar correctly, cut an 8-inch (20 cm) length of 16-gauge tie wire. Pass the wire under the bar intersection. Twist the wire 2.5 turns with tie pliers to lock both bars together. Fold the twisted tail flat toward the center of the slab never toward the formwork face, as wire tails at the surface cause rust staining. Space ties at every intersection for slabs under 500 sq ft (46 m²). For larger slabs, tie every other intersection in a checkerboard pattern.
Rebar Spacing Rules for Rebaring in Concrete Slabs and Footings
Rebar spacing determines how evenly the concrete distributes load and resists cracking. Increasing spacing by 50% reduces the effective steel area by 33% the equivalent of dropping one bar size.
ACI 318 Section 7.7.2 sets maximum bar spacing for non-prestressed slabs at 3 times the slab thickness or 18 inches (46 cm), whichever is less. In practice:
- 4-inch (10 cm) residential slab: 12 inches (30 cm) OC in both directions — the most common specification
- 5–6-inch (13–15 cm) structural slab: 18 inches (46 cm) OC is acceptable; 12 inches (30 cm) OC recommended for vehicle loads
- Footing, linear: 2 bars minimum in the bottom of each footing, placed 3 inches (76 mm) from each side face
- Foundation wall: vertical bars at 12 inches (30 cm) OC, horizontal bars at 12–18 inches (30–46 cm) OC depending on wall height and soil pressure
When you modify spacing from 12 to 18 inches (30 to 46 cm), material cost drops by 33%, but you add risk. Consult ACI 318 or a structural engineer before widening spacing on any load-bearing element.
How Rebaring in Concrete Applies to Roof Decks and Parapet Walls
Rebaring applies directly to flat roof construction. Concrete roof decks, parapet walls, and chimney bases all require steel reinforcement to survive thermal cycling, wind loads, and water infiltration pressure.
Parapet walls — the upright concrete edges at flat roof perimeters — are among the most common places for cracking due to inadequate rebaring. A 12-inch (30 cm) tall parapet wall needs minimum #4 (13 mm) vertical bar at 12 inches (30 cm) OC with a horizontal #3 (10 mm) tie at top and bottom to prevent the wall from splitting vertically under wind pressure.
Before cutting into any concrete parapet or roof deck for penetrations or repairs, review cutting concrete safely, cutting within 12 inches (30 cm) of a structural wall risks severing reinforcing bars and triggering structural damage that costs $10,000–$50,000 to repair.
Rebar for Concrete Tile Roof Structures
Concrete tile roofing weighs 9–12 pounds per square foot (44–59 kg/m²) — up to 4 times heavier than asphalt shingles. Roof framing and the concrete deck below must carry that load without deflection. On retrofit installations, a structural engineer verifies the deck reinforcement before concrete tiles go on.
New-build roof decks in seismic zones (California, Oregon, Nevada) require special reinforcing details including continuous top and bottom steel at all openings and additional diagonal bars at re-entrant corners.
Common Rebaring in Concrete Mistakes and How to Avoid Them
4 installation errors cause most rebar-related concrete failures:
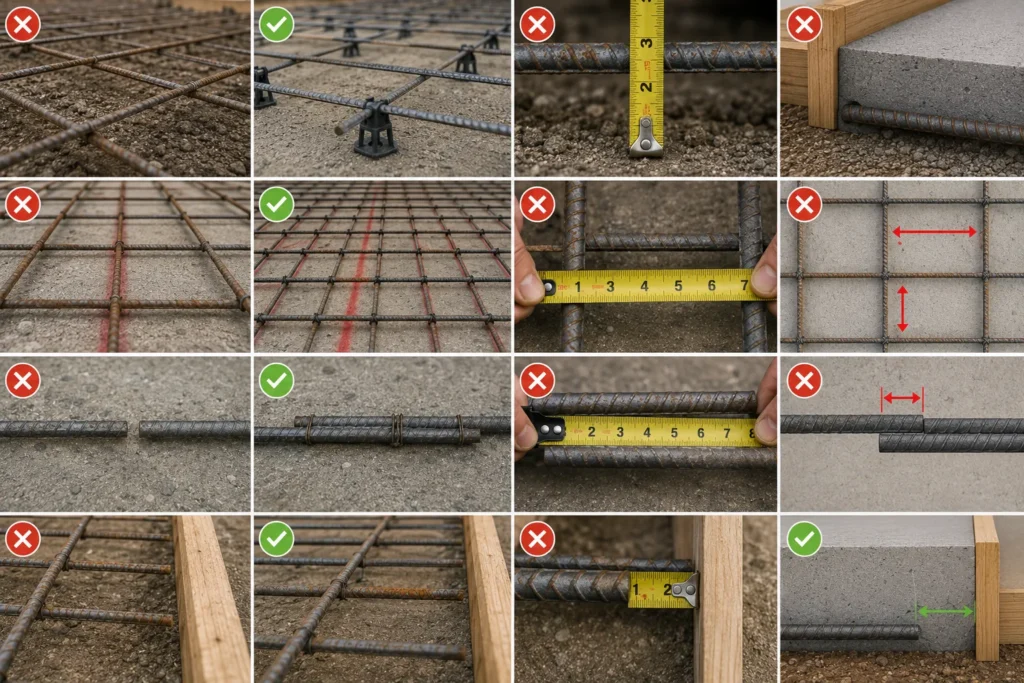
- Rebar sitting on the ground. Rebar without chairs rests on the sub-base and ends up in the bottom 1 inch (25 mm) of the slab. Corrosion starts within 5 years. Fix: always use plastic chairs at 36-inch (91 cm) spacing.
- Spacing errors of 5–10%. Placing bars at 5-inch (12.7 cm) spacing instead of the specified 4-inch (10.2 cm) spacing reduces slab strength by 20%. Fix: measure and mark spacing with a tape before placing any bar.
- Skipping lap splices. Bars must overlap by a minimum of 24 bar diameters — that is 12 inches (30 cm) for #4 bar (13 mm). Butt-spliced bars with no overlap carry zero tension at the joint. Fix: reference ACI 318 Table 25.5.2.1 for Class A and Class B splice lengths.
- Rebar too close to formwork faces. Bar ends within 1 inch (25 mm) of the form face rust and stain the concrete surface. Fix: leave 1.5 inches (38 mm) minimum between bar ends and any formwork face.
Plan Your Rebaring in Concrete Project Correctly
Rebaring in concrete is the single most effective way to prevent cracking, settlement, and structural failure in slabs, footings, walls, and roof decks. Match bar size to project type, set cover depth with chairs, space bars per ACI 318 guidelines, and tie every intersection before the concrete truck arrives.
Roofing and concrete structures intersect on flat roofs, parapet walls, and chimney bases more often than most homeowners expect. Rainy Roofers works with concrete and roofing elements on every project type. Use the concrete cost calculator to price your reinforcement and concrete in one step or contact Rainy Roofers for an on-site assessment of your slab, footing, or roof deck project.




