
Concrete polishing is a mechanical grinding process that refines a concrete floor with diamond abrasives, starting at 30 grit and finishing at 800 to 3,000 grit, until the surface holds a measurable shine. A densifier hardens the slab between grinding stages, and a stain guard protects the finish at the end. The full process takes 2 to 5 days for a typical 1,000-square-foot (93-square-meter) floor.
That’s the short version. The longer version decides whether your floor lasts 20 years or fails in 2. This guide covers the complete process, real 2026 pricing, and the mistakes that ruin most first attempts.
What Is Concrete Polishing?
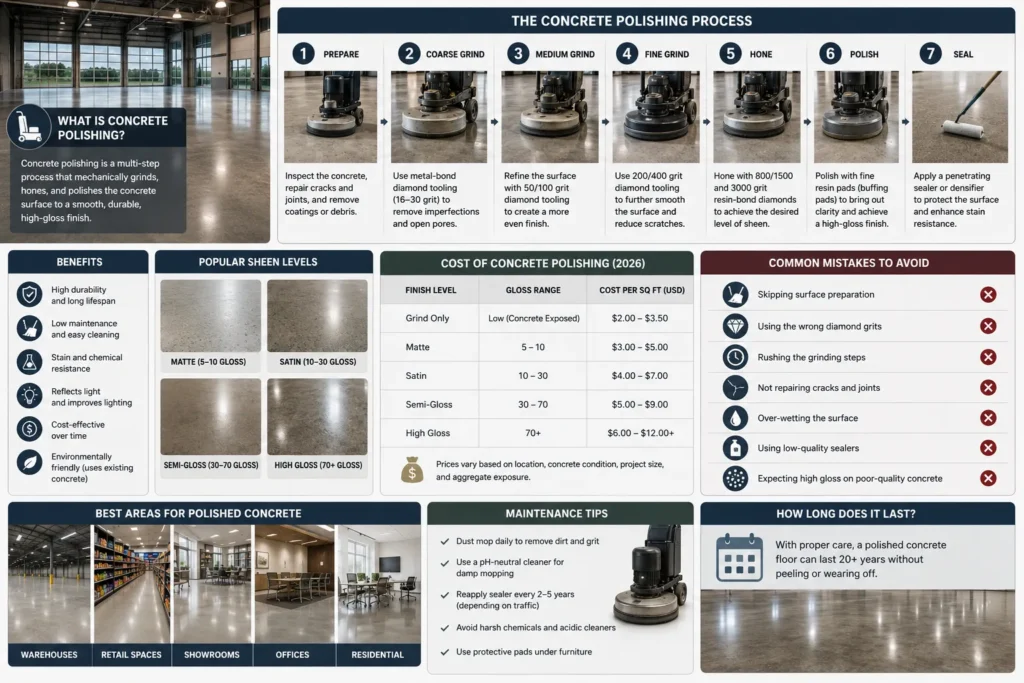
Concrete polishing is the progressive grinding, honing, and buffing of a concrete surface with bonded diamond tooling until it reaches a specified gloss level. The Concrete Polishing Council (CPC), part of the American Society of Concrete Contractors (ASCC), defines 4 gloss levels: Level 1 (flat), Level 2 (satin), Level 3 (semi-gloss), and Level 4 (high-gloss). A gloss meter measures the result, and Level 4 floors score 70 or higher on gloss readings.
Polishing changes the concrete itself. Coatings such as epoxy, urethane, and paint sit on top of the slab and peel over time. A polished floor can’t peel because the shine comes from the refined concrete, not from a film.
The process also controls aggregate exposure. Grinding depth determines the look you get: a cream finish shows no stone, a salt-and-pepper finish reveals fine sand particles, and a full-exposure finish displays large aggregate throughout the floor. The CPC classifies these as exposure classes A through D.
5 Benefits of Polished Concrete Floors
Polished concrete floors deliver 5 measurable benefits: long lifespan, low maintenance cost, high light reflectivity, strong abrasion resistance, and improved indoor air quality.
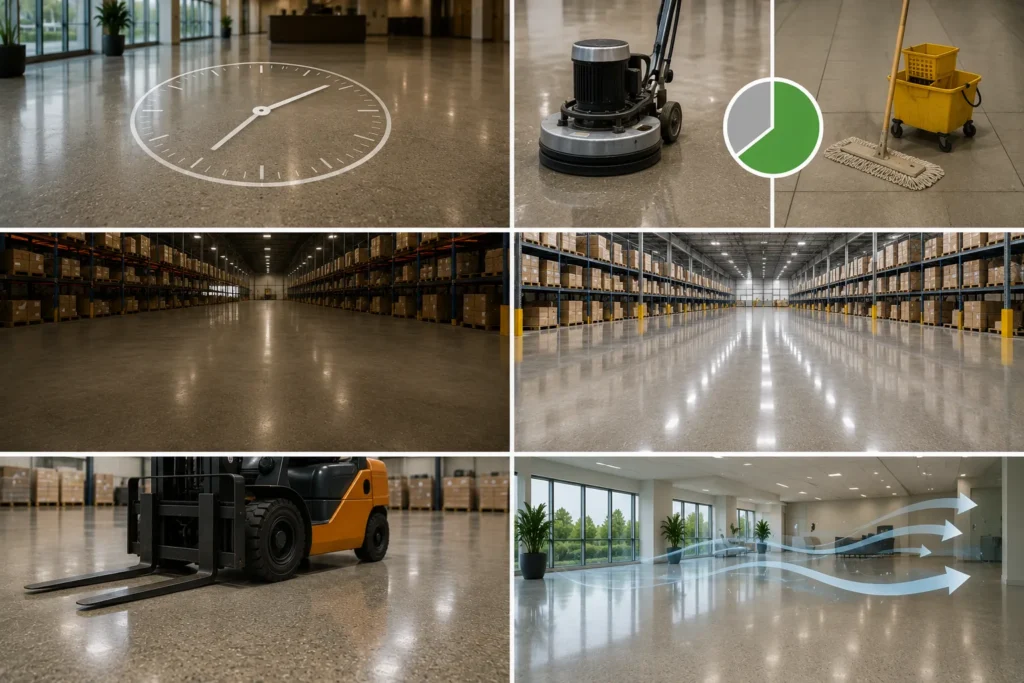
1. Lifespan of 20+ years. Vinyl composition tile (VCT) needs replacement every 8 to 12 years. A polished floor needs occasional re-burnishing, nothing more.
2. Maintenance costs 60% lower than VCT. Polished floors skip the waxing and stripping cycles that eat facility budgets. Dust mopping and periodic auto-scrubbing handle daily care.
3.Light reflectivity up to 30% higher. Warehouses and retail stores cut lighting bills because a Level 3 or Level 4 floor bounces light back into the room.
4.Abrasion resistance for heavy traffic. Densified concrete withstands forklifts weighing 10,000 pounds (4,536 kilograms), pallet jacks, and constant foot traffic without wear patterns.
5.Better indoor air quality. No coatings means no volatile organic compounds (VOCs) off-gassing. Sealed pores also block dusting, a common problem with bare concrete slabs.
These numbers explain why big-box retailers, distribution centers, schools, and hospitals across the USA have switched to polished concrete since the early 2000s.
Test Concrete Hardness Before You Start
Test the slab with a MOHS hardness kit before selecting any diamond tooling. Scratch the surface in 3 separate areas, average the results, and match your diamonds to the score. Soft concrete (MOHS 3-4) needs hard-bond diamonds. Hard concrete (MOHS 6-7) needs soft-bond diamonds. The bond must wear at the right rate to keep fresh diamond segments cutting.
Most failed polishing jobs trace back to skipping this test. Wrong tooling either glazes over on hard slabs and stops cutting, or wears out in hours on soft slabs and wastes hundreds of dollars. A hardness kit costs about $50 and takes 10 minutes to use. Concrete strength also matters here, and slabs rated at 3,000 pounds per square inch (PSI) or higher polish best.
One more requirement: new concrete must cure for at least 28 days before grinding starts.
How to Polish Concrete Floors in 7 Steps
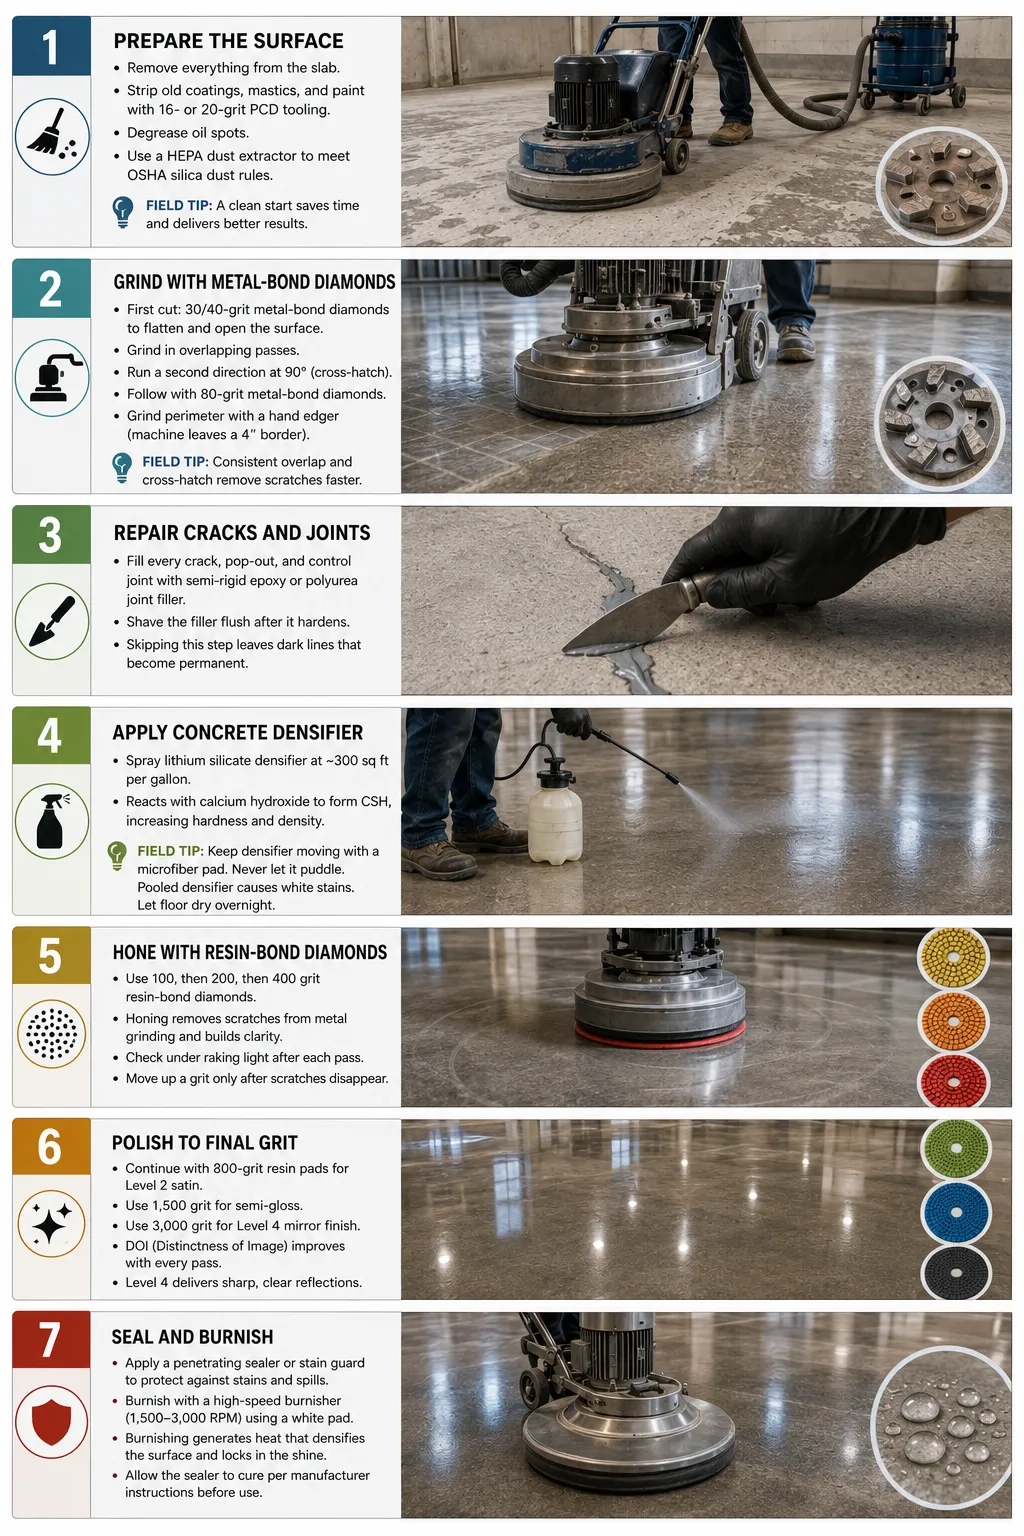
To polish concrete floors, prepare the surface, grind with metal-bond diamonds, repair cracks, apply densifier, hone with resin-bond diamonds, polish to final grit, and seal with stain guard. Each step below includes the exact grit and a field tip.
Step 1: Prepare the Surface
Remove everything sitting on the slab. Strip old coatings, mastics, and paint with 16-grit or 20-grit polycrystalline diamond (PCD) tooling. Degrease oil spots, because grinding pushes oil deeper into the pores where densifier can’t reach. Connect a HEPA dust extractor to your grinder to meet Occupational Safety and Health Administration (OSHA) silica dust rules — Table 1 of the respirable crystalline silica standard requires it on every dry-grinding job in the USA.
Step 2: Grind with Metal-Bond Diamonds
Start the first cut with 30/40-grit metal-bond diamonds on a planetary grinder. This pass flattens the slab and opens the surface. Move in overlapping passes, then run a second direction at 90 degrees — the cross-hatch pattern removes the scratch marks left by the first direction. Follow with 80-grit metal-bond diamonds. Grind the perimeter with a hand edger, since the big machine leaves a 4-inch (10-centimeter) border along walls.
Step 3: Repair Cracks and Joints
Fill every crack, pop-out, and control joint with semi-rigid epoxy or polyurea joint filler. Shave the filler flush after it hardens. Skipping this step leaves dark lines that become permanent once densifier locks the surface.
Step 4: Apply Concrete Densifier
Spray lithium silicate densifier across the floor at roughly 300 square feet (28 square meters) per gallon (3.8 liters). The silicate reacts with calcium hydroxide in the slab and forms calcium silicate hydrate (CSH), the compound that gives concrete its strength. The floor gets harder, denser, and able to take a shine.
Field tip: keep the densifier moving with a microfiber pad and never let it puddle. Pooled densifier dries into white stains that require re-grinding to remove. Let the floor dry overnight before the next step.
Step 5: Hone with Resin-Bond Diamonds
Switch to resin-bond diamonds and run 100 grit, then 200 grit, then 400 grit. Honing removes the scratch pattern from metal grinding and starts building clarity. Check the floor under raking light after each pass, and move up a grit only after the previous scratches disappear.
Step 6: Polish to Final Grit
Continue with 800-grit resin pads for a Level 2 satin finish. Push to 1,500 grit for semi-gloss or 3,000 grit for a Level 4 mirror finish. Distinctness of image (DOI) improves with every pass — at Level 4, overhead lights reflect with sharp, readable edges.
Step 7: Seal and Burnish
Apply a penetrating stain guard to close the remaining pores against oil, wine, and salt. Burnish the floor with a high-speed propane or electric burnisher fitted with a 3,000-grit pad. Burnishing heats the guard into the surface and locks in the final gloss reading.
Wet vs Dry Concrete Polishing
Dry polishing dominates the US market in 2026 because it runs faster, produces no slurry, and allows same-day grit changes. A HEPA vacuum captures the dust, which keeps the jobsite OSHA-compliant and clean enough for occupied buildings.
Wet polishing uses water to cool the diamonds, which extends tooling life and suits very hard slabs above MOHS 7. The tradeoff is slurry — a wet cement waste that crews must collect, contain, and dispose of under local environmental rules. Wet methods also slow the schedule because the floor needs drying time before densifier application.
Most contractors now grind dry through the metal-bond stages and stay dry through resin polishing. Choose wet polishing only if your slab is extremely hard or your tooling budget is tight.
Concrete Polishing Cost in 2026
Concrete polishing costs $3 to $12 per square foot ($32 to $129 per square meter) in the USA in 2026, depending on gloss level, slab condition, and region.
| Finish Level | Grit Range | 2026 Price per Sq Ft |
| Level 1 (flat, cream) | Up to 400 | $3 – $5 |
| Level 2 (satin) | 800 | $4 – $6 |
| Level 3 (semi-gloss) | 1,500 | $5 – $8 |
| Level 4 (high-gloss, full exposure) | 3,000 | $8 – $12 |
Three factors move the price:
1.Slab condition. Coating removal adds $1 to $3 per square foot. Crack repair adds $0.50 to $2 per linear foot.
2.Project size. Jobs above 10,000 square feet (929 square meters) often drop below $3.50 per square foot because setup costs spread out.
3.Region. Coastal metros such as New York, Los Angeles, and Seattle run 20% to 35% above the national average. Southern and Midwest markets sit near the low end.
Compare that with epoxy at $4 to $9 per square foot with a 7-to-10-year life, or VCT at $3 to $7 with recurring wax costs. Polished concrete wins on lifetime cost in almost every commercial scenario.
DIY vs Professional Concrete Polishing
Hire a professional for any floor above 500 square feet (46 square meters) or any job requiring a Level 3 or Level 4 finish. Rental grinders weigh 200 to 400 pounds (91 to 181 kilograms) less than commercial planetary machines, and lighter machines cut slower and leave more visible scratch patterns.
A DIY approach makes sense for a small garage or basement targeting a Level 1 or Level 2 finish. Expect these numbers: grinder rental at $150 to $300 per day, diamond tooling at $200 to $500, densifier at $40 to $60 per gallon, and 3 to 4 full days of labor for a 2-car garage. Total DIY cost lands between $1.50 and $2.50 per square foot — but the finish quality depends entirely on your patience with each grit pass.
Professionals bring gloss meters, 480-volt grinders, and crews that finish the same garage in 1 day. They also carry the insurance that covers a slab if grinding exposes rebar or fails a moisture test.
5 Concrete Polishing Mistakes to Avoid
The 5 most expensive concrete polishing mistakes are skipping grits, letting densifier puddle, ignoring the hardness test, polishing green concrete, and forgetting the stain guard.
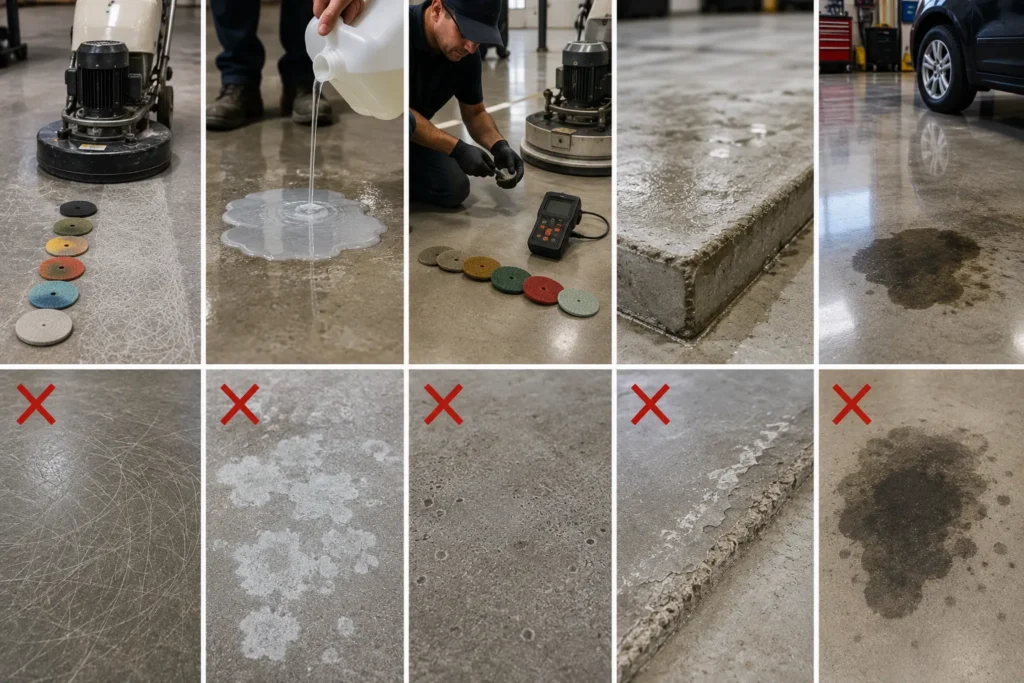
1.Skipping grits. Jumping from 80 to 400 leaves deep scratches sealed under the shine. Every grit must remove the scratch pattern of the previous one.
2.Letting densifier puddle. Pooled silicate dries into white blotches. Fixing them means grinding back to bare concrete and starting over.
3.Ignoring the hardness test. Wrong diamond bonds either stop cutting or wear out in hours. Test first, buy tooling second.
4.Polishing green concrete. Slabs younger than 28 days are too soft to hold a polish, and the finish fades within weeks.
5.Forgetting the stain guard. An unsealed polished floor absorbs oil and acids. One parked car can leave a permanent shadow in the surface.
How to Maintain Polished Concrete
To maintain polished concrete, dust mop daily, auto-scrub weekly with a neutral-pH cleaner, and burnish quarterly. Acidic cleaners such as vinegar and citrus degreasers etch the shine, so keep them off the floor permanently.
| Task | Frequency | Product |
| Dust mopping | Daily | Microfiber pad |
| Wet cleaning | Weekly | Neutral-pH concrete cleaner |
| Burnishing | Every 3 months (high traffic) | 3,000-grit burnish pad |
| Stain guard reapplication | Every 2 to 3 years | Penetrating guard |
Wipe spills within a few hours. Stain guard buys you time, not immunity — red wine and motor oil will still mark the floor if they sit overnight. A floor maintained on this schedule holds its gloss reading for 20 years or longer without re-polishing.
The Bottom Line on Concrete Polishing
Concrete polishing turns an ordinary slab into a 20-year floor for $3 to $12 per square foot, and success comes down to 3 decisions: test the hardness first, respect every grit in the sequence, and never skip the densifier. The floors that fail are the ones where someone rushed a step. The floors that shine for decades followed the same 7-step process this guide laid out.
Start with the MOHS test this week if you’re planning a project. That $50 kit tells you more about your slab than any estimate ever will. And if your floor is bigger than a 2-car garage or you want a Level 3 finish or higher, bring in a certified crew — the price difference pays for itself the first time the gloss meter reads 70.
Your concrete is already there, already paid for, and already strong. Polishing simply reveals what’s underneath.




