
Concrete stamp patterns turn a plain gray slab into a surface that looks like natural stone, brick, slate, or wood at a fraction of the cost. A stamped concrete patio, driveway, or pool deck costs $12–$25 per square foot installed in 2026, compared to $20–$40+ for natural stone pavers.
The right pattern makes the difference between a surface that blends naturally with your home’s architecture and one that looks out of place. This guide covers the 10 most popular concrete stamp patterns, the complete stamping procedure, coloring methods, cost breakdown, and maintenance requirements everything you need to plan or evaluate your project.
What Is Stamped Concrete?
Stamped concrete (also called imprinted concrete or textured concrete) is freshly poured concrete that is colored, then pressed with rubber or polyurethane stamp mats while still in its plastic state to create the appearance of natural materials.
The technique has been used since the early 1950s and has expanded to hundreds of available patterns. Today’s stamp mats are precision-molded from actual stone, brick, and wood samples, producing realistic texture depth, joint lines, and surface variation that’s difficult to distinguish from the real material.
- Patios and outdoor living areas
- Driveways and parking areas
- Pool decks and surrounding areas
- Walkways and sidewalks
- Interior floors, countertops, and entryways
- Commercial plazas and storefronts
Stamped vs. Natural Materials: The Core Advantage
Natural flagstone: $20–$40/sq ft. Brick pavers: $15–$30/sq ft. Stamped concrete: $12–$25/sq ft. Beyond cost, stamped concrete has no joints for weeds to grow through, no individual pieces to shift or settle, and a monolithic structure that holds fasteners and waterproofing membranes better than loose-laid materials.
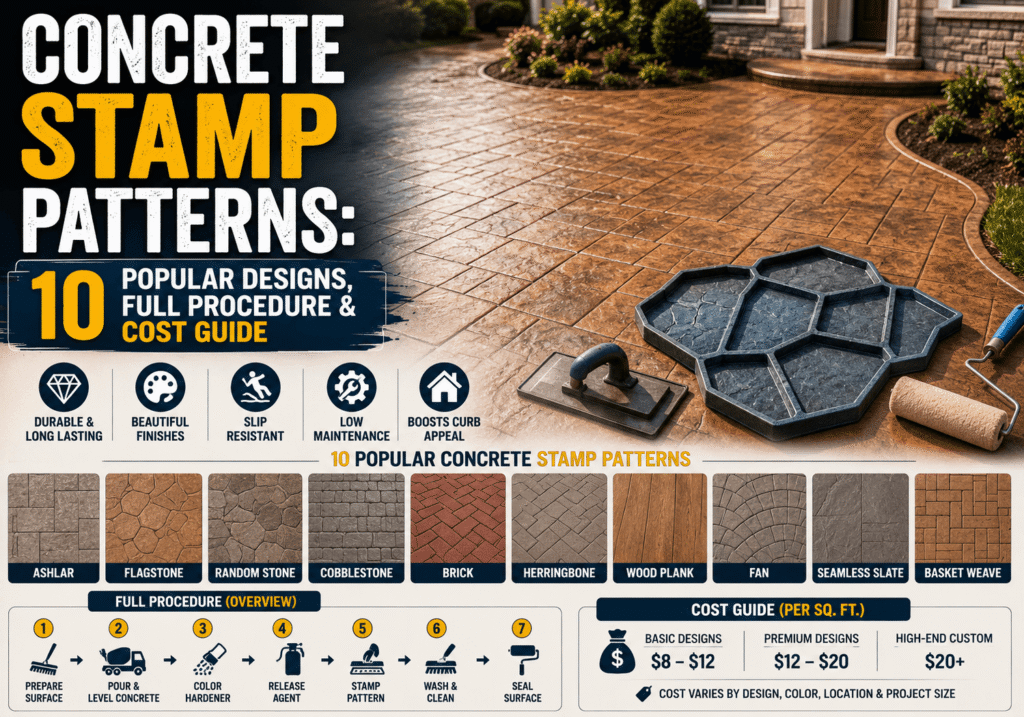
10 Popular Concrete Stamp Patterns
These are the patterns contractors use most, ranked by versatility and homeowner demand:
| Pattern | Best For | Difficulty | Avg. Cost/sq ft |
| Ashlar Cut Slate | Patios, driveways, entryways | Medium | $13–$18 |
| Random Stone / Flagstone | Patios, pool decks, paths | Medium-High | $14–$20 |
| Cobblestone | Driveways, walkways, borders | Medium | $13–$17 |
| Running Bond Brick | Driveways, walkways, porches | Low-Medium | $12–$16 |
| Herringbone Brick | Patios, interior floors | Medium | $13–$17 |
| Basket Weave Brick | Patios, driveways | Low-Medium | $12–$16 |
| European Fan | Patios, courtyards, focal areas | High | $16–$22 |
| Wood Plank | Interior floors, decks, patios | Medium-High | $14–$20 |
| Seamless Texture | Large areas, pool decks | Low | $10–$14 |
| Tile / Geometric | Interior floors, patios | Medium | $13–$18 |
1. Ashlar Cut Slate
Ashlar is the most popular concrete stamp pattern in the USA. It replicates cut stone blocks arranged in a staggered, geometric grid producing clean joint lines and a refined, upscale look. Available in several formats: standard ashlar, grand ashlar (larger blocks), and large ashlar cut slate. Works on every application from driveways to interior floors. Color combinations of warm gray, sandstone, and brown are most common.
2. Random Stone / Flagstone
Random stone mimics the irregular, organic layout of natural fieldstone or flagstone. No two sections look the same a heavily textured surface with varied block sizes creates a rustic, aged appearance. Best for patios, garden paths, and pool surrounds where a natural landscape feel is the goal. Slightly harder to stamp because the irregular layout requires more planning to avoid awkward cuts at borders.
3. Cobblestone
Cobblestone is the go-to pattern for driveways and high-traffic areas. Rounded, tightly packed stone shapes give a classic European street look. The texture provides natural slip resistance. London Cobble is the most common variant — a lightly textured, traditional cobblestone with uniform block sizing. Works particularly well with darker base colors (charcoal, dark gray, deep red) combined with a lighter antiquing release.
4. Running Bond Brick
Running bond is the standard brick pattern horizontal courses with staggered vertical joints, the same layout used in traditional masonry. It’s one of the most affordable stamped patterns because the large, simple stamps cover ground quickly. Best for driveways, walkways, and porches where a timeless, low-maintenance look is needed. Pair with red-brown or terra cotta color hardener for a realistic result.
5. Herringbone Brick
Herringbone creates a 45-degree or 90-degree V-shaped interlocking pattern with rectangular brick shapes. More visually complex than running bond and directional — it draws the eye toward an entry point or focal area. Popular for patios, interior floors, and courtyard areas. Requires more precise stamp alignment to maintain the angle across a large slab, making contractor skill more important here than with simpler patterns.
6. Basket Weave Brick
Basket weave alternates pairs of horizontal and vertical brick rectangles in a checkerboard arrangement. The result is a three-dimensional woven effect that adds visual depth without being overly busy. Works well for driveways where the symmetrical pattern pairs naturally with rectangular lots. One of the most cost-effective brick patterns to stamp because the repeat unit is large and alignment is forgiving.
7. European Fan (Fan / Shell Pattern)
European fan is the most decorative and labor-intensive standard pattern. Semicircular arc shapes radiate outward from a central point, creating a shell or fan effect commonly seen in European plazas and high-end commercial spaces. Requires precise layout and skilled execution to keep arcs consistent. Best reserved for focal areas a central patio, a courtyard, a formal entryway where the visual impact justifies the higher cost ($16–$22/sq ft).
8. Wood Plank
Wood plank stamps replicate the look of planked hardwood or barn wood, with pronounced grain texture, knots, and visible board edges. 6-inch-wide plank formats are most common. It’s the only pattern that works equally well indoors and outdoors a wood plank stamped interior floor eliminates the maintenance and moisture issues of real hardwood while delivering the same warmth. Cedar plank and barnwood variants offer coarser, more rustic grain textures.
9. Seamless Texture
Seamless texture stamps have no joint lines they create a uniform surface texture without repeating pattern blocks. Feather-edged texture skins can be rotated and overlapped to create infinite variation without visible seams. This makes them ideal for large open areas like pool decks and commercial plazas where a busy joint pattern would look cluttered. Seamless textures are also the most beginner-friendly because there’s no pattern alignment to maintain.
10. Tile / Geometric
Tile stamps reproduce the look of ceramic, travertine, or marble tile in square or rectangular formats. Most common on interior floors and covered patios where a cleaner, more formal look is desired. Geometric options include diamond patterns, octagon-and-dot combinations, and modular grid layouts. Color choices here lean toward warm neutrals ivory, cream, and light tan to mimic the appearance of natural tile.
3 Types of Concrete Stamp Tools
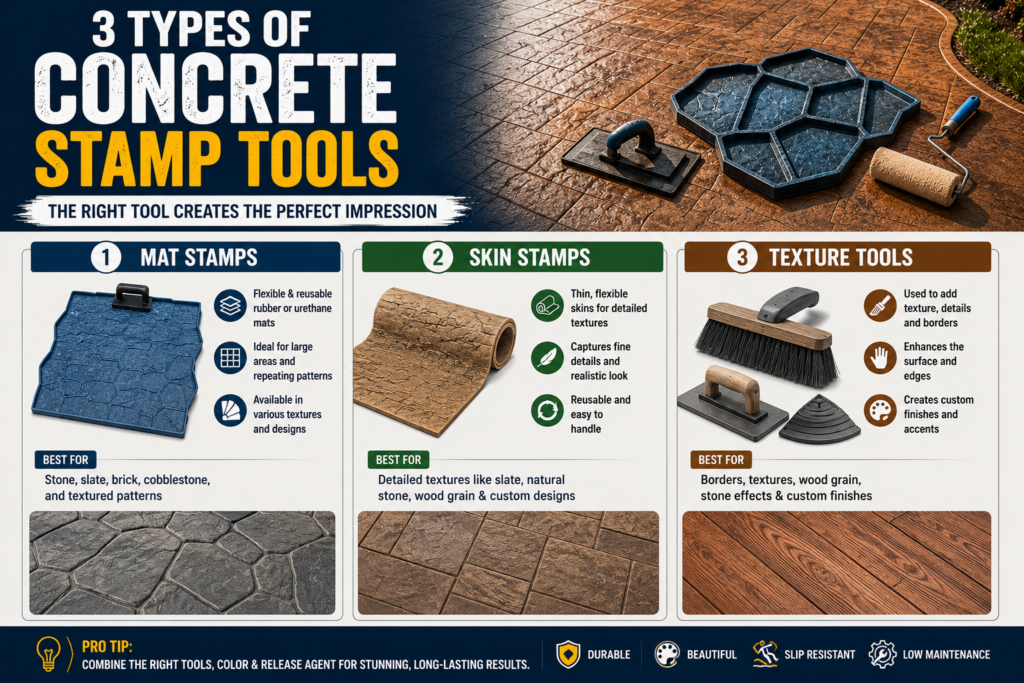
The pattern is only part of the equation the tool type determines how well that pattern transfers to the slab:
Rigid Mats
Rigid mats are the workhorse of any stamping job. Made from firm polyurethane with handles, they’re solid enough to stand on, which lets the contractor’s body weight drive the pattern deep into the concrete. Used for the main field area of any project. Produce the most consistent, deep impressions. Zero flex not suitable for curved surfaces or edges.
Floppy/Flexible Mats
Floppy mats are thinner, more pliable versions of rigid mats bendable to 90 degrees. No handles, not meant for standing on. Used along edges, in corners, up against walls, and around obstacles where a rigid mat can’t reach or would leave an untextured gap. Every stamping job needs at least one floppy for edge work.
Texture Skins (Seamless Skins)
Texture skins are thin, feather-edged mats used to blend the main pattern into edges and create seamless transitions between stamped sections. Also used as the primary tool for seamless texture applications. Can be layered and overlapped each rotation creates a slightly different surface impression, preventing obvious pattern repetition.
Stamped Concrete Procedure: 8 Steps
Stamping has a narrow time window. Concrete becomes too stiff to stamp within 2–4 hours in warm weather, faster in direct sunlight. Have the full crew and all equipment on site before the truck arrives.
Step 1: Site Prep and Forms
Excavate to proper depth — minimum 4 inches (100 mm) for patios, 6 inches (150 mm) for driveways. Install compacted gravel base for drainage. Set forms at the correct grade and slope (minimum 1/8 inch per foot for outdoor drainage). Install steel rebar or welded wire mesh reinforcement.
Step 2: Pour and Screed
Pour concrete directly from the ready-mix truck as close to its final position as possible moving wet concrete too far causes segregation. Screed (level) the surface with a straight board or power screed to remove high and low spots. Bull-float to bring cement paste to the surface this paste is what takes the stamp impression. The quality of this step directly determines the quality of the final imprint.
Step 3: Apply Base Color
2 methods: Integral color (pigment mixed into the truck before pour runs through the full depth of the slab) or dry-shake color hardener (broadcast onto the wet surface after screeding, worked in with a float higher surface color concentration, wider color range, slightly more labor). Integral color is more consistent; color hardener produces richer, more vivid surface tones. Both methods are valid.
Step 4: Apply Release Agent
Release agent is not optional. Applied as a powder or liquid to the concrete surface immediately before stamping, it prevents the stamp mats from bonding to the wet concrete. It also carries an accent color that settles into the texture recesses during stamping, creating the natural antiqued variation that makes stamped concrete look realistic. A darker release over a lighter base color produces the most dramatic result.
Step 5: Stamp the Pattern
Start at the most visible edge or at a reference line. Lay stamps edge to edge in sequence, standing on each mat to transfer body weight into the impression. Butt each stamp tightly against the previous one gaps create unprinted strips. Work in the same direction the concrete was placed, advancing before the section stiffens. Use floppies for edges, corners, and tight areas. Maintain consistent pattern alignment throughout.
Critical Timing Note
The stamping window is determined by the bleed water drying off the surface. When you press a gloved hand into the concrete and it leaves a 3/4-inch (19 mm) impression without sinking or sticking, the concrete is ready to stamp. Too early = stamps sink too deep and slide. Too late = stamps don’t penetrate, leaving a shallow or partial impression.
Step 6: Wash and Cut
After the concrete has cured for 12–24 hours, wash the surface with a garden hose or low-pressure sprayer to remove the release agent powder. Use a brush on heavily textured areas. Avoid high pressure along grout lines preserving more release agent in the joint recesses enhances the natural shadowing effect. Cut control joints at proper depth and spacing (every 10–12 feet / 3–3.5 m) to control where the slab cracks.
Step 7: Apply Secondary Color (Optional)
For a more realistic, multi-tonal result, hand-apply accent stains or liquid release tints to individual stones or brick faces. This technique, called hand-antiquing or spot staining, mimics the natural color variation in real stone or aged brick. It takes extra labor but elevates the realism significantly especially for premium installations.
Step 8: Seal the Concrete
Sealing is mandatory skip it and the color fades within one season. Apply a solvent-based or water-based acrylic sealer once the surface is fully clean and dry. Acrylic sealers ($25–$50/gallon) are most common and deliver satin to high-gloss finishes. Polyurethane sealers ($40–$80/gallon) offer better chemical resistance. For exterior surfaces, add a non-slip aggregate to the sealer stamped concrete can be slippery when wet without it. Wait 2–4 hours before foot traffic, 24 hours before vehicle traffic.
How to Color Stamped Concrete: 3 Methods
Color is what makes stamped concrete believable. There are 3 approaches most professional jobs use at least 2:
- Integral color: Pigment added to the concrete mix before pour. Color runs through the full depth. If the surface chips or cracks, the color below matches. Lower color intensity than surface methods but requires zero additional labor at the time of stamping.
- Color hardener (dry-shake): Dry pigment broadcast onto the wet surface after screeding, then floated in. Creates a dense, hardened color layer at the surface. Produces richer, more saturated tones than integral color. Most professional stamped concrete uses this method.
- Antiquing release: The release agent applied before stamping carries its own pigment. As it settles into the texture grooves during the imprint, it creates a darker accent in the recesses mimicking the shadow and aging of natural stone. The contrast between base color and release color determines how realistic the result looks.
Stamped Concrete Cost: 2026 Pricing Breakdown
Stamped concrete costs $12–$25 per square foot installed in 2026. Plain concrete runs $6–$12/sq ft — you’re paying a $4–$13/sq ft premium for the stamping and coloring work. Here’s the full project cost reference:
| Project Type | Basic Pattern | Premium / Multi-Color |
| Stamped Patio (400 sq ft) | $4,800–$6,000 | $7,200–$10,000 |
| Stamped Driveway (600 sq ft) | $7,200–$9,000 | $10,800–$15,000 |
| Pool Deck (500 sq ft) | $6,000–$7,500 | $9,000–$12,500 |
| Walkway (100 sq ft) | $1,200–$1,500 | $1,800–$2,500 |
| Stamped Overlay (existing slab) | $1,500–$2,500 | $2,500–$4,000 |
4 factors control your final cost:
- Pattern complexity: Simple running bond or seamless texture = lower cost. Herringbone, fan, or multi-stamp designs = higher cost due to alignment labor.
- Color choices: Single-color integral finish is cheapest. Multi-color with hand-antiquing adds $2–$5/sq ft.
- Slab thickness: 4 inches (100 mm) for patios, 6 inches (150 mm) for driveways, 8 inches (200 mm) for heavy vehicles.
- Site conditions: Excavation, demolition of existing concrete, or complex shapes (curved edges, steps) each add cost.
Stamped Concrete vs. Pavers: Which Costs Less?
Stamped concrete ($12–$25/sq ft) typically costs 15–30% less than interlocking pavers ($12–$25/sq ft installed) and 40–50% less than natural stone ($20–$40/sq ft). Long-term maintenance costs are similar — both need resealing every 2–3 years. Stamped concrete has no joints for weeds or ant nests, but individual paver repairs are easier to match than patching colored stamped concrete.
Stamped Concrete Maintenance: What You Must Do
Properly maintained stamped concrete lasts 25–50 years. Neglected surfaces particularly ones left without resealing can fade, stain, and develop surface scaling within 3–5 years. 4 maintenance requirements:
Resealing Every 2–3 Years
This is the most important maintenance task. Sealer protects the color, enhances sheen, and prevents moisture penetration and staining. Budget $1–$3/sq ft for professional resealing, or plan to DIY with rented equipment. Missing one resealing cycle is not catastrophic. Missing 2–3 consecutive cycles causes significant color fading and surface deterioration that requires stripping and full resealing to correct.
Power Washing Twice Per Year
Wash in spring to remove winter grit and salt residue, and in fall before the freeze season. Use moderate pressure — high-pressure washing on fresh sealer can lift it from the surface. A mild detergent removes organic stains from leaves, pollen, and mold. Avoid acid-based or solvent cleaners.
No Salt or Sand for Ice Removal
Never use rock salt or deicing chemicals on stamped concrete. Salt and chloride compounds penetrate the sealer and attack both the color and the concrete surface, causing pitting and spalling within 1–2 seasons. Use sand for traction (sweep off when possible) or calcium magnesium acetate (CMA) which is concrete-safe. Always shovel snow before traffic drives it into the surface.
Crack Control and Joint Maintenance
All concrete cracks — the goal is to control where. Control joints cut at proper intervals direct cracking to visible lines that look intentional. Inspect control joints annually and fill any widening cracks with an elastomeric joint filler matched to the surface color. Small surface cracks under 1/8 inch (3 mm) are cosmetic only and don’t affect structural performance.
How Decorative Concrete and Roofing Work Together
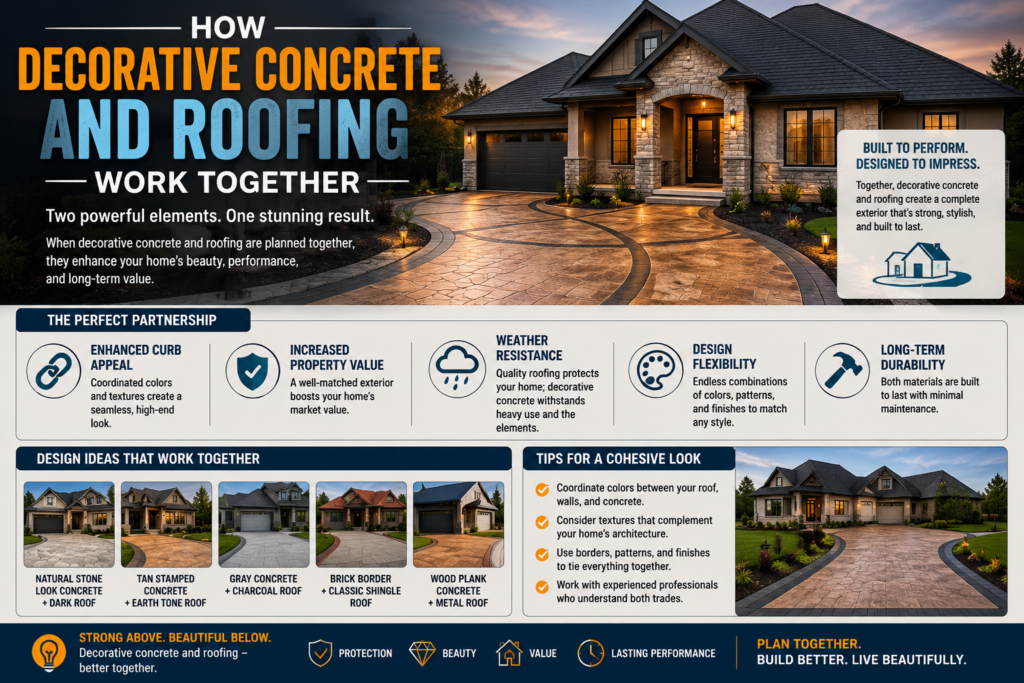
The same concrete slab that gets stamped for your patio also forms the structural deck for flat-roof extensions, covered patios, and rooftop terraces. The quality of that concrete its mix design, water-cement ratio, and proper placement determines whether the roofing system above it stays watertight for decades or fails within years. Our professional roof repair services frequently trace active leaks back to poorly placed or segregated concrete beneath membrane systems.
Stamped concrete pool decks are a direct overlap point. A pool deck needs both an attractive decorative surface and a waterproof structural foundation. Commercial roof repair specialists understand this intersection — waterproofing systems on horizontal concrete surfaces follow the same principles as low-slope roofing membranes.
If your property has a stamped concrete area adjacent to roofing a covered patio, a concrete-decked roof terrace, or an attached carport professional roof inspection services can evaluate whether the waterproofing transition between the deck and the roof structure is performing correctly. Water intrusion at these transitions is one of the most common sources of building envelope failures.
For homes with concrete tile roofing specifically, proper substrate and structural concrete quality affects how the tiles are secured and how the flashing system integrates. Routine roof maintenance on concrete tile roofs includes inspection of the concrete structure below the tiles, not just the tiles themselves.
Stamped Concrete: 5 Advantages and 3 Limitations
5 Advantages
- Cost: 25–50% cheaper than natural stone or brick at the same visual quality.
- Durability: 25–50 year lifespan with proper maintenance — outlasts pavers that shift and settle.
- No joints: Monolithic surface eliminates weed growth, ant nests, and joint sand washout.
- Customization: Hundreds of pattern and color combinations — no other paving material matches it.
- Fast installation: Most residential projects complete in 2–3 days.
3 Limitations
- Repairs are difficult to match: Color batches, aged concrete, and weathered sealer all make patch repairs visible. Spot repairs on stamped surfaces almost never look invisible.
- Resealing is mandatory: Unlike plain concrete which needs sealing every 3–5 years, stamped concrete requires attention every 2–3 years.
- Requires professional installation: The stamping window is narrow. A DIY error is permanent there’s no undoing a badly stamped slab.
Conclusion
The right concrete stamp pattern makes an outdoor surface look intentional, upscale, and permanent. Ashlar slate works on almost any project. Cobblestone excels on driveways. Herringbone and fan patterns deliver maximum visual impact for focal areas. Wood plank brings warmth to covered patios and interiors.
Whatever pattern you choose, the installation fundamentals don’t change: proper site prep, correct concrete mix, quality coloring, precise stamping within the timing window, and regular resealing. Get those right and a stamped concrete surface will perform for 25–50 years with minimal upkeep.




