
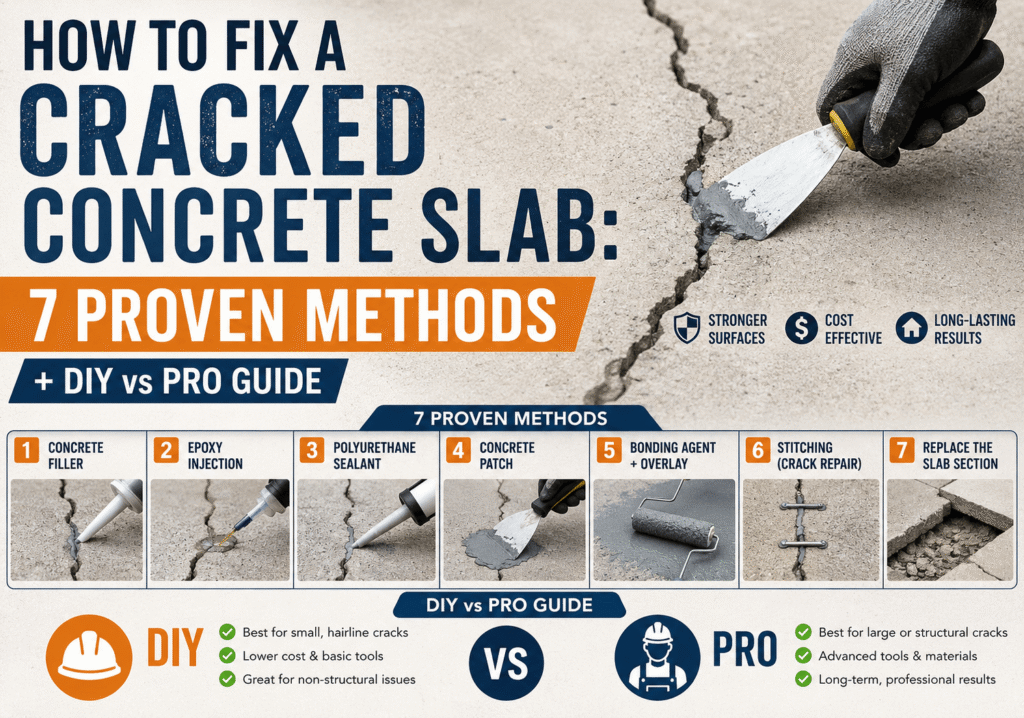
A cracked concrete slab is fixable and the method you choose determines whether the repair lasts 2 years or 20. This guide covers every repair option, exact costs, warning signs you need a pro, and the one roof-related cause most homeowners completely miss.
Why Concrete Slabs Crack: 6 Real Causes
Concrete cracks for specific, predictable reasons. Understanding the cause is the first step because the wrong repair for the wrong crack type wastes money and fails within months.
1. Shrinkage During Curing
Fresh concrete contains water. As that water evaporates during curing, the slab shrinks. This shrinkage creates internal tension that splits the surface often within the first 30 days of pour. These are typically hairline cracks under 1/16 inch wide and are mostly cosmetic.
2. Freeze-Thaw Cycles
Water seeps into micro-pores in the slab. When temperatures drop below 32°F (0°C), that water expands by roughly 9% as it freezes, cracking the slab from the inside. Repeated over winters, this turns hairline cracks into 1/2-inch gaps.
3. Soil Settlement and Erosion
When the soil beneath a slab compresses, washes away, or shifts from clay expansion, the slab loses support underneath. The unsupported section cracks under its own weight. This is the most common cause of sunken and uneven slabs.
4. Overloading
Residential concrete slabs are rated 3,000 to 4,000 PSI (pounds per square inch). Heavy equipment, full dumpsters, or large RVs parked on a slab that sits on softened soil after rain can exceed that rating and crack the surface.
5. Tree Root Growth
Tree roots growing beneath a slab exert upward pressure over years. The slab heaves unevenly, creating raised edges and running cracks along the pressure points. This is common in older driveways near mature trees.
6. Poor Drainage Including Roof Drainage
Water pooling around a slab from inadequate gutters and downspouts saturates the soil, accelerates erosion, and creates the exact conditions that cause settlement cracks. Blocked or damaged gutters are a direct contributor to concrete damage. roof maintenance services include seasonal gutter cleaning and drainage checks that protect not just your roof but the concrete surfaces below it.
7 Types of Concrete Cracks, What Each One Means
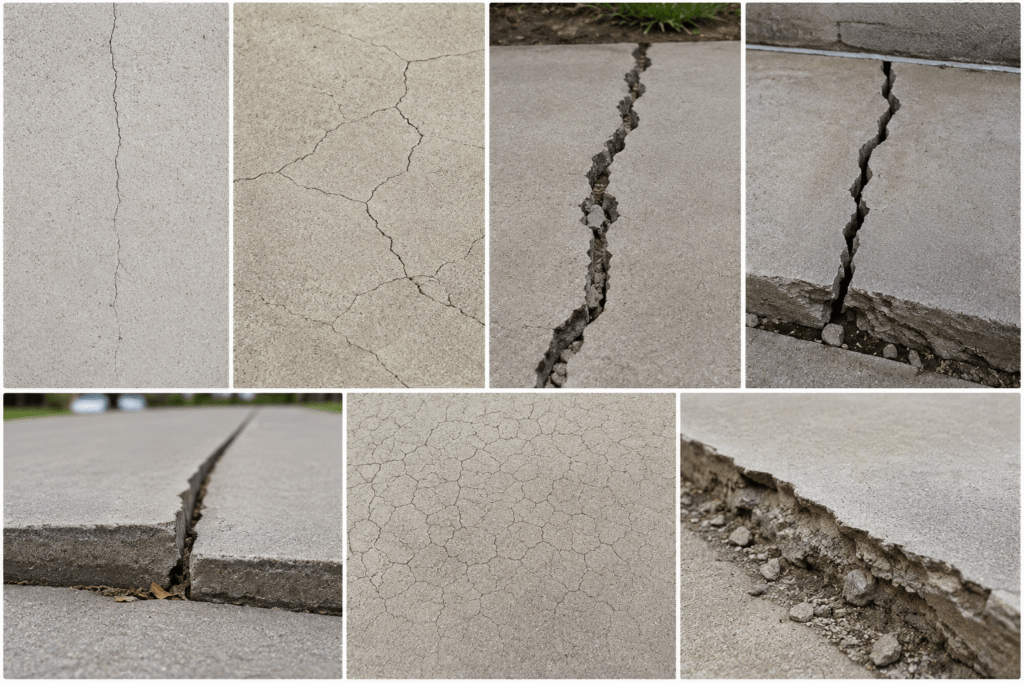
Not all cracks are equal. Identify yours before buying any repair product.
1. Hairline Cracks (Under 1/16 inch)
Surface-level, thin lines that form during initial curing. They are cosmetic in most cases. Seal them to prevent water intrusion and freeze-thaw widening.
2. Shrinkage Cracks
Short, random cracks that appear within weeks of a new pour. Stable and not structurally dangerous. A flexible sealant is the correct fix.
3. Settlement Cracks
Wider gaps often 1/8 inch or more that run across the slab. They signal that the soil below has shifted. Sealing alone does not fix these; the soil issue must be addressed first.
4. Structural Cracks
Cracks wider than 1/2 inch, running through the full thickness of the slab. These are serious. They indicate overloading, foundation failure, or extreme soil movement. A structural engineer or foundation specialist must assess these before any repair attempt.
5. Heaving Cracks
Cracks where one side sits higher than the other. Caused by root growth or expansive soil pushing up. The slab must be ground down or lifted back to level before sealing.
6. Crazing Cracks
Spider-web patterns on the surface caused by the top layer drying too fast during curing. Purely cosmetic. A penetrating concrete sealer prevents worsening.
7. Spalling
Flaking or chipping of the surface layer, often triggered by freeze-thaw damage or deicing salt. Requires an epoxy patching compound or concrete resurfacer, not a crack filler.
7 Proven Methods to Fix a Cracked Concrete Slab
Method 1: Flexible Concrete Caulk (Best for Hairline to 1/2-inch Cracks)
Flexible polyurethane or silicone-based caulk is the go-to fix for most exterior slab cracks on driveways, patios, and walkways. It flexes with seasonal expansion and contraction instead of cracking again.
How to apply it:
- Clean the crack with a wire brush and compressed air or water. Let it dry completely.
- For cracks deeper than 1/2 inch (1.27 cm), insert closed-cell foam backer rod first to control depth and save sealant.
- Cut the tube tip to match the crack width. Apply in a steady bead from one end to the other.
- Smooth with a wet sponge (for latex products) or acetone rag (for polyurethane).
- Apply a second coat after 15 minutes if needed. Allow 24 hours before traffic.
Cost: $15–$50 (DIY materials). DIY repairs last 2–5 years with annual touch-ups.
Method 2: Epoxy Injection (Best for Structural Cracks)
Epoxy injection bonds the two sides of a crack together internally, restoring tensile strength. It is the correct method for structural cracks where water intrusion is an active problem.
The process involves drilling injection ports along the crack, pumping two-part epoxy under pressure from the bottom up, and sealing the surface once the epoxy gels. This is technically demanding. Improper mixing ratios or application sequence leads to incomplete bonding.
Cost: $250–$800 per crack (professional). Not suitable for active (still-moving) cracks.
Method 3: Polyurethane Crack Filler (Best for Wide or Leaking Cracks)
Polyurethane foam expands into the crack and remains flexible after curing, making it ideal for cracks that experience movement. It also creates a watertight seal, which epoxy cannot always guarantee for wet cracks.
Cost: $20–$80 (DIY). Professional application runs $150–$400.
Method 4: Concrete Patching Compound (Best for Surface Damage and Spalling)
Vinyl-reinforced concrete patching compounds are the correct product for wide, shallow damage and spalling. Pure concrete does not bond well to existing slabs patching compounds include bonding agents that create a lasting connection.
Application: Chisel the crack to at least 1 inch deep (2.54 cm) with undercut edges wider at the bottom than the top. Dampen the area, coat edges with a bonding agent, pack the compound in layers, and cure slowly under plastic sheeting for 3 days with daily moisture.
Cost: $10–$60 (DIY materials). Professional patching: $100–$1,000 depending on area size.
Method 5: Carbon Fiber Staple Reinforcement (Best for Preventing Crack Widening)
Carbon fiber staples or stitching bars are installed across wide cracks by grinding slots, embedding the staple with epoxy, and grinding flat. This method does not just fill the crack it mechanically locks the two sides together so the crack cannot widen further. Many surface coating companies require this before applying a warranty on decorative overlays.
Cost: Professional installation only. Typically part of a larger repair package.
Method 6: Mudjacking / Slab Jacking (Best for Sunken Slabs)
For slabs that have sunk or become uneven due to soil settlement, mudjacking pumps a cement-sand-water slurry through drilled holes to raise the slab back to level. It is effective but heavy the slurry adds weight to already compromised soil and can cause re-settling.
Cost: $600–$2,500 for residential applications. Holes are 1.5–2 inches (3.8–5 cm) in diameter.
Method 7: Polyurethane Foam Injection Lifting (Best Long-Term Alternative to Mudjacking)
Two-part polyurethane foam is injected through small 5/8-inch holes (1.6 cm), expands to fill voids under the slab, and cures in 15 minutes. It is lightweight, does not add stress to weak soil, and lasts decades without re-settling.
Cost: $1,000–$3,500. More expensive upfront but far more durable than mudjacking for most soil conditions.
DIY vs. Professional Repair: The 3-Question Test
Answer these 3 questions before reaching for a tube of crack filler:
Question 1 — Is the crack wider than 1/2 inch (1.27 cm) or running the full depth of the slab?
Yes: Call a professional. Width and depth at this scale indicate structural failure, not surface wear.
Question 2 — Is the crack actively growing or showing movement (displacement on one side)?
Yes: The underlying cause — soil movement, root pressure, or drainage failure — must be fixed before any surface repair. DIY patching will fail within a season.
Question 3 — Has water started pooling near the crack, especially after rain?
Yes: Check your gutter and downspout system before spending money on concrete repairs. Overflowing gutters dump water directly against your slab and foundation. roof repair services address the drainage failures that drive repeated concrete damage. For all other cracks hairline, shrinkage, cosmetic DIY repair with flexible caulk or patching compound is appropriate and cost-effective.
Concrete Slab Repair Cost: Real Numbers for 2026
Repair costs vary by crack type, repair method, and whether you hire a professional or do it yourself.
DIY Materials Cost:
- Flexible crack caulk: $15–$50 per tube
- Concrete patching compound: $10–$60 per bag
- Epoxy crack filler kit: $25–$80
- Backer rod: $8–$20
Professional Repair Cost:
- Non-structural crack sealing: $250–$800 per crack
- Epoxy injection (structural): $500–$1,500 per crack
- Mudjacking to level a sunken slab: $600–$2,500
- Polyurethane foam injection leveling: $1,000–$3,500
- Full concrete resurfacing: $2,000–$5,000
- Full slab replacement: $8–$15 per square foot ($2,000–$15,000+ for a typical driveway)
The cost of delaying repairs compounds fast. A $50 crack filler job ignored for two winters can become a $3,000 leveling project when soil erosion takes hold.
How a Damaged Roof Directly Causes Concrete Slab Cracks
This connection surprises most homeowners, but the mechanism is straightforward. When gutters clog, crack, or detach, rainwater pours off the roof edge and lands immediately adjacent to driveways, patios, and foundation slabs. That concentrated water flow saturates the soil, triggers erosion, and creates the voids beneath the slab that cause settlement cracks and heaving. A professional roof inspection identifies gutter failures, damaged downspouts, and drainage deficiencies before they reach your concrete.
3 specific roof failures that damage concrete slabs:
- Clogged gutters: Water backs up and spills over the gutter edge, saturating soil alongside the foundation slab.
- Disconnected downspouts: Water dumps at the base of the wall directly onto patio or driveway concrete.
- Missing drip edge: Water runs down the fascia and pools at grade level against the concrete.
Seasonal gutter maintenance through residential roof maintenance program keeps water moving away from your slab year-round — which is the most cost-effective concrete protection available.
Step-by-Step: How to Fix a Cracked Concrete Slab (DIY)
Use this process for hairline to 1/2-inch cracks on driveways, patios, and walkways.
Step 1: Assess the Crack
Measure width and depth. Check if one side is higher than the other. If width exceeds 1/2 inch or depth runs through the full slab, stop and call a professional.
Step 2: Clean Thoroughly
Remove dirt, weeds, old filler, and loose concrete with a wire brush or cold chisel. Blow out debris with compressed air or rinse with a hose. For crack filler to bond, the surface must be completely dry — wait at least 24 hours after rinsing.
Step 3: Install Backer Rod (for Cracks Deeper Than 1/2 inch)
Push closed-cell foam backer rod into the crack to within 1/4 inch of the surface. This controls the depth of the repair, saves material, and improves the flexibility of the finished seal.
Step 4: Apply the Repair Product
Cut the tube tip to match crack width. Apply in one steady bead. For epoxy or patching compound, work from one end to the other with no gaps. Expect the material to settle a second application is normal.
Step 5: Smooth and Finish
Use a wet sponge for latex products or acetone for polyurethane. Level the repair flush with the surrounding slab. Avoid touching it for at least 24 hours. Do not open to vehicle traffic for 48–72 hours.
Step 6: Seal the Entire Slab
Apply a penetrating concrete sealer to the whole slab after the repair cures. This closes the pores of the surrounding concrete, slows water intrusion, and extends the life of both the repair and the slab.
Step 7: Inspect Annually
Re-seal cracks each year before winter. A 30-minute annual check prevents the freeze-thaw widening that turns minor repairs into full replacement jobs.
When to Replace Instead of Repair
Repair is not always the right answer. Replace the slab when:
- The crack is structural (full-depth, over 1/2 inch wide, or showing displacement)
- Multiple large cracks run throughout the entire slab
- The slab has heaved severely and leveling is not feasible
- Widespread spalling or crumbling covers the majority of the surface
- The slab has sunken more than 2 inches (5 cm) with continued soil instability beneath
Full slab replacement costs $8–$15 per square foot. A typical 20 x 20 ft driveway replacement runs $3,200–$6,000 in materials and labor, plus $250–$400 in permits for most municipalities.
How to Prevent Concrete Slab Cracks: 5 Practical Steps
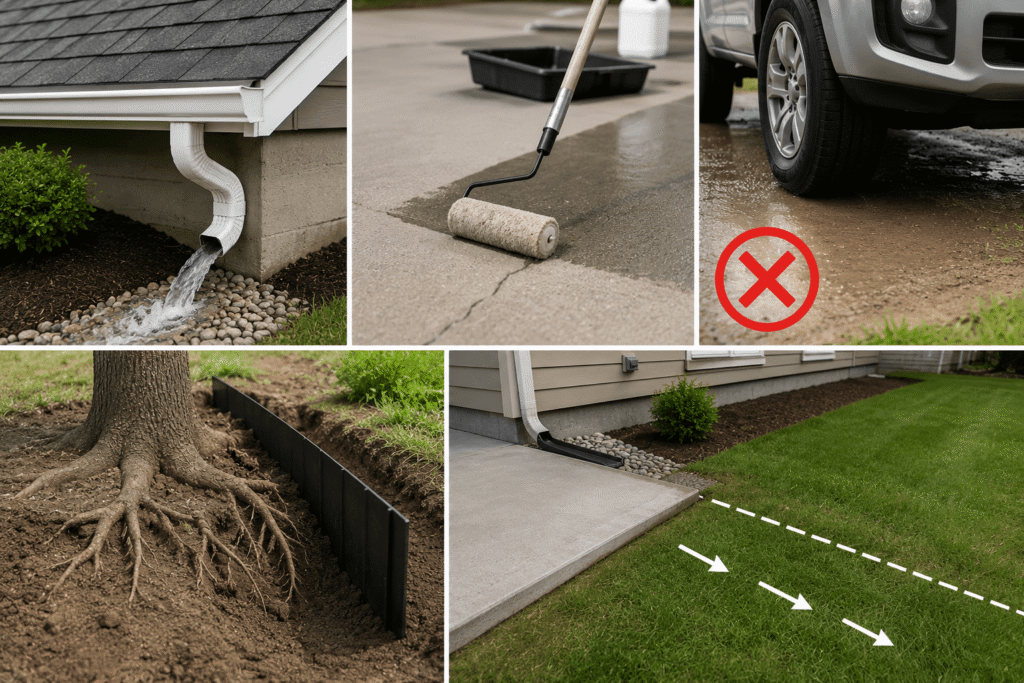
- Manage roof and gutter drainage. This is the highest-leverage prevention step. Gutters that direct water away from your slab eliminate the soil saturation that drives settlement cracks. roof maintenance inspection before the rainy season to verify your drainage system works correctly.
- Seal the slab every 2–3 years. A penetrating concrete sealer closes surface pores, blocks moisture, and dramatically reduces freeze-thaw damage. Budget $30–$80 for DIY sealing of a standard driveway.
- Avoid heavy loads on wet soil. After heavy rain, soil bearing capacity drops. Do not park heavy vehicles or place dumpsters on a residential slab when the surrounding soil is saturated.
- Control tree root growth. Plant new trees at least 10 feet from any concrete slab. For existing trees, install root barriers to redirect growth downward rather than laterally.
- Ensure proper grading. The ground around your slab should slope away at a minimum 1/8 inch per foot (1 cm per 10 cm). This keeps surface runoff moving away from the slab instead of pooling against it.
Conclusion
A cracked concrete slab is not a death sentence for your driveway, patio, or foundation but it is a deadline. Every season you delay, water works deeper into the crack, soil erodes further underneath, and what started as a $50 DIY fix becomes a $3,000 leveling job or a full slab replacement. The repair window is always open, but it gets more expensive the longer you wait.
The 3 things that determine whether your repair lasts are: choosing the right product for your crack type, addressing the root cause before patching, and sealing the whole slab once the repair cures. Skip any one of these and the crack returns. Follow all three and the slab can serve another 20 years without issue.
One root cause that gets overlooked almost every time is roof drainage. Clogged gutters, disconnected downspouts, and missing drip edges dump concentrated water directly alongside concrete slabs, saturating soil and triggering the settlement cracks that most homeowners blame on age or weather alone. Fix the concrete and ignore the roof drainage, and the same crack opens again next spring.
If your concrete has cracked more than once in the same spot, or if cracks keep appearing after repairs, get your gutters and downspouts inspected before spending another dollar on concrete products. A free roof inspection takes 45 minutes and can reveal the exact drainage failures driving your concrete damage saving you from the cycle of patching the same slab year after year.




