

Most 4×4 fence posts need 1–2 bags of 80 lb (36 kg) concrete each. Gate posts, corner posts, and posts in sandy or loose soil need 2–4 bags. This guide gives you the exact numbers, the math behind them, and the step-by-step method professionals use on every job.
Quick Reference: Concrete Bags Per Fence Post
Use this chart as your starting point. Adjust up by 1 bag for gate posts, corner posts, loose or sandy soil, or fences taller than 6 ft (1.8 m).
| Post Size | Hole Diameter | Hole Depth | Bags Needed (80 lb) |
| 4×4 in (100×100 mm) | 12 in (30 cm) | 24 in (61 cm) | 1–2 bags |
| 4×4 in (100×100 mm) | 12 in (30 cm) | 30 in (76 cm) | 2 bags |
| 4×4 in (100×100 mm) | 12 in (30 cm) | 36 in (91 cm) | 2–3 bags |
| 6×6 in (150×150 mm) | 16 in (41 cm) | 30 in (76 cm) | 3–4 bags |
| 6×6 in (150×150 mm) | 16 in (41 cm) | 36 in (91 cm) | 4–5 bags |
| Gate / Corner Post | 18 in (46 cm) | 36–42 in (91–107 cm) | 4–6 bags |
| Steel 2.5 in round | 10 in (25 cm) | 36 in (91 cm) | 2–3 bags |
Bag yield reference: one 40 lb (18 kg) bag = 0.30 cu ft (0.0085 m³). One 50 lb (23 kg) bag = 0.37 cu ft. One 60 lb (27 kg) bag = 0.45 cu ft. One 80 lb (36 kg) bag = 0.60 cu ft. Always buy 10% extra for waste and uneven holes.
Why the Right Amount of Concrete Matters
Too little concrete and the post rocks under wind load, loosens over time, and eventually leans or fails. Too much concrete without proper drainage and you create a moisture trap that rots wood posts from the base up within 5–7 years often faster than the fence panels above them ever wear out.
The concrete footing does 3 jobs: it transfers lateral wind load into the surrounding soil, prevents the post from heaving upward during freeze-thaw cycles, and keeps the base of the post away from direct soil contact where moisture concentrates. Getting the volume right means sizing the hole correctly first — the concrete quantity follows from the hole dimensions, not the other way around.
5 Variables That Determine How Much Concrete Each Post Needs
1. Post Size
Bigger posts displace more volume inside the hole, which reduces the concrete needed — but bigger posts also require larger diameter holes to maintain the 3:1 hole-to-post ratio. Net result: larger posts still use more concrete per hole because the hole diameter increases proportionally. A 4×4 in (100×100 mm) post in a 12-inch (30 cm) hole needs roughly 2 bags of 80 lb. A 6×6 in (150×150 mm) post in a 16-inch (41 cm) hole needs 4–5 bags.
2. Hole Depth
Hole depth is the single biggest driver of concrete volume. The standard rule is to bury 1/3 to 1/2 of the total post length. For a 6 ft (1.8 m) above-ground fence, that means a 2–3 ft (0.6–0.9 m) hole. In cold climates, the hole must extend at least 6 inches (15 cm) below the local frost line regardless of the 1/3 rule. In parts of northern Minnesota, Wisconsin, and Canada, this means holes 4–5 ft (1.2–1.5 m) deep — nearly doubling the concrete needed versus the same fence in Texas or Florida.
3. Hole Diameter
The hole diameter should be 3 times the post width. A 4-inch (100 mm) post = 12-inch (30 cm) hole. A 6-inch (150 mm) post = 18-inch (46 cm) hole. Gate and corner posts benefit from holes 4 times the post width because they carry more load from gate swing and fence tension. Narrower holes hold less concrete and distribute wind loads over a smaller soil contact area both reduce long-term stability.
4. Soil Type
Soil type changes how much concrete you need and how deep the hole must go. Sandy soil drains fast but provides little lateral resistance posts in sandy soil need wider holes and more concrete to compensate for the reduced soil grip. Clay soil holds moisture and expands when wet, which can push posts upward and crack footings over time. A 4-inch gravel base (10 cm) at the bottom of every hole is non-negotiable in clay soil. Rocky soil is the most stable once the hole is dug but requires more effort to dig correctly.
5. Post Function — Line, Corner, or Gate
Line posts carry panel weight and light wind load. Corner posts carry tension from two fence runs pulling in perpendicular directions. Gate posts carry the dynamic load of an opening and closing gate potentially hundreds of pounds swinging daily. Gate and corner posts always get the next size hole and 1–2 extra bags of concrete. A gate post set with line-post concrete volume is one of the most common causes of fence failure within 3–5 years.
How to Calculate Exactly How Much Concrete You Need
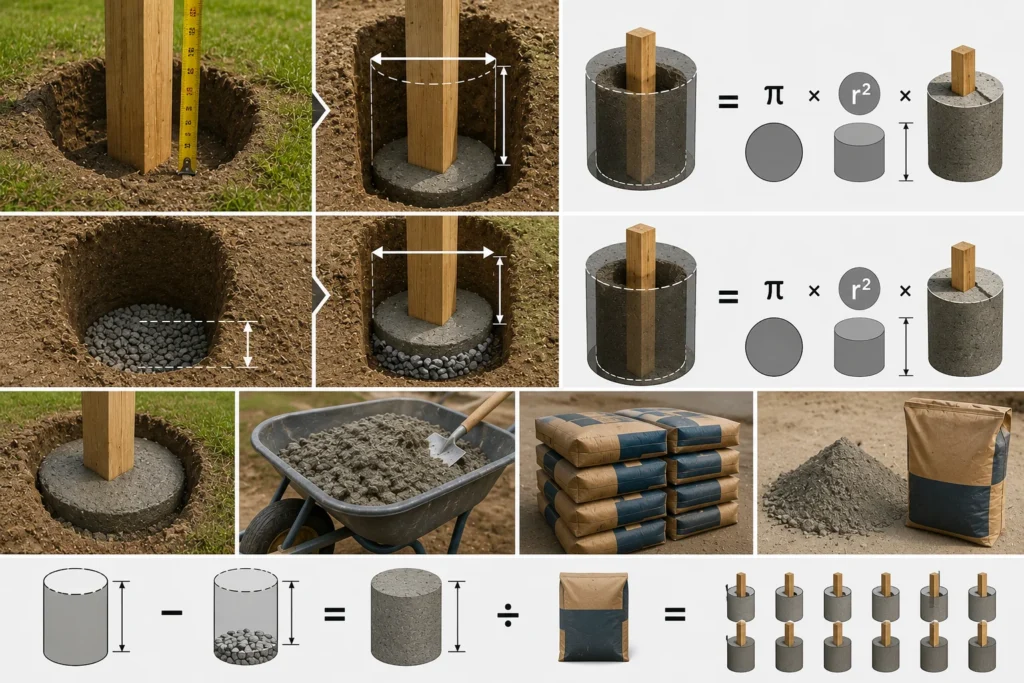
The calculation has 3 steps. Work in inches and cubic feet for easiest conversion to bag counts.
Step 1: Calculate the Hole Volume
For a round hole (most common): Volume = π × radius² × depth. Convert inches to feet first. A 12-inch (30 cm) diameter hole is 0.5 ft radius. A 30-inch (76 cm) deep hole is 2.5 ft deep.
Volume = 3.14 × (0.5)² × 2.5 = 3.14 × 0.25 × 2.5 = 1.96 cubic feet (0.055 m³).
Step 2: Subtract the Gravel Layer
A 4–6 inch (10–15 cm) gravel base goes in every hole before the post. Subtract 0.5 ft (6 inches / 15 cm) from the depth for the gravel layer. Adjusted depth = 2.5 ft − 0.5 ft = 2.0 ft. Recalculated volume = 3.14 × 0.25 × 2.0 = 1.57 cubic feet (0.044 m³).
Step 3: Divide by Bag Yield
Divide the concrete volume needed by the yield of your chosen bag size. For 80 lb (36 kg) bags (0.60 cu ft yield): 1.57 ÷ 0.60 = 2.6 bags. Round up to 3 bags per post. For a 20-post fence: 3 × 20 = 60 bags, plus 10% waste = 66 bags total.
For rectangular post holes (less common): Volume = length × width × depth. A 4×4 in (100×100 mm) square post hole at 30 inches deep = (0.33 ft × 0.33 ft) × 2.5 ft = 0.27 cubic feet for the post. Subtract this from the hole volume to get the net concrete needed, though most contractors skip this step since the post volume is minor.
Fast-Setting vs Standard Concrete: Which to Use for Fence Posts
Fast-Setting Concrete (Quikrete Fast-Setting, Sakrete Fast Setting)
Fast-setting concrete reaches initial set in 20–40 minutes and carries fence panel loads within 4 hours. It is the correct choice for most DIY fence installations because it eliminates the need for extended post bracing while the concrete cures. The dry-pour method pouring dry mix into the hole and adding water on top — works specifically with fast-setting products and is faster than wet mixing for single-post work.
Final compressive strength: 4,000 PSI (27.6 MPa) at 28 days stronger than most residential foundation concrete. Fast-setting concrete costs 15–30% more per bag than standard mix. For a 20-post fence, the premium is roughly $30–$60 total minimal compared to the labor saved.
Standard Concrete Mix
Standard concrete requires pre-mixing with water, 24–48 hours of curing before loading, and post bracing during the cure period. It is appropriate for large projects (20+ posts) where cost savings on materials justify the extra time, and for gate posts or heavy installations where a wet pour allows better air purging around the post. Standard mix provides slightly higher ultimate density than fast-setting formulas because the slower cure allows full hydration.
The Dry-Pour Method (Fast-Setting Only)
Pour 1/3 of the hole full of water first. Place the post and check plumb on both axes. Pour dry fast-setting mix around the post to within 3–4 inches (7–10 cm) of grade. If the top layer looks dry, add water slowly. The concrete draws moisture from the soil and the water below to cure. Do not mix. Do not pour wet concrete using this method — it will not hydrate properly from the top down.
Hold the post plumb for 3–5 minutes until initial set begins. Do not adjust after this point. Allow 30 minutes before light contact and 4 hours before attaching panels.
Step-by-Step: How to Set a Fence Post in Concrete
Step 1: Check Local Building Codes and Frost Line
Before digging, confirm the required post depth for your municipality and look up your local frost line depth. The post hole must extend at least 6 inches (15 cm) below the frost line to prevent frost heave. Frost line depths range from 0 in southern Florida to 60+ inches (152+ cm) in northern Minnesota and Montana. Digging to the correct depth is the single most important factor in long-term post stability.
Step 2: Mark and Dig the Holes
Mark post locations with stakes and string. Use a manual post hole digger (clamshell digger) for fewer than 5 holes, or a power auger for longer fence runs. Auger size should match the planned hole diameter — a 12-inch (30 cm) auger bit for 4×4 posts. Flare the bottom of the hole slightly wider than the top to prevent the footing from pulling upward during frost heave. A straight-sided or bottom-narrower hole is more likely to lift.
Step 3: Add the Gravel Base
Pour 4–6 inches (10–15 cm) of coarse gravel into the bottom of every hole. Tamp firmly with the end of the post or a tamping rod. This drainage layer prevents water from pooling at the base of the post and dramatically reduces both wood rot and winter frost heave. Do not skip this step even in dry climates storm drainage accumulates in holes.
Step 4: Set the Post and Check Plumb
Lower the post into the center of the hole. Use a 4-foot (1.2 m) level to check plumb on both the front-to-back and side-to-side axes. Brace the post with two scrap 2×4 boards screwed to the post at 45-degree angles to stakes in the ground. Check plumb again after bracing bracing often shifts the post slightly.
Step 5: Pour and Cure the Concrete
For fast-setting dry pour: fill 1/3 of hole with water first, then pour dry mix around the post to within 3–4 inches (7–10 cm) of grade. Hold plumb for 5 minutes. For standard wet mix: pour mixed concrete in 6-inch (15 cm) lifts, rodding each lift with a scrap rod to remove air pockets. Slope the concrete surface slightly downward away from the post at grade level to shed water away from the wood.
Step 6: Cure and Load
Fast-setting concrete: wait 4 hours before attaching fence rails and panels. Standard concrete: wait 24–48 hours. Do not attach gates to posts for 72 hours regardless of concrete type. Full concrete cure takes 28 days the fence will gain strength gradually during this period. Do not hang unusually heavy loads in the first week.
Concrete Needs by Post Type and Fence Style
Wood Posts (4×4 and 6×6 Pressure-Treated)
The most common residential fence post. A 4×4 (100×100 mm) post in a 12-inch (30 cm) diameter hole at 24–30 inches (61–76 cm) deep needs 1–2 bags of 80 lb concrete. A 6×6 (150×150 mm) post in a 16-inch (41 cm) hole at 30–36 inches (76–91 cm) deep needs 3–5 bags. Always use a gravel base — wood rot at the soil line is the primary failure mode for wood fence posts.
Steel and Galvanized Metal Posts
Steel posts have a smaller cross-section than wood, which means the concrete fills more of the hole. A 2.5-inch (64 mm) round steel post in a 10-inch (25 cm) hole at 36 inches (91 cm) deep needs approximately 2–3 bags of 80 lb concrete. Steel does not rot but corrodes at the base if water pools in the hole — the gravel drainage layer is equally important for metal posts.
Vinyl Posts
Vinyl posts are hollow and relatively lightweight. They require a steel insert sleeve or internal concrete fill in addition to the footing concrete to resist lateral wind load. A standard 5×5 inch (127×127 mm) vinyl post needs 2–3 bags of 80 lb concrete for the exterior footing, similar to a 4×4 wood post. The hollow core can also be filled with concrete on gate posts for added rigidity.
Gate Posts
Gate posts are the highest-load posts on any fence line. The gate swings on them daily, adding dynamic stress on top of static wind and panel loads. Gate posts should use a hole at least 4 times the post width in diameter and at least 36–42 inches (91–107 cm) deep regardless of fence height. Budget 4–6 bags of 80 lb concrete per gate post and always use a gravel base. Under-concreted gate posts are the most common cause of gate sag within 3–5 years.
How Roof Drainage Destroys Fence Post Concrete Footings
This connection is missed by nearly every homeowner who installs a fence along a house wall or runs fence posts within 10 feet (3 m) of the roofline. When gutters overflow, detach, or discharge without proper downspout extensions, concentrated rainwater saturates the soil in exactly the zones where fence posts are set. The result is concrete footing failure within 2–5 years from causes the homeowner blames on bad concrete or a bad contractor.
3 specific ways roof drainage failure damages fence post footings:
- Soil saturation weakens the lateral resistance of the concrete footing even a properly sized footing in waterlogged soil loses grip and allows post movement under wind load.
- Repeated wet-dry cycles from overflowing gutters accelerate frost heave in cold climates, lifting posts that were correctly set below the frost line.
- Pooled water at the post base accelerates wood rot from the concrete line down turning a 20-year post into a 7-year replacement.
A blocked gutter discharges up to 50 gallons per minute during a heavy storm, all of it landing within a few feet of the house wall. Roof maintenance services that include gutter cleaning and inspection prevent this concentrated discharge before it reaches your fence line — protecting both the fence footings and the foundation.
If your fence posts near the house are already leaning or showing base rot, check the gutters directly above them before replacing posts. Fixing the posts without addressing a roof leak or drainage failure means the replacement posts will fail in the same timeframe for the same reason.
6 Common Mistakes That Waste Concrete and Fail Posts
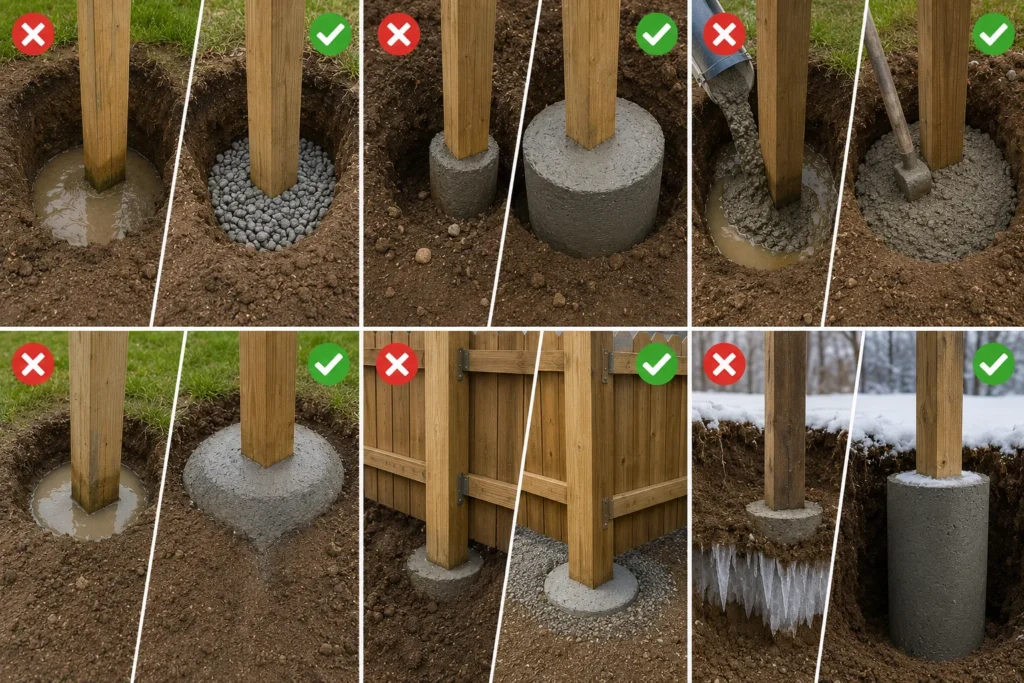
Mistake 1: Skipping the Gravel Base
Posts set without a 4–6 inch (10–15 cm) gravel base at the bottom trap water under the concrete footing. In freeze-thaw climates, this water freezes and lifts the entire post upward by 1–3 inches (2.5–7.5 cm) over 3–5 winters. In warm climates, it rots the post base from below. The gravel layer costs almost nothing and adds years to post lifespan.
Mistake 2: Hole Too Narrow
A hole less than 3 times the post width creates insufficient concrete mass to resist lateral wind load. The concrete cylinder becomes a lever pivot rather than an anchor. In high-wind areas or for privacy fences taller than 6 ft (1.8 m), use 3.5–4 times the post width for the hole diameter.
Mistake 3: Pouring Wet Concrete Using the Dry-Pour Method
Adding water on top of dry fast-setting mix is correct. Pouring pre-mixed wet concrete into a water-filled hole is not the water below dilutes the concrete mix at the base and creates a weak footing. If using standard wet-mix concrete, pour it into a dry hole and rod each lift to remove air voids.
Mistake 4: Capping Concrete Flush or Below Grade
If concrete sits level with or below the surrounding soil, water pools against the post at the wood-concrete interface the exact line where rot begins. Finish the concrete surface 2–3 inches (5–7 cm) above grade, sloped away from the post at a 5-degree angle to shed water outward.
Mistake 5: Loading the Fence Too Early
Attaching fence panels and rails before the concrete reaches adequate strength causes micro-movement in the footing that permanently weakens the post-concrete bond. Wait 4 hours for fast-setting concrete and 24–48 hours for standard mix before panel installation. Wait 72 hours before hanging gates.
Mistake 6: Ignoring the Frost Line
Setting posts above the local frost line in a cold climate guarantees frost heave within 1–3 winters. Look up your local frost line depth before digging. In northern US states, that depth ranges from 36–60 inches (91–152 cm). No amount of concrete in a shallow hole prevents heave only depth below the frost line does.
Conclusion
The answer to how much concrete per fence post is not one number it is a calculation based on 3 inputs: hole diameter, hole depth, and bag yield. For most standard 4×4 residential fence posts, 1–2 bags of 80 lb fast-setting concrete per post is the right amount for a 24–30 inch deep hole. Gate posts and corner posts always need more plan for 4–6 bags each, with a wider and deeper hole to match.
The calculation matters, but the installation details matter more. A correctly sized footing in a hole without a gravel base will still fail early from rot or frost heave. A properly sized footing in a hole that receives concentrated roof drainage will fail from the same causes just 3 years later instead of 10. Get the volume right, set below the frost line, add the gravel base, slope the concrete away from the post at grade, and let it cure before loading.
If your fence runs near the house wall and posts keep failing or leaning, check the gutters and downspouts before replacing them. Blocked gutters saturate the soil at the base of your posts with every rain event. A roof maintenance inspection identifies every drainage failure before the next storm season — protecting your fence footings, your foundation, and the concrete work you just invested time and money to get right.




