
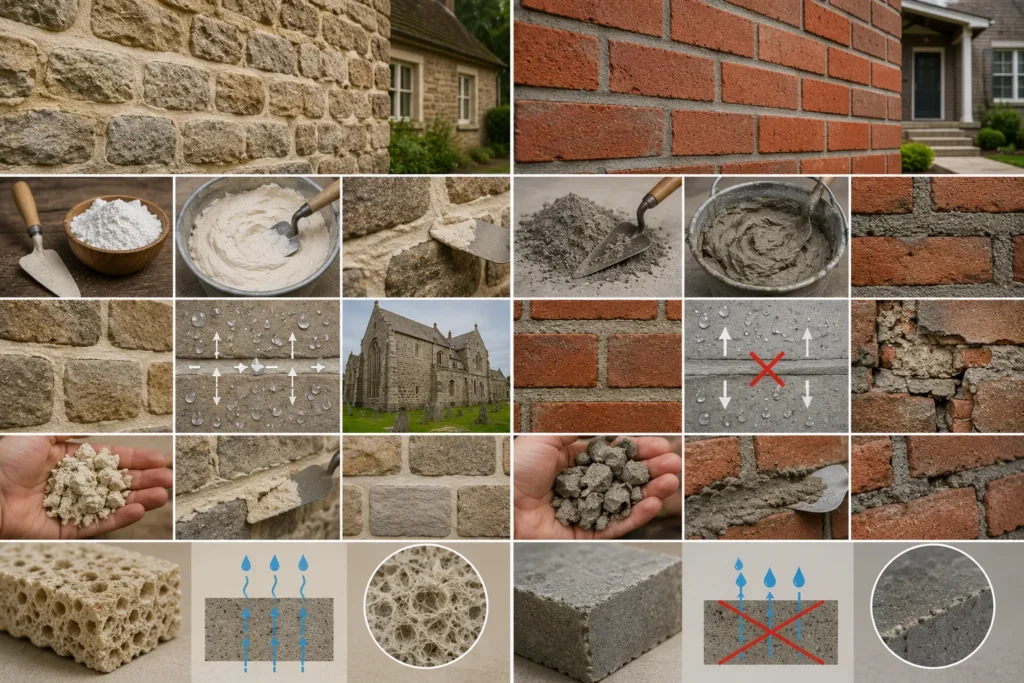
Lime mortar and cement mortar are not interchangeable. Use cement mortar on a pre-1920 brick building and you risk cracking the bricks, trapping moisture, and paying for expensive masonry repairs within 10–15 years.
This guide gives you the exact mix ratios, compressive strength figures, cost data, and project-match rules to pick the right mortar before you buy a single bag.
Lime Mortar vs Cement Mortar: Quick-Reference Comparison
The table below covers 8 performance factors across both mortar types and the blended option.
| Factor | Lime Mortar | Cement Mortar | Lime-Cement Blend |
| Binder | Hydrated lime or NHL | Portland cement (OPC) | OPC + hydrated lime |
| Compressive strength | 75–500 PSI (0.5–3.4 MPa) | 1,800–2,500 PSI (12.4–17.2 MPa) | 500–2,500 PSI (3.4–17.2 MPa) |
| Flexibility | High — absorbs movement | Low — cracks under movement | Medium |
| Breathability | High vapor permeability | Low — traps moisture | Moderate |
| Setting time | 24 hrs–6 weeks (NHL type) | 4–24 hours | 6–48 hours |
| Self-healing | Yes — carbonation fills cracks | No | Partial |
| Cost (50 lb / 22.7 kg bag) | $15–$61 | $7–$12 | $8–$15 |
| Best use | Heritage, restoration | New builds, structural | General residential |
| Lifespan (masonry) | 100–500+ years | 30–80 years | 40–100 years |
PSI = pounds per square inch. NHL = Natural Hydraulic Lime (BS EN 459). OPC = Ordinary Portland Cement. Compressive strength figures measured at 28 days per ASTM C270.
What Is Lime Mortar and How Does Lime Mortar Work?
Lime mortar combines lime, sand, and water. The lime binder sets through a process called carbonation — the lime reacts with carbon dioxide (CO₂) in the air and converts back to calcium carbonate (CaCO₃), the original limestone mineral. This process gives lime mortar 2 properties no cement mortar provides.
Non-Hydraulic vs Hydraulic Lime Mortar: 3 Key Differences
Non-hydraulic lime (putty lime) sets only through carbonation with air. Hydraulic lime — classified as Natural Hydraulic Lime [NHL] — sets through a chemical reaction with water (hydrolysis) in addition to carbonation. NHL grades are NHL 2, NHL 3.5, and NHL 5, where the number indicates compressive strength in megapascals (MPa) at 28 days.
| Lime Type | Setting Mechanism | Compressive Strength | Best Application |
| Non-hydraulic (putty lime) | Carbonation only (air) | 75–150 PSI (0.5–1 MPa) | Interior plaster, sheltered joints |
| NHL 2 | Hydrolysis + carbonation | 290 PSI (2 MPa) minimum | Sheltered exterior joints, soft brick |
| NHL 3.5 | Hydrolysis + carbonation | 510 PSI (3.5 MPa) minimum | Exposed exterior walls, repointing |
| NHL 5 | Hydrolysis + carbonation | 725 PSI (5 MPa) minimum | Marine structures, severe exposure |
Non-hydraulic lime mortar costs $20–$61 per 50 lb (22.7 kg) bag. NHL 3.5 mortar — the most common grade for U.S. residential repointing — costs $25–$45 per 50 lb bag in 2026.
Lime mortar self-heals micro-cracks. When a hairline crack opens in a lime joint, rainwater carries dissolved calcium hydroxide [Ca(OH)₂] into the crack. The calcium hydroxide then carbonates and deposits calcium carbonate — sealing the crack without any repair intervention.
Where Lime Mortar Has Been Used Historically
Lime mortar built the Roman Pantheon (125 AD), Notre-Dame Cathedral, and every pre-1920 brick structure in the United States. Buildings constructed before modern Portland cement existed used non-hydraulic or natural hydraulic lime exclusively. The lime mortars in these structures remain sound today — outperforming any Portland cement repointing applied over the past 50 years.
What Is Cement Mortar and How Does Cement Mortar Perform?
Cement mortar combines Portland cement, sand, and water. Portland cement sets through hydration — cement particles react with water to form calcium silicate hydrate [C-S-H] crystals that lock aggregate together. The C-S-H crystal network produces high compressive strength within 24 hours and reaches 90% of full strength by 28 days.
ASTM C270 Mortar Types: N, S, M, and O Explained
ASTM C270 — the U.S. standard for masonry mortar — defines 4 mortar types by mix ratio and compressive strength. Each type suits a different structural application.
| Mortar Type | Mix Ratio (Cement:Lime:Sand) | Compressive Strength | Best Application | Cost per 80 lb Bag |
| Type N | 1 : 1 : 6 | 750 PSI (5.2 MPa) | General above-grade masonry, chimneys | $9–$12 |
| Type S | 1 : 0.5 : 4.5 | 1,800 PSI (12.4 MPa) | Below-grade, retaining walls, foundations | $10–$14 |
| Type M | 1 : 0.25 : 3 | 2,500 PSI (17.2 MPa) | Heavy loads, driveways, below-grade only | $10–$14 |
| Type O | 1 : 2 : 9 | 350 PSI (2.4 MPa) | Interior non-load-bearing walls only | $8–$11 |
Warning: Never use Type M mortar on soft brick or historical masonry. Type M at 2,500 PSI (17.2 MPa) exceeds the compressive strength of soft pre-1920 bricks. A harder mortar forces movement stress into the brick face instead of the joint — spalling brick faces result within 5–10 years.
Type N mortar is the correct choice for 85% of residential above-grade masonry. Type S applies below grade and in seismic zones. Type M suits only heavy-load commercial applications and subgrade work.
Mortar choice directly affects your roof’s masonry elements — chimney stacks, parapet walls, and ridge capping all require correct joint specification. Rainy Roofers provides roof repair service that covers masonry assessment, joint inspection, and repointing recommendations.
Lime Mortar vs Cement Mortar: 6 Critical Differences
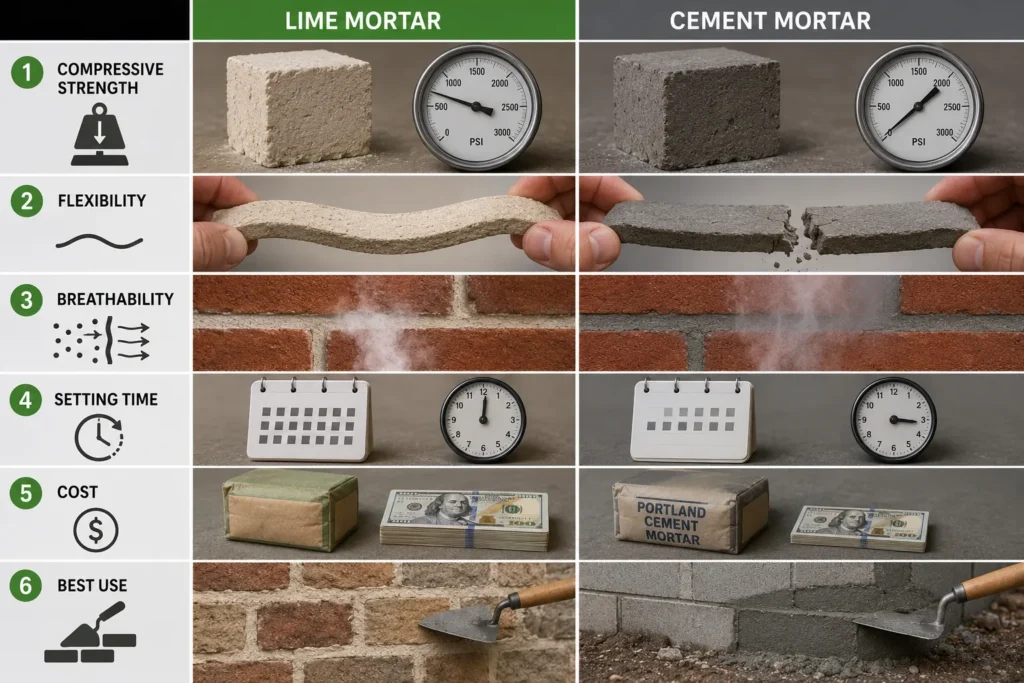
1. Compressive Strength — Cement Mortar Wins
Cement mortar reaches 750–2,500 PSI (5.2–17.2 MPa). Lime mortar reaches 75–725 PSI (0.5–5 MPa) depending on NHL grade. Cement mortar carries structural loads that lime mortar cannot — load-bearing walls, foundations, and retaining structures all require cement mortar.
You do not always need the stronger mortar. Mortar joint strength must stay below the compressive strength of the masonry units it bonds. Soft handmade brick tests at 500–1,000 PSI — Type N cement mortar at 750 PSI already sits at or above that range.
2. Flexibility — Lime Mortar Wins
Lime mortar flexes 3–5 times more than cement mortar under thermal movement. Masonry walls expand in summer and contract in winter. A 20-foot (6.1 m) brick wall changes length by 0.08–0.12 inches (2–3 mm) across a 60°F (33°C) temperature swing. Lime mortar accommodates this movement in the joints. Cement mortar transfers the stress into the brick faces.
3. Breathability — Lime Mortar Wins
Lime mortar allows water vapor to pass through at 15–25 perms. Cement mortar measures 3–8 perms — 60–80% less vapor transmission. In solid masonry walls built before cavity construction, moisture enters from outside and must exit through the mortar joints. Cement mortar blocks that exit path and forces moisture into the brick core, accelerating freeze-thaw spalling.
4. Setting Time — Cement Mortar Wins
Cement mortar sets in 4–24 hours and reaches workable strength in 48 hours. Non-hydraulic lime mortar needs 3–6 weeks to carbonate fully. NHL 3.5 lime mortar reaches initial set in 24 hours but requires 28 days for full strength development. On commercial projects where scaffolding costs accumulate daily, the faster cement mortar set directly reduces project cost.
5. Cost — Cement Mortar Wins
Cement mortar costs $7–$14 per 80 lb (36.3 kg) bag in 2026. Lime mortar costs $15–$61 per 50 lb (22.7 kg) bag. On a 1,000 sq ft (93 m²) brick wall repointing job requiring 30 bags of material, lime mortar costs $450–$1,830 in material vs. $210–$420 for cement mortar. Add 20–30% higher labor cost for lime due to slower application and the total lime premium runs $400–$2,000 per job.
6. Environmental Impact — Lime Mortar Wins
Portland cement production generates 0.83 tons of CO₂ per ton of cement. Lime production generates 0.64 tons of CO₂ per ton — 23% less. Lime mortar also reabsorbs CO₂ during carbonation, partially offsetting production emissions. At end of life, lime mortar returns to calcium carbonate without landfill residue. Cement mortar does not biodegrade and adds to construction waste streams.
Metal roofing systems work best with correctly specified masonry around chimney penetrations and parapet flashings. The team at Rainy Roofers handles metal roofing services and inspects mortar joints at all roof-to-masonry interfaces during every metal roof installation.
Mortar Mix Ratios: Exact Proportions for Lime and Cement Mortars
Mix ratio specifies parts by volume — not by weight. A 1:1:6 cement mortar mix means 1 part Portland cement, 1 part hydrated lime, and 6 parts masonry sand. The water-cement ratio stays between 0.45 and 0.55 for all cement-containing mixes.
| Mortar Type | Binder : Sand Ratio | Water per 50 lb Mix | Yield per 50 lb Bag | Working Time |
| Pure lime (non-hydraulic) | 1 lime : 2.5–3 sand | 4–5 qt (3.8–4.7 L) | 0.45 ft³ (0.013 m³) | 60–90 min |
| NHL 2 hydraulic lime | 1 NHL : 2.5 sand | 3.5–4.5 qt (3.3–4.3 L) | 0.40 ft³ (0.011 m³) | 45–60 min |
| NHL 3.5 hydraulic lime | 1 NHL : 2.5 sand | 3–4 qt (2.8–3.8 L) | 0.38 ft³ (0.011 m³) | 30–45 min |
| Type N (cement + lime) | 1 cement : 1 lime : 6 sand | 4–5 qt (3.8–4.7 L) | 0.55 ft³ (0.016 m³) | 60–90 min |
| Type S (cement + lime) | 1 cement : 0.5 lime : 4.5 sand | 3.5–4 qt (3.3–3.8 L) | 0.50 ft³ (0.014 m³) | 45–75 min |
| Type M (cement only) | 1 cement : 0.25 lime : 3 sand | 3–3.5 qt (2.8–3.3 L) | 0.42 ft³ (0.012 m³) | 30–45 min |
Add water slowly — never pour all water at once. Too much water reduces compressive strength by 15–25% per extra 10% water added. Mix dry ingredients first, then add water in 3 stages over 5 minutes. Allow the mix to rest for 5 minutes (slake), then remix before applying.
How to Mix Lime Mortar by Hand for Repointing
To mix lime mortar by hand, follow these 4 steps in order:
- Measure 1 part NHL 3.5 lime and 2.5 parts dry masonry sand by volume into a clean mortar tub.
- Blend dry ingredients with a margin trowel for 2 minutes until the color is uniform — no streaks of unmixed lime.
- Add 3 quarts (2.8 L) of clean water per 50 lb (22.7 kg) mix, mixing continuously.
- Rest the mix for 5 minutes, then remix. Adjust consistency with water drops only — lime mortar should hold a peak when cut with a trowel, not slump.
How to Choose Between Lime Mortar and Cement Mortar for Your Project
To choose the correct mortar, identify your building’s age, brick hardness, and exposure conditions first. These 3 factors determine which mortar fails prematurely and which performs for decades.
How Building Age Determines Your Mortar Choice
To match mortar to building age, use this 3-category rule:
- Pre-1920 buildings: Use NHL 3.5 lime mortar or non-hydraulic lime putty for all repointing. These buildings used soft, high-absorption brick that cement mortar destroys within 10 years.
- 1920–1980 buildings: Use Type N mortar (1:1:6 cement:lime:sand). Brick hardness increased after 1920, and Type N provides flexibility while meeting modern code requirements.
- Post-1980 buildings: Use Type S or Type N cement mortar. Modern kiln-fired bricks exceed 3,000 PSI (20.7 MPa) compressive strength, and standard cement mortars match that range without risk.
How Climate Zone Affects Mortar Selection
To select mortar based on climate, apply these 4 rules:
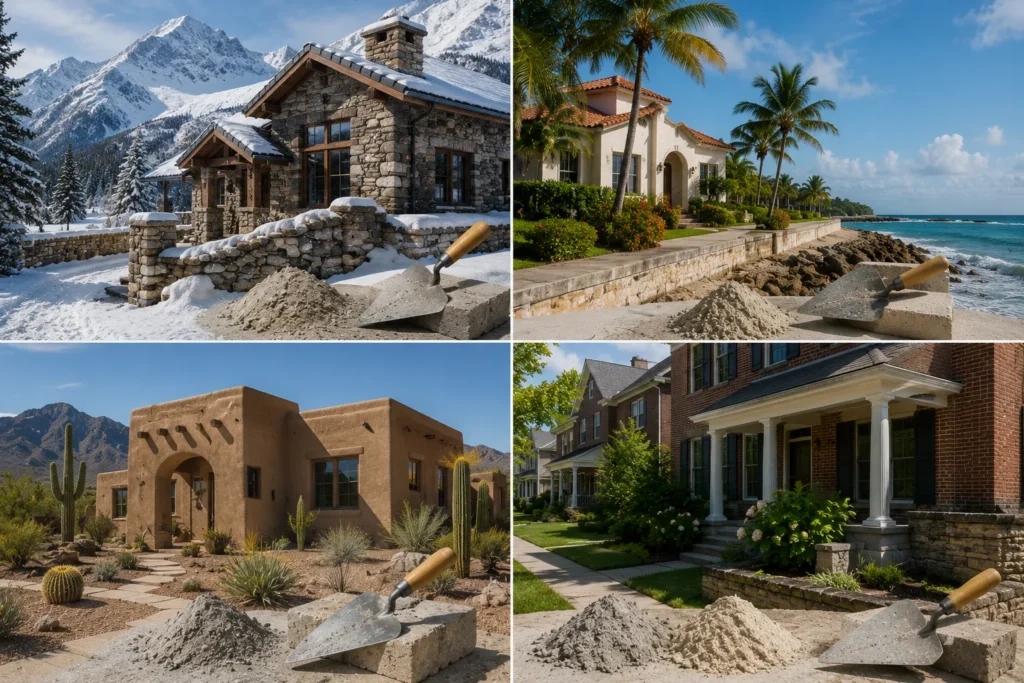
- Freeze-thaw zones (Minnesota, Wisconsin, Colorado above 5,000 ft / 1,524 m): Use NHL 3.5 or Type S. Both handle freeze-thaw cycling without joint deterioration.
- Coastal salt-air zones (Florida, Gulf Coast, Pacific Northwest): Use NHL 5 or Type S. Salt crystallization pressure destroys non-hydraulic lime joints within 8–12 years.
- Hot and dry zones (Arizona, Nevada, New Mexico): Use Type N with hydrated lime addition. The lime extends working time from 30 minutes to 90 minutes — critical when air temperature exceeds 95°F (35°C).
- Temperate zones (Midwest, Southeast): Use Type N for above-grade and Type S for below-grade applications. This combination covers 90% of standard residential masonry needs.
Chimney mortar joints fail faster than any other masonry on your property due to direct weather exposure and heat cycling. Schedule a residential roof maintenance inspection to catch deteriorating chimney joints before water infiltration damages the flue liner and surrounding roof structure.
How to Repoint Brick Mortar Joints: Lime vs Cement Process
To repoint brick joints, match the new mortar to the original specification — not to what is easiest or cheapest. Wrong mortar choice in repointing causes more damage than leaving deteriorated joints alone.
How to Identify Your Existing Mortar Type Before Repointing
To identify existing mortar before buying repointing material, run 3 tests:
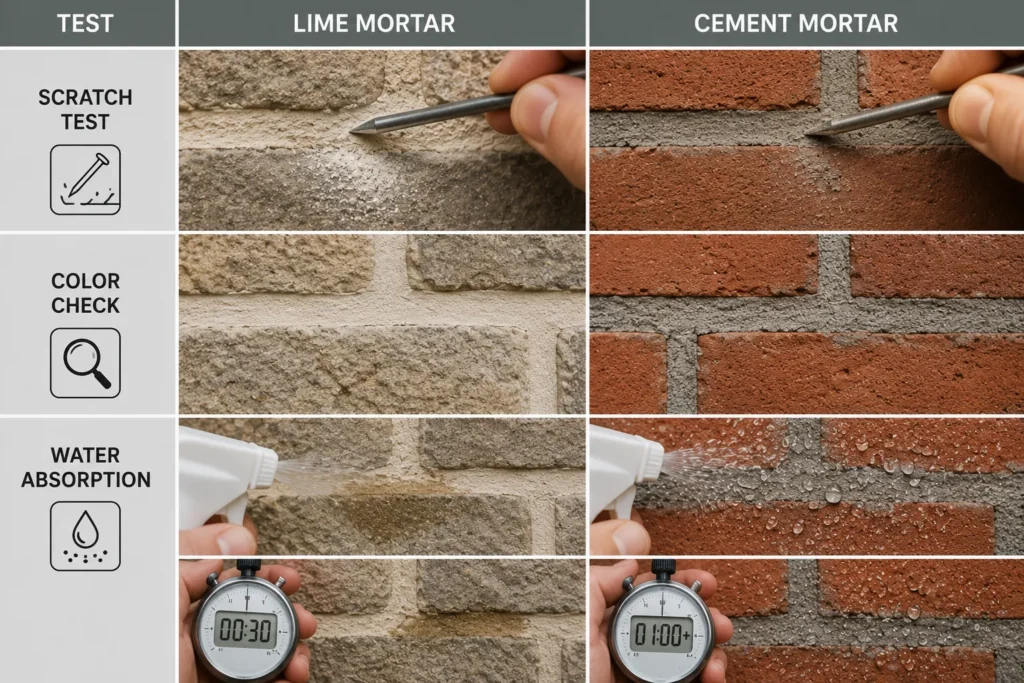
- Scratch test: Drag a steel nail across the joint. Lime mortar scratches easily and leaves a white powder. Cement mortar resists scratching and leaves a gray scratch mark.
- Color check: Lime mortar joints appear white or cream-colored. Cement mortar appears gray. Color-matched repointing mortar reduces visual inconsistency.
- Water absorption: Spray water on the joint. Lime mortar absorbs water within 30 seconds — the surface darkens rapidly. Cement mortar beads water on the surface for 60 seconds or more before absorption.
Remove deteriorated mortar to a depth of 0.75 inches (19 mm) minimum using a mortar raking tool or angle grinder with a mortar raking blade. Never use a chisel — chisel impact cracks the brick face. Vacuum dust from the joint before applying fresh mortar.
Full Cost Comparison: Lime Mortar vs Cement Mortar (2026)
The table below shows total project cost for repointing 100 sq ft (9.3 m²) of standard brick wall with 0.5-inch (13 mm) joints in 2026.
| Cost Item | Lime Mortar (NHL 3.5) | Type N Cement Mortar | Type S Cement Mortar |
| Material (bags) | $180–$350 (6–8 bags) | $54–$96 (6–8 bags) | $60–$112 (6–8 bags) |
| Labor (skilled) | $350–$600 | $280–$480 | $280–$480 |
| Scaffold rental | $150–$300 | $100–$200 | $100–$200 |
| Tools and prep | $80–$120 | $60–$100 | $60–$100 |
| Total estimate | $760–$1,370 | $494–$876 | $500–$892 |
| Cost per sq ft | $7.60–$13.70 | $4.94–$8.76 | $5.00–$8.92 |
| Expected lifespan | 40–80 years | 20–40 years | 25–50 years |
Lime mortar labor costs 20–30% more because lime application requires experienced masons who understand carbonation curing, joint tooling timing, and surface protection during slow set. Using an inexperienced crew on lime mortar produces weak, dusty joints that fail within 5 years.
Which Mortar Is Right for Your Project?
Lime mortar and cement mortar solve different problems. Lime mortar belongs on pre-1920 buildings, heritage restoration, and any masonry where breathability and flexibility outweigh speed and budget. NHL 3.5 costs $25–$45 per bag and takes weeks to cure — but a correctly specified lime repoint lasts 40–80 years and protects irreplaceable historic brick.
Cement mortar belongs on modern construction, load-bearing structural walls, and projects where fast setting and low material cost drive the decision. Type N at $9–$12 per bag covers 85% of residential above-grade masonry. Type S handles the rest — below-grade, retaining walls, and high-seismic zones.
The blended option — Portland cement plus hydrated lime — delivers the best of both for general residential work. A 1:1:6 Type N mix costs $9–$12 per bag, sets in 24 hours, and adds enough lime to extend working time and reduce shrinkage cracking.
One rule covers all scenarios: never use a mortar stronger than the masonry units it bonds. Match mortar compressive strength to brick compressive strength — and choose lime when in doubt on any building older than 1920.




